
User guide · October 19, 2026
Gpay member app user guide
This guide walks you through the member app Gpay step by step, with screenshots, from sign-up to ordering, payment, the shopping mall and mileage. The names and numbers on the screens are fictional values.
0Quick start
These are the five things you need on your first day. For the other features, see the relevant chapter.
The screens in this guide are examples. Names, photos and amounts may differ from your actual screen.
- Install and sign up: Install Gpay (지페) from Google Play (Android) or the App Store (iPhone). Open the app, tap 회원가입 Sign up at the very bottom of the login screen, then agree to the terms, complete identity verification, and set your ID and password. See Chapter 1 for the detailed steps.
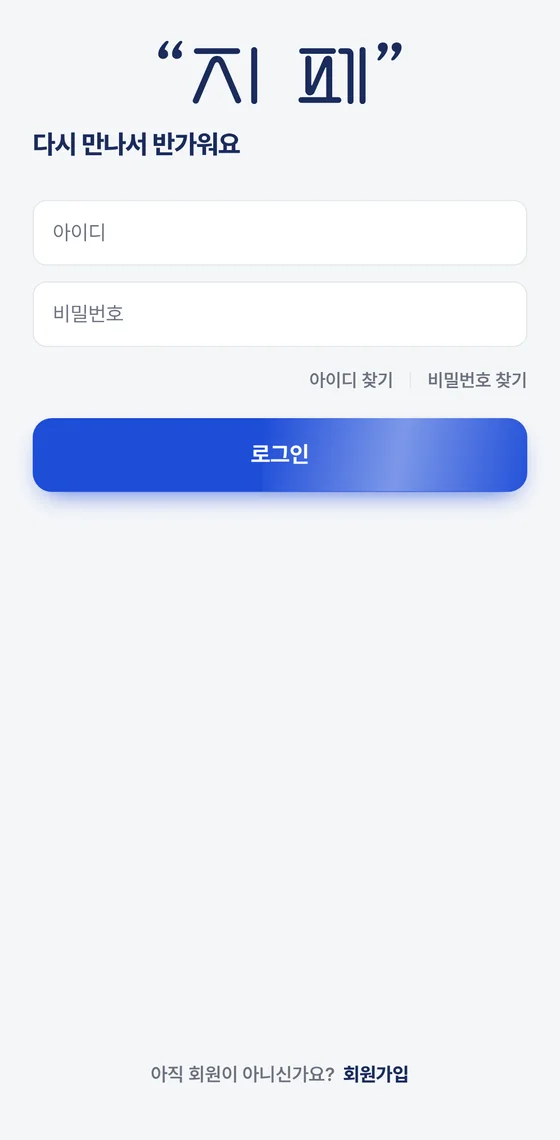
- Log in: Enter your ID and password and tap 로그인 Log in. If an approval code field appears, tap 승인번호 받기 Get approval code and also enter the 6-digit code you receive by text message. This field appears on a phone you are using for the first time.
- Register a card: On the 마이 My tab at the bottom, open 카드관리 Manage cards and tap 카드 추가 Add card to register the card you want to pay with. Chapter 11 explains this in detail.
- Set a payment password: In 결제비밀번호 Payment password on the 마이 My tab, set the 6-digit number you will use when you pay.
- First order: Find a nearby merchant with 주변 상점 Nearby stores on the home screen, or scan a table QR with QR 주문 QR order in the middle of the bottom bar. Add menu items and pay, and an in-progress order card appears on the home screen. When you pay by card, enter your 6-digit payment password.
Where do I do it?
| Task | Where to tap | Details |
|---|---|---|
| Sign up · log in | The first screen when you open the app | Chapter 1 |
| Card registration · payment password | 마이 My tab at the bottom | Chapters 1 and 11 |
| Find a nearby store | 주변 상점 Nearby stores · 포장주문 Takeout order on the home screen | Chapters 2 and 3 |
| Order with a table QR | QR 주문 QR order tab in the middle of the bottom bar | Chapter 5 |
| Add menu items and place an order | Store screen → cart | Chapters 4, 5 and 6 |
| Check order progress | In-progress order card on the home screen | Chapters 2 and 8 |
Multi-card payment, AI ordering, Quick Pay and mileage are full-member benefits. You can use them once you pay the annual membership fee. AI ordering uses an external AI service (OpenAI). Mileage can be used only at the store where you earned it, and you can't get it back as cash.
Your payment password is different from your login password. It is a 6-digit number used only when you pay. Don't tell it to anyone.
1Install · sign up · log in
These are the steps from installing the app to your first login. Signing up takes 4 steps: agreeing to the terms, identity verification, checking the result, and setting your ID and password.
Install the app
- Find Gpay (지페) in Google Play (Android) or the App Store (iPhone) on your phone and install it.
- When the installation finishes, open the app. The login screen appears.
At the bottom of the My screen, tap 앱 업데이트 App update to get the latest version from the Play Store (Android) or the App Store (iPhone).
Log in
- Enter your ID and password.
- On a phone you are using for the first time, or after you have logged out, a 6-digit approval code field may appear. When you tap 승인번호 받기 Get approval code, an “Approval code requested” notice appears and a text message is sent to the phone you signed up with. Enter the number from the text message. On some phones the number is filled in automatically.
- Tap 로그인 Log in.
- When you are logged in, the home screen opens.
The approval code is a way to verify who you are when you start using a new phone. On a phone you have already verified, the approval code field does not appear. If you see only the ID and password fields, as in the example screen above, just tap 로그인 Log in. If you log out from the My screen, the app tells you that you need an approval code the next time you log in.
Enter your ID and password before you tap 승인번호 받기 Get approval code. If you don't, a message like “Enter your ID first” appears and no text message is sent. If the approval code field is showing and you leave it empty and tap 로그인 Log in, the app tells you “Enter the approval code”.
Sign up
Start by tapping 회원가입 Sign up at the very bottom of the login screen. A number like “1/4” at the top of the screen shows which step you are on.
| Step | Screen | What you do |
|---|---|---|
| 1/4 | Terms and consent | Agree to the required terms and review two notices |
| 2/4 | Identity verification | Complete KCB phone identity verification |
| 3/4 | Check the identity verification result | Check the name, date of birth, gender and phone number confirmed through verification |
| 4/4 | ID and password | Choose your ID and password and finish signing up |
1/4 Terms and consent
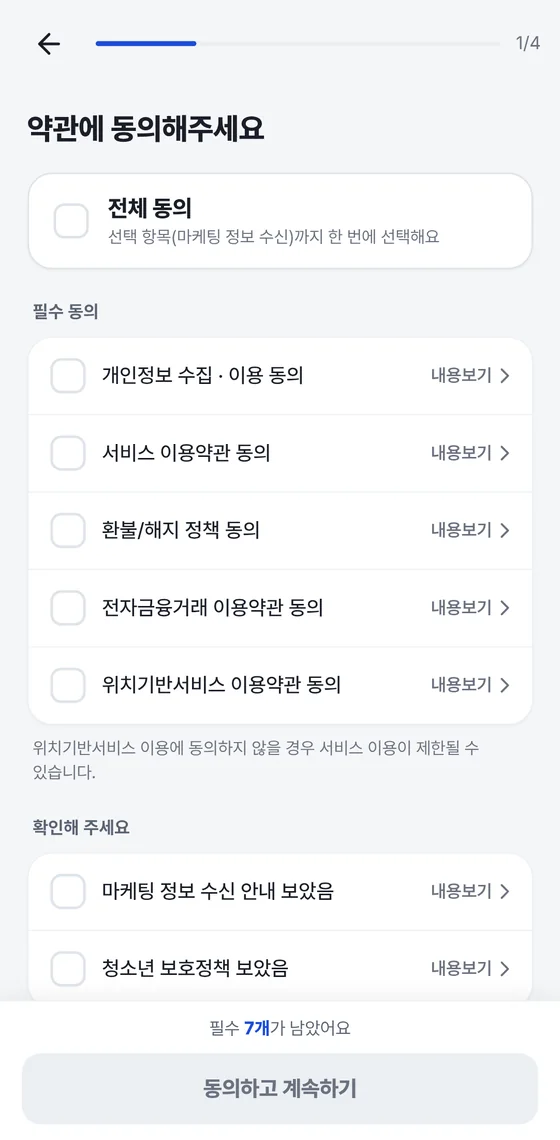
- Tap 전체 동의 Agree to all to tick everything, including the optional items, at once. To tick items one by one, tap the checkbox on each line.
- To read a term, tap 내용보기 View details on the right of its line and read the full text. Tap 동의하고 닫기 Agree and close at the bottom of the window that opens, and that line is ticked. On the “Please review” lines, the button is 확인했어요 I've checked instead.
- Tick the two “Please review” lines (the notice about receiving marketing information and the youth protection policy) to show you have read their content.
- As the number in “○ required items left” goes down and changes to “All checked”, 동의하고 계속하기 Agree and continue becomes active. Tap it to go to the next step.
Consent to receive marketing information is optional. If you don't agree, basic use of the service is not restricted. The location-based service terms of use, however, are required. If you don't agree, use of the service may be restricted.
2/4 Identity verification
This screen shows the notice “KCB phone identity verification is required for safe payments” and fields for carrier, phone number and a 6-digit verification code, but you don't enter anything in those fields on this screen. At the bottom are a blue 휴대폰 본인인증 시작 Start phone verification button and 회원가입 취소 Cancel sign-up.
- Tap 휴대폰 본인인증 시작 Start phone verification. The KCB identity verification screen opens.
- On the KCB screen, enter the carrier and number of the phone registered in your own name, then enter the 6-digit verification code you receive by text message.
- When verification is done, you move on to step 3/4.
Choosing a carrier, entering your phone number, entering the verification code and the code's time limit are all handled on the KCB screen. They are not shown on the sign-up screen.
If you see the message “Could not connect to the identity verification service”, wait a moment and tap 연결 다시 확인 Recheck connection. You can't sign up without identity verification. If it keeps failing, contact the customer center (1566-4250).
3/4 Check the identity verification result
The name, date of birth, gender and phone number confirmed by KCB are shown. You can't edit this information yourself. If anything is wrong, start identity verification over from the beginning. If everything is correct, tap 확인했어요 I've checked to go to the next step.
4/4 ID and password
| Item | Rule |
|---|---|
| ID | 4 or more characters. After you enter it, tap 중복확인 Check availability to check that the ID can be used. |
| Password | 8 or more characters. Include at least 1 number and at least 1 special character. After you enter it, a strength rating (weak, medium, strong) appears below. Tap the eye-shaped button on the right to see the characters you typed. |
| Re-enter password | Enter the same password as above once more. If it is different, “The password and re-entry do not match” appears. |
| Optional items | If a field at the bottom of the screen is marked “(optional)”, you can leave it empty and still sign up. |
- Enter an ID and tap 중복확인 Check availability. When “This ID is available” appears, go on to the next step.
- Enter the same password in the password and re-enter password fields.
- Tap 가입 완료 Finish sign-up. When sign-up is finished, the app moves to the next screen.
Include English letters in your password as well. English letters are required when you change your password later. You can change your nickname after you sign up, in My ▸ 프로필/계정 관리 Profile / account.
If the phone number is already registered, sign-up does not go through and you return to the login screen. In that case, tap 아이디 찾기 Find ID to check the ID you signed up with.
Find ID · find password
The Find ID / Find password screen has two tabs at the top, 아이디 찾기 Find ID and 비밀번호 찾기 Find password, a 휴대폰 본인인증 Phone verification button in the middle, and an “Instructions” section. Tap 닫기 Close at the bottom to close the screen.
Find your ID
- On the login screen, tap 아이디 찾기 Find ID.
- Tap 휴대폰 본인인증 Phone verification and complete KCB verification with the phone registered in your own name.
- When verification is done, the ID you signed up with appears in an app prompt. Depending on your app version, the prompt may show 이 아이디로 로그인 Log in with this ID and 닫기 Close buttons together. If you tap 이 아이디로 로그인 Log in with this ID, the ID field on the login screen is filled in.
Find your password
- On the login screen, tap 비밀번호 찾기 Find password.
- Tap 휴대폰 본인인증 Phone verification, enter your ID first on the verification screen, then verify with the phone registered in your own name.
- When verification is done, set a new password in the app prompt. Then log in with the new password.
The ID you found, or the result of setting a new password, appears in the app prompt, not on the Find ID / Find password screen. This screen does not show the result. You must verify with the phone registered in your own name.
About full membership (annual fee)
When you pay the annual membership fee, you become a full member. Full members can use the full-member benefits below.
- Multi-card payment: Split a payment across up to 3 cards in the ratio you want. You set the ratio yourself with a slider.
- AI ordering: From menu recommendations to placing the order, you do it all in conversation. It uses an external AI service (OpenAI).
- Quick Pay: A quick in-store payment where you just enter the amount and pay right away.
- Mileage: When you pay, you earn mileage at each store's earning rate. You can use it only at the store where you earned it, and you can't get it back as cash.
If you have not paid the annual membership fee, some features, such as making payments and using mileage, are restricted.
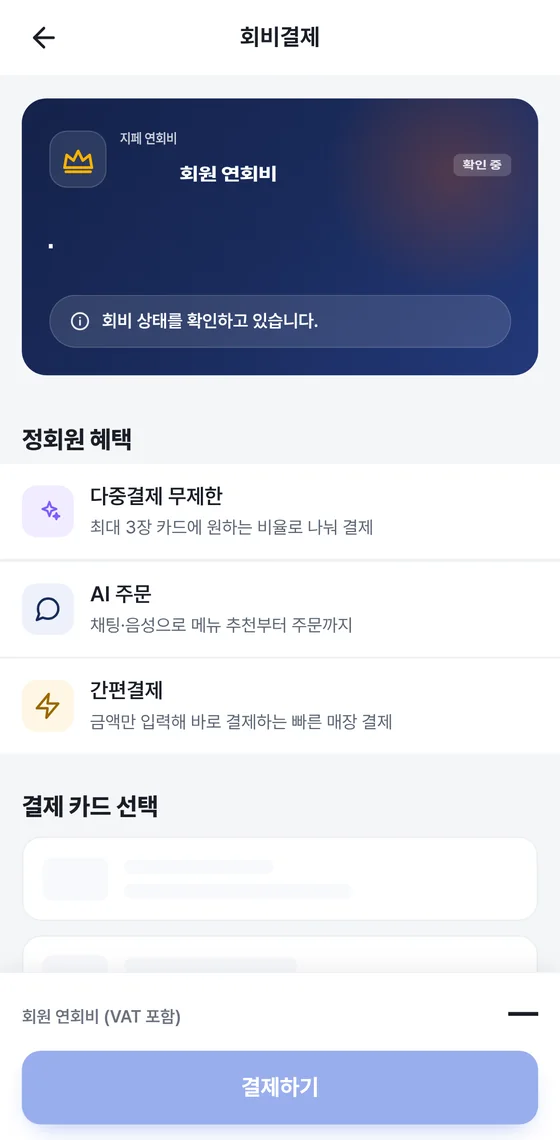
- Tap 결제하기 Pay in the “Pay membership fee” notice at the top of the 마이 My tab, or in the “Annual fee unpaid” notice on the 혜택 Benefits tab. You see this notice only when you have not paid the annual fee yet.
- Under “Select payment card” at the bottom of the membership fee payment screen, choose a card you have registered. If you don't have a card, register one first in 카드관리 Manage cards.
- Check the amount shown next to “Member annual fee (VAT included)” and tap 결제하기 Pay.
- When payment is complete, “Full member · Membership fee paid” appears on the 혜택 Benefits tab.
Check your payment status and next payment date in My ▸ 회비 결제 내역 Membership fee history. Refunds follow the refund and termination policy.
Set a 6-digit payment password
A payment password is a 6-digit number that confirms who you are when you pay. It is different from your login password.
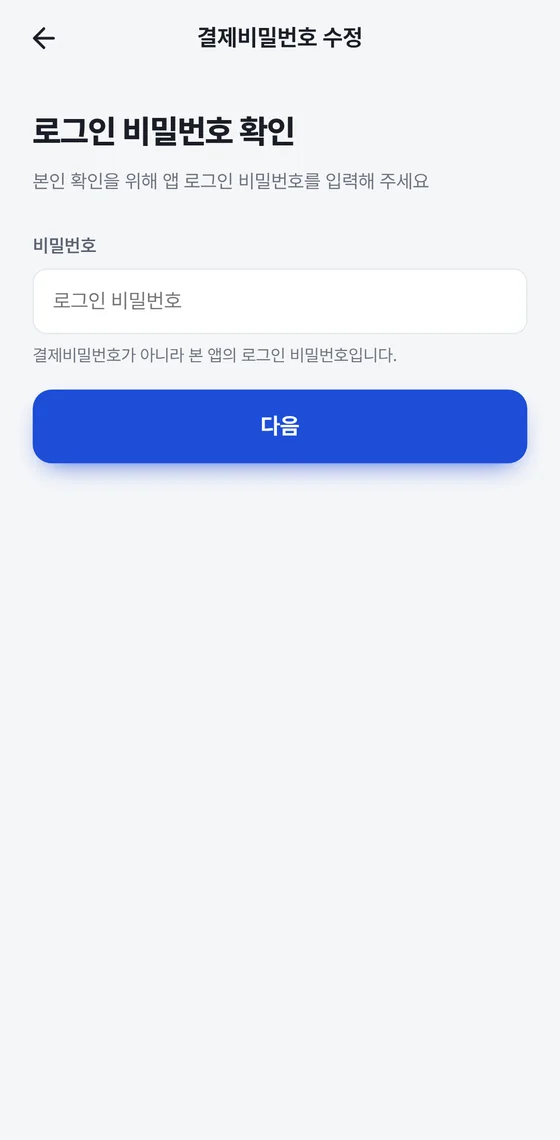
- On the 마이 My tab, tap 결제비밀번호 Payment password.
- If you already have a payment password and are changing it, enter your login password and tap 다음 Next. If you are creating it for the first time, you may go straight to entering the new number without this step.
- Enter your new 6-digit password on the number keypad.
- To confirm, enter the same number once more. If it is different, the app says “The passwords don't match” and you enter it again from the start.
- When “Payment password has been set” appears (“Changed” if you changed it), you are done. From now on, enter these 6 digits when you pay.
If your phone supports fingerprint (Face ID on iPhone), a 지문으로 결제 Pay with fingerprint toggle appears on the My screen. When you turn it on, a “Pay with your fingerprint?” prompt appears; follow the prompt and tap 지문 등록하기 Register fingerprint. After that, you pay with your fingerprint instead of the password. If the fingerprint doesn't work, you can always pay with your password. If you change your password or log out, the saved fingerprint setting is erased and you need to turn it on again.
Any fingerprint registered on your own phone can authorize a payment. Don't register anyone else's fingerprint.
The approval code text message doesn't arrive.
Check that you entered your ID and password first, then tap 승인번호 받기 Get approval code again. The text message goes to the phone number you signed up with. If it still doesn't arrive, contact the customer center (1566-4250).
Do I have to enter an approval code every time I log in?
No. The approval code is needed to verify who you are on a phone you are using for the first time. On a phone you have already verified, the field is not shown. However, if you logged out from My, the app tells you that an approval code is needed when you log in again.
Can I edit my name or date of birth myself when I sign up?
No. This information is confirmed by KCB identity verification, so you can't edit it yourself. If the information is wrong, do identity verification again.
The ID check says the ID is already in use.
Enter a different ID and tap 중복확인 Check availability again. If you change the ID, you must run the check again before you can sign up.
Is the app unusable if I don't pay the annual membership fee?
No. However, some features, such as payment and mileage use, are restricted. Full-member benefits become available after you pay the annual fee.
2Home screen
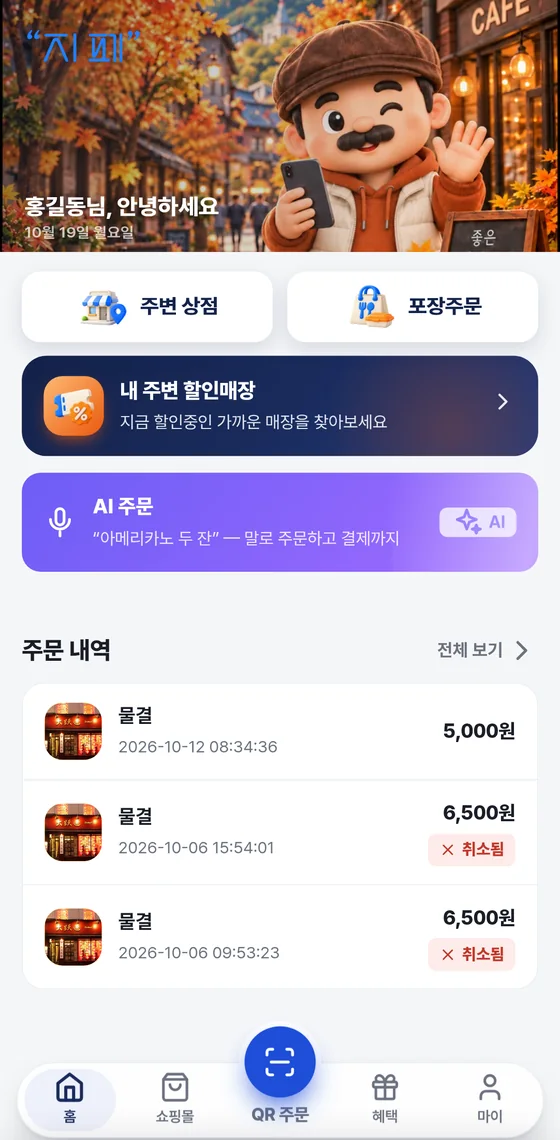
This is the first screen you see when you open the app. Find stores, check orders in progress, and see your recent payments at a glance.
Home screen layout
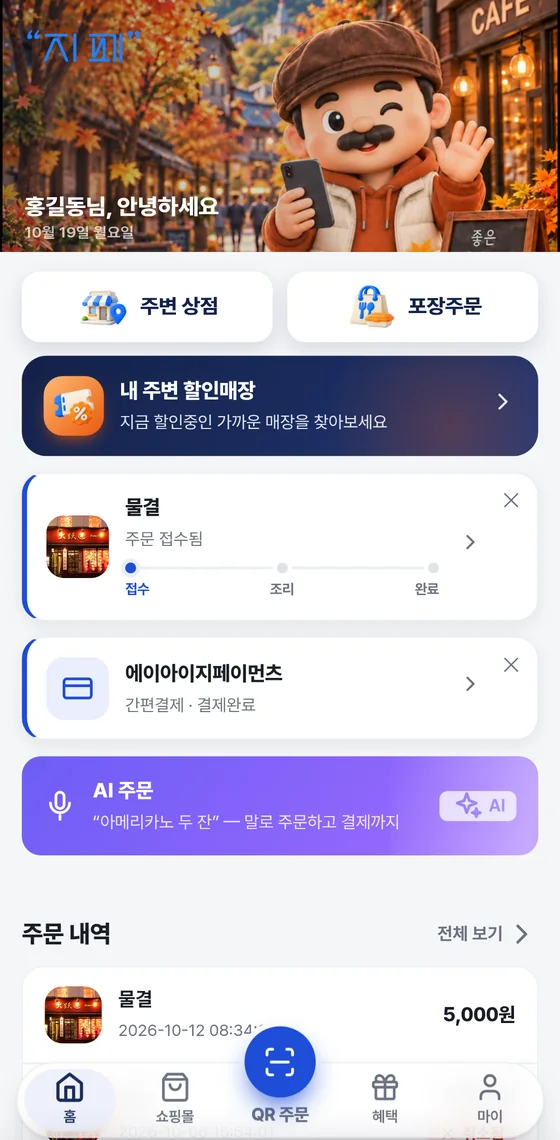
| Area | What you see | When you tap it |
|---|---|---|
| Greeting | Your nickname with “Hello”, and today's date | There is nothing to tap |
| 주변 상점 Nearby stores tile | Find a nearby merchant | The nearby stores map opens (Chapter 3) |
| 포장주문 Takeout order tile | Find a store that takes takeout orders | A map opens with the takeout order filter turned on (Chapters 3 and 5) |
| Discount stores near you | Find nearby stores that have a discount right now | A map showing only stores with a discount opens (Chapter 3) |
| In-progress order card | The name of the store you ordered from and the current order step | The order details open (Chapter 8) |
| Notice banner | A notice banner that slides sideways automatically. Dots appear below it | The screen that matches the banner's content opens. The golf banner goes to the nationwide golf course map (Chapter 3) |
| AI ordering card | An introduction to AI ordering, where you order by talking | The AI ordering screen opens (Chapter 7) |
| Order history | List of recent payments | Order details; 전체 보기 View all opens the payment status screen (Chapter 8) |
| 5 tabs at the bottom | Home · Shopping mall · QR order · Benefits · My | Each one takes you to its own screen |
If your name doesn't appear in the greeting and you see only “Hello”, the app hasn't loaded your name yet. Check again in a moment or reopen the app. The small store photos are the photos each store registered.
Nearby stores · takeout orders · discount stores
- 주변 상점 Nearby stores: See Gpay merchants near your location on a map and in a list.
- 포장주문 Takeout order: The map opens with the takeout order filter turned on. Only stores that accept takeout orders are shown.
- Discount stores near you: Shows only the nearby stores that have a discount right now.
If there are stores with a discount nearby, a “Discounts now · Near me” row appears under this card. Swipe sideways, and tap a card to open that store's screen. If no store has a discount, this row is not shown.
Discounts run only at the times each store sets. There may be no discount stores near you.
In-progress order card
When you order and pay, a card for each store appears at the top of the home screen. Check the current step on the progress line in the card (Received → Cooking → Done). The current step is shown in blue.
| Text on the card | Meaning |
|---|---|
| Order received (“Received” is blue on the progress line) | The store has received your order. |
| Now cooking | The kitchen is making it. |
| Ready · Takeout ready · Pick it up | The store tapped “Ready”. For a takeout order, go to the store to pick it up. |
| Quick Pay · Payment complete | An order paid by entering only the amount. There is no cooking step, so there is no progress line. |
| Not paid yet · Pay at the counter when you leave | You placed an order at a pay-later store and have not paid yet. |
- Tap a card to open the order details. You can see the Received, Cooking and Done steps and the menu items you ordered.
- Tap the ✕ at the top right of a card to close that card on the home screen. It does not appear again for the same status, but when the status changes (for example, Received → Cooking), it appears again because it is new information.
- On a pay-later store card, tap 계산하기 Settle bill to pay in the app, or tap 계산 요청 Request bill to let the store staff know. When you call the staff, the button changes to “Staff called”.
- If you closed a pay-later card with ✕, tap 계산 전 ○자리 보기 View ○ unpaid tables below the list to bring it back.
Pay later is available only at pay-later stores. Not every store accepts pay later.
Orders that are no longer in progress (after the food has been served) drop off the card list. You can see past orders in Order history below or on the payment status screen. If phone notifications are turned off, you may not receive them, so check the status on the home card.
AI ordering card
Tap the purple “AI ordering” card to open the AI ordering screen. The “Two Americanos” on the card is an example sentence. See Chapter 7 for details on how to use it.
AI ordering is a full-member benefit. It uses an external AI service (OpenAI).
Order history
You can see your recent payments right at the bottom of the home screen. Each line shows the store photo and name, the payment date and time, and the amount paid. The home screen shows only the 3 most recent payments.
- Tap a line to open the order details for that payment.
- Tap 전체 보기 View all at the top right to see your full payment status.
- A line for a canceled payment has a red 취소됨 Canceled mark below the amount.
If you have not made any payment yet, it says “No payment history · Your payments will appear here once you pay”.
5 tabs at the bottom
| Tab | Screen that opens | Description |
|---|---|---|
| 홈 Home | The home screen you are looking at now | Chapter 2 |
| 쇼핑몰 Shopping mall | Gpay mall | Chapter 9 |
| QR 주문 QR order | QR scan screen. It is the large blue button in the middle. | Chapter 5 |
| 혜택 Benefits | Mileage and full-member status | Chapter 10 |
| 마이 My | Card management, payment status, account settings | Chapter 11 |
The tab you are on is shown as a blue pill. The tabs stay fixed at the bottom of most screens. However, the tabs are not shown on the store screen you open from a takeout order.
I closed an in-progress card by mistake.
It does not appear again for the same status, but it appears again when the order status changes. You can see the order details in Order history or payment status below.
Order history shows only three items.
The home screen shows only your 3 most recent payments. Tap 전체 보기 View all to see your full payment status.
I don't see discount stores on the home screen.
Discounts run only at the times each store sets. If no nearby store has a discount, the “Discounts now” row does not appear. Tap “Discount stores near you” and widen the distance to look.
3Merchants near you
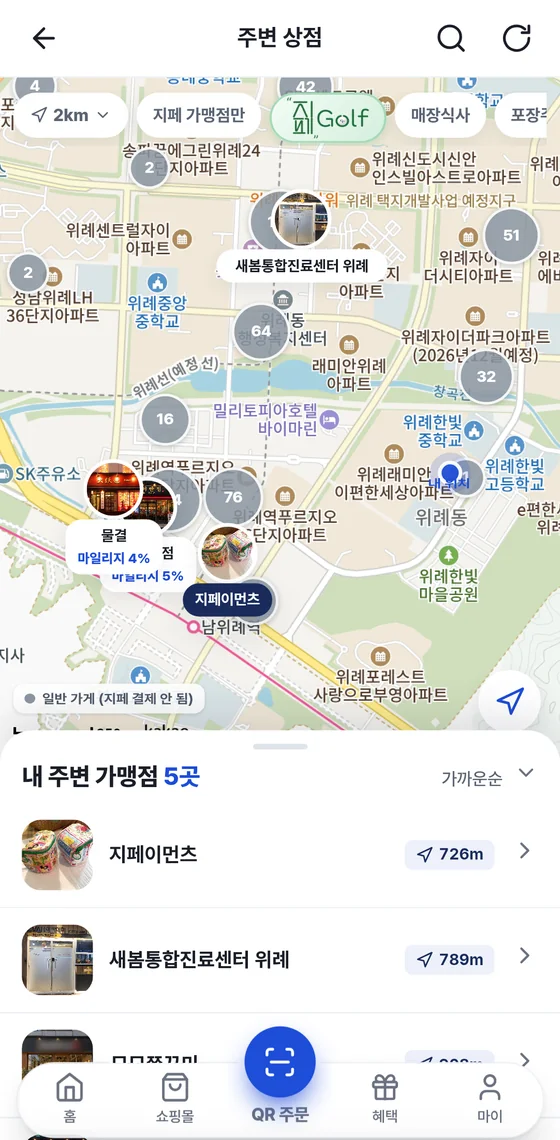
Find nearby Gpay merchants on the map and open the store screen. The 주변 상점 Nearby stores and 포장주문 Takeout order tiles on the home screen and the “Discount stores near you” card all lead to this map. You also open the nationwide golf course map from the same screen.
Open the map
- On the home screen, tap 주변 상점 Nearby stores.
- The map opens centered on your location, and nearby merchants appear in the list window below.
- The number of places is shown next to the list title, and the list is sorted from nearest to farthest.
If “No location information. Please check your current location again.” appears, check your phone's location settings and Gpay's location permission. Then tap the refresh icon at the top right.
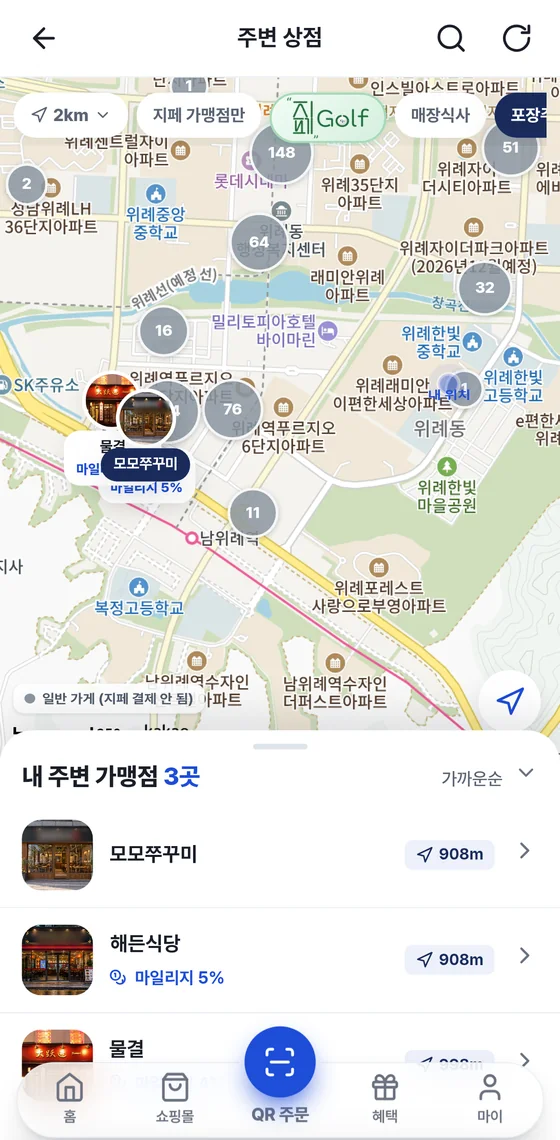
Screen layout
| Part | What you do |
|---|---|
| Top bar | The ← on the left takes you back to the home screen. The title in the middle is “Nearby stores”. On the right are a magnifier (search by name) and a refresh icon. |
| Chip row | Choose the distance and filters. Swipe sideways to see the rest of the chips. |
| Map | Merchants appear as photo pins and name tags. Pinch with two fingers to zoom in and out, and drag to move the map. |
| My location button | An arrow button at the bottom right. If you moved the map, tap it to return to your location. |
| List window | The “○ merchants near you” window at the bottom. Tap the handle or title bar at the top to collapse it, and tap again to expand it. |
Distance and filter chips
| Chip | What you do |
|---|---|
| 2km | Opens a menu where you choose from 전체 All, 2km and 5km. It starts at 2km. |
| Golf | A green “Golf” logo button. Tap it to switch to the nationwide golf course map, and a golf panel appears in place of this chip row. See “Nationwide golf course map” below. |
| 매장식사 Dine-in | Shows only merchants that accept dine-in orders. |
| 포장주문 Takeout order | Shows only merchants that accept takeout orders. |
| 쇼핑몰 Shopping mall | Shows only merchants that sell shopping mall products. |
| Other chips | Even if chips other than the ones above appear in the chip row, you can't use them for ordering yet. They are coming soon. |
- Tap a chip to turn it on, and it is shown in a darker color. Tap it again to turn it off.
- You can turn on several of the 매장식사 Dine-in, 포장주문 Takeout order and 쇼핑몰 Shopping mall chips together. Stores that match at least one of the chips you turned on are shown.
- When you change the distance to 5km or 전체 All, “Searching…” appears briefly and then stores in a wider area appear.
Store type information applies to a chip only for stores that have entered it themselves. When you turn on a type chip, stores that do not have this information yet drop off the list.
If you tap 5km or 전체 All and see “Update the app to see wider distances”, your app is out of date. Update the app.
Depending on your app version, the map may also show gray dots and number circles, a 지페 가맹점만 Gpay Store merchants only chip, and a “Regular shop (Gpay payment not available)” label. These mark regular shops that do not accept Gpay payment and are shown only on the map, so they are not in the list below. Some versions do not have this display.
Pins and name tags on the map
- Photo pin: The photo the merchant registered appears in a circle. If there is no photo, a shop icon appears.
- Name tag: Shows the store name and the earning rate, such as “Mileage ○%”. If the store has a discount, the discount text is added. Stores that are closed look faded, and the name tag shows “Closed”.
- Highlight: The nearest open store is highlighted in a larger size.
- Blue dot: Your location.
Mileage is a full-member benefit. The earning rate on a name tag is the rate you earn when you pay at that store. It differs from store to store. You can use mileage only at the store where you earned it, and you can't get it back as cash.
Store preview and store screen
- Tap a pin or name tag on the map to open a preview. It shows the photo, store name, “Merchant” label, distance, mileage and address. Places labeled “Info-only store” instead of “Merchant” are stores where Gpay payment is not available yet. Use the call and directions buttons to check the details.
- Tap 매장 보기 View store to go to the store screen. Tap 닫기 Close to close only the preview.
- In the list below, tap a line to open the store screen right away. The bottom of the list also says “Tap a store to go to its store screen”.
Each list line shows the store photo, name, mileage earning rate and distance. Closed stores are marked 영업종료 Closed, and stores with a discount are marked 할인 Discounts with the discount text. See Chapter 4 for how to use the store screen.
Search by name and refresh
- Tap the magnifier at the top to open the “Search by store name” input box.
- When you type a name, only stores whose names match stay on the map and in the list. Spaces and capitalization do not matter.
- Tap 닫기 Close on the right of the input box to clear the search text and return the list to the start.
- If your location has changed or the list looks wrong, tap the refresh icon at the top right to find your location again.
Takeout order map
- Tap the 포장주문 Takeout order tile on the home screen. Turning on the 포장주문 Takeout order chip on the map yourself does the same thing.
- Choose a store for takeout from the list or the map.
- The store screen for takeout orders opens. On this screen the shopping mall, store photo and store information sections are hidden, and the bottom tabs are not shown either. You can focus on the takeout order flow.
- See Chapter 4 for adding menu items and Chapter 5 for the takeout order steps.
Only stores that have turned on takeout orders are shown. If there are no results, the app shows a note that only places the stores have entered are listed, along with “Not many places have been entered yet.” In that case, switch to the 매장식사 Dine-in chip or look for another store.
Discount stores near you
On the “Discount stores near you” map, the title at the top and the list title change to “Discount stores near you”, and only stores with a discount are shown. If there are none nearby, it says “There are no discount stores nearby”.
- Tap the “Discount stores near you” card on the home screen.
- If there are stores with a discount, their list lines show a 할인 Discounts mark and the discount text.
- If there are no discount stores, try widening the distance chip to 5km or 전체 All.
Nationwide golf course map
In the chip row at the top of the map, tap the green Golf button to switch to the nationwide golf course map. Tapping the golf banner on the home screen opens the same screen.
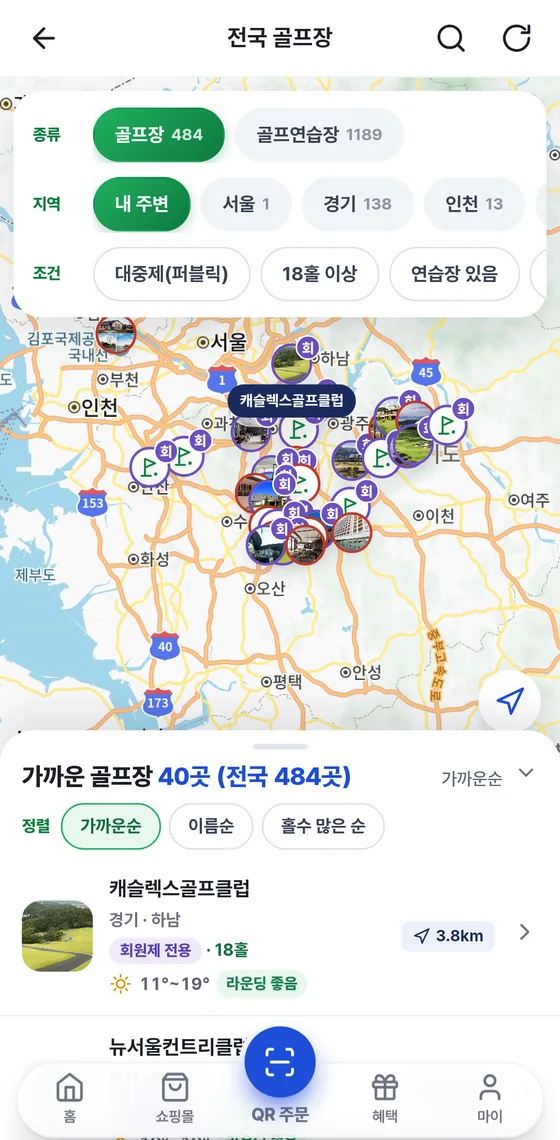
- Golf: tap it. The title changes to “Nationwide golf courses” and a panel appears at the top.
- On the Type row, choose 골프장 Golf courses or 골프연습장 Driving ranges.
- On the Region row, choose 내 주변 Near me or a city or province (Seoul, Gyeonggi, Incheon, etc.). The number next to a chip is the number of places in that region. When you choose a region, a row of its cities and counties may open. If your location could not be found, 전체 All appears instead of 내 주변 Near me.
- On the Conditions row, turn on 대중제(퍼블릭) Public course, 18홀 이상 18+ holes, 연습장 있음 Has driving range, 숙박 있음 Has lodging and 사우나 있음 Has sauna. You can turn on several together, and when you do, a description and 초기화 Reset appear below. If you choose driving ranges, the Conditions row disappears.
- In Sort above the list, choose 가까운순 Nearest first, 이름순 By name or 홀수 많은 순 Most holes first.
- At first the list shows only the nearest golf courses. To see more, tap 더 보기 Show more at the bottom.
- Tap a golf course row to open its detail screen. If you tap a pin on the map, a preview opens, and you can use 골프장 정보 보기 View course info, call and directions.
- Tap the magnifier to open the “Search by golf course name or region” input box. If you enter a name or region, the app searches all golf courses nationwide for you.
- To leave the golf map, tap the ← at the top left. You return to the nearby stores map.
| One list row | What you see |
|---|---|
| Photo | A photo of the golf course. |
| Name · region | The region appears below the name, like “Gyeonggi · Hanam”. |
| Type | Places that have only a members' course get a purple “Members only” tag. If there is a public course, “Public” and the number of holes are shown, and places that also have a members' course show something like “Public ○ holes available”. |
| Weather | One line shows the sky condition, today's low–high temperature, and a golf round index such as “Good for a round”. If caution is needed, “Weather caution” is added. |
| Distance | The distance from your location. |
The purple single-character badge on the map (short for “members only”) marks members-only golf courses. The golf map opens even if your location cannot be found. In that case, the courses are listed by name, without distances.
Golf course information (business hours and so on) can change. Call to check before you go. Gpay does not take golf course reservations or payments.
The list shows no stores at all.
Try widening the distance chip to 5km or 전체 All, and turn off any type chips you have turned on. If your location looks wrong, tap the refresh icon. If no store matches your conditions, the app says “No stores match your conditions”.
I turned on the takeout order chip and there are few stores.
Only stores that have turned on takeout orders are shown. Turn off the 포장주문 Takeout order chip and search with the 매장식사 Dine-in chip.
The store name tag says “Closed”.
The store is closed. It looks faded on the map. You can also check the business status on the store screen.
4Store screen and adding menu items
On the store screen, check the photos · business status · benefits, and add the menu items you like to your cart. You can also read reviews left by other customers here, and if you have paid at the store, you can leave a review too.
4.1 How to open the store screen
The store screen opens when you choose a store or scan a QR code. There are three ways to open it.
- Choose from a list — Tap a store in the Nearby stores or Merchants near me list on the home screen. (Chapter 3)
- QR scan — Scan a table QR or a store introduction QR on the QR 주문 QR order tab. (Chapter 5)
- Search by name or phone number — Under Other ways at the bottom of the QR 주문 QR order tab, find a store by merchant name or phone number.
The way you open the store sets how you order. If you open it with a table QR, it is dine-in (Table N appears on the screen). If you open it from a list or search, it is a takeout order. You can place a takeout order only at stores that accept takeout. Chapter 5 explains the details.
If you open a store marked Info-only store in the map preview, you see Store information with call and directions instead of the menu and cart. This is a store where Gpay payment is not available yet.
4.2 View store information
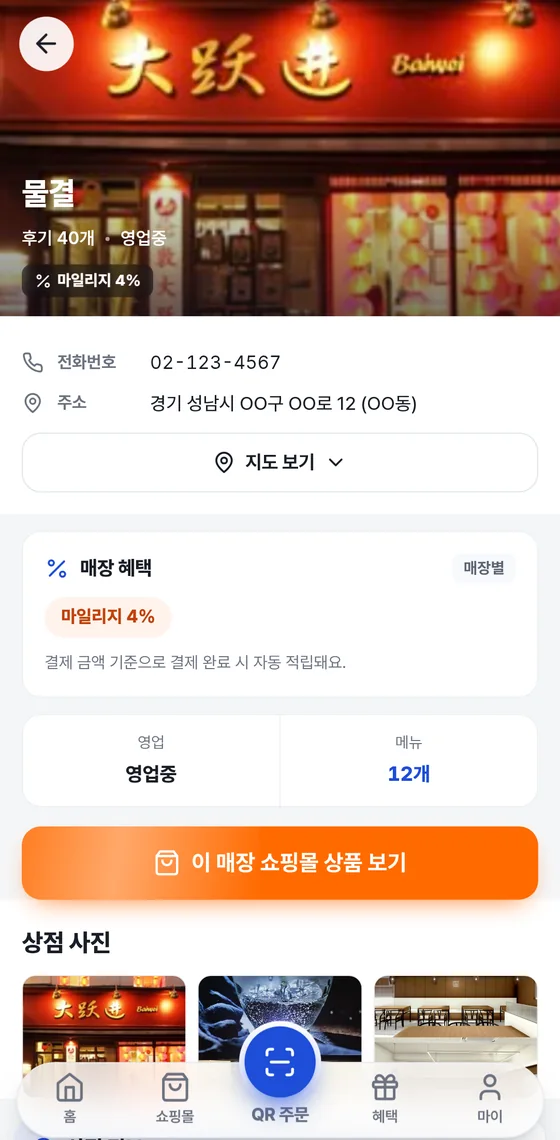
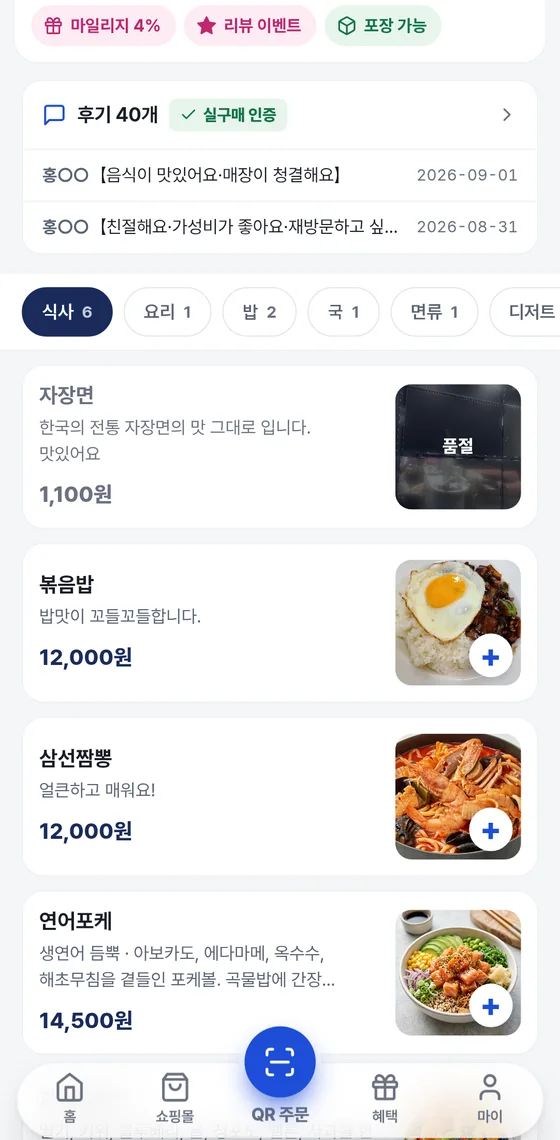
| Area | What you see | Good to know |
|---|---|---|
| Main photo · name | The store name, N reviews, business status and mileage badge are overlaid on the store's main (exterior) photo. | Tap the photo to view it large in full screen. If even one menu item is on discount, a Discount store badge is also shown. |
| Phone number · address | The store's phone number and address. | Use the phone number to ask the store a question, and the address to find your way there. |
| 지도 보기 View map | Tap it to expand a map of the store's location. | When expanded, the button text changes to Collapse map. Under the map, you can open a navigation app with Directions, and if you tap the map, a larger map opens. |
| Store benefits | A store-specific mileage earning rate is shown together with the notice Earned automatically when payment is complete, based on the amount paid. | The earning rate differs from store to store. Mileage is a full-member benefit. |
| Business · menu | The Business field shows Open or Closed, and the Menu field shows the number of menu items posted. | If the store is closed, you can't add menu items. |
| 이 매장 쇼핑몰 상품 보기 View this store's mall products | An orange button that appears only when the store has listed products in the shopping mall. | Tap it to open that store's product list. The shopping mall is explained in Chapter 9. |
| Store photos | The photos the store has posted appear side by side in a row. They are 1 main (exterior) photo and the interior photos the store uploaded. | The first photo is the same main photo as the large photo at the top. Tap it to open it in full screen, and swipe sideways to see the next photo. Close it with the X at the top right. |
| Store information | Tags show the store's benefits and how to use it, such as Mileage, Review event and Takeout available. | The tags you see differ from store to store. A faded tag with a dotted outline is an item that does not apply to that store. If the store has posted items such as business hours, they appear below the tags. A store with the Takeout available tag accepts takeout orders. |
When a store is closed, the store screen shows the notice This store is currently closed. Orders are not being accepted right now. If you tap a menu item then, the app tells you Orders are not being accepted right now. and the item is not added.
4.3 View categories and the menu list
- Category tabs — The number of menu items is shown next to each category name, such as Meals · Dishes. Tap a tab to see only that category's menu items. If there are many tabs, swipe sideways to find the one you want.
- Menu card — The menu item's name, short description, price and photo appear on one card. Tap a card to open the menu sheet.
- Sold out — Sold out covers the photo and the + button disappears. You can't add the item even if you tap it.
- Discount — For a discounted item, a line is drawn through the original price, and the discount rate and discounted price are shown together.
- Mileage excluded — If this mark appears next to a menu item's name, that item does not earn mileage.
The photo on a menu card is a photo of that menu item's food. Look for photos of the store itself in Store photos at the top.
4.4 Add menu items to your cart
- Tap the + button at the corner of the menu card or photo you want to add.
- On the menu sheet that slides up from the bottom, check the photo, description and price.
- If the item has options, an option row appears above the quantity. It is marked Required, and the first option is selected at first. Tap another option to change it, and the option price is added to the amount on the add button. Items without options do not have this row.
- Tap + next to Quantity to increase the number. When the number is 1, - cannot be tapped.
- Tap N원 담기 Add N KRW to cart. When you change the quantity, the amount on the button changes too.
- A notice Added to your cart appears and the sheet closes. To add more, add other menu items the same way.
- When you have added everything, tap the 장바구니 보기 View cart bar at the bottom of the screen to go to your cart. (Chapter 5)
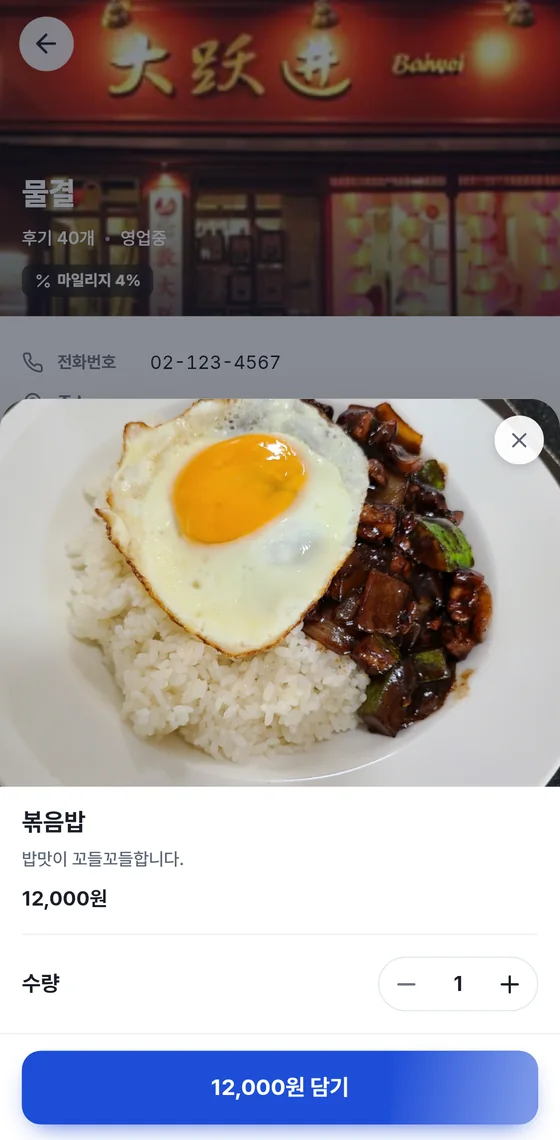
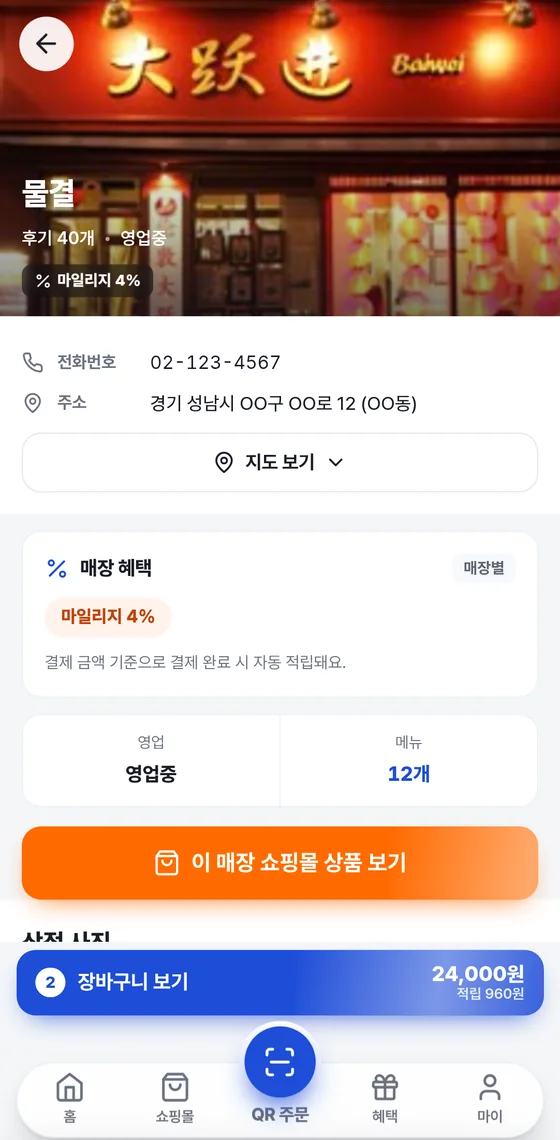
If you add the same menu item with the same options again, it merges into one line in the cart and only the quantity goes up. The Earn amount shown in the bar is the amount calculated with this store's earning rate. Mileage is a full-member benefit.
You can put items from only one store in the cart at a time. If you add a menu item from a different store than the one in your cart, a Start a new cart? window appears. If you tap 새로 담기 Start a new cart, all the items you added earlier are deleted.
When you can't add an item
| Message on the screen | Meaning | What to do |
|---|---|---|
| Orders are not being accepted right now. | The store is closed. | Add the item again after the store changes to open. |
| Sold out | That menu item is sold out. | Choose another menu item. |
| This store is not accepting takeout orders right now | You opened a store without a table QR, and that store is not accepting takeout. | For dine-in, scan the table QR and enter that way. For takeout, choose a store that accepts takeout. |
| We have not been able to confirm whether takeout is available yet. Please tap again in a moment | The store status is loading. | Wait a moment, then tap the menu item again. |
4.5 Read and write store reviews
Read reviews
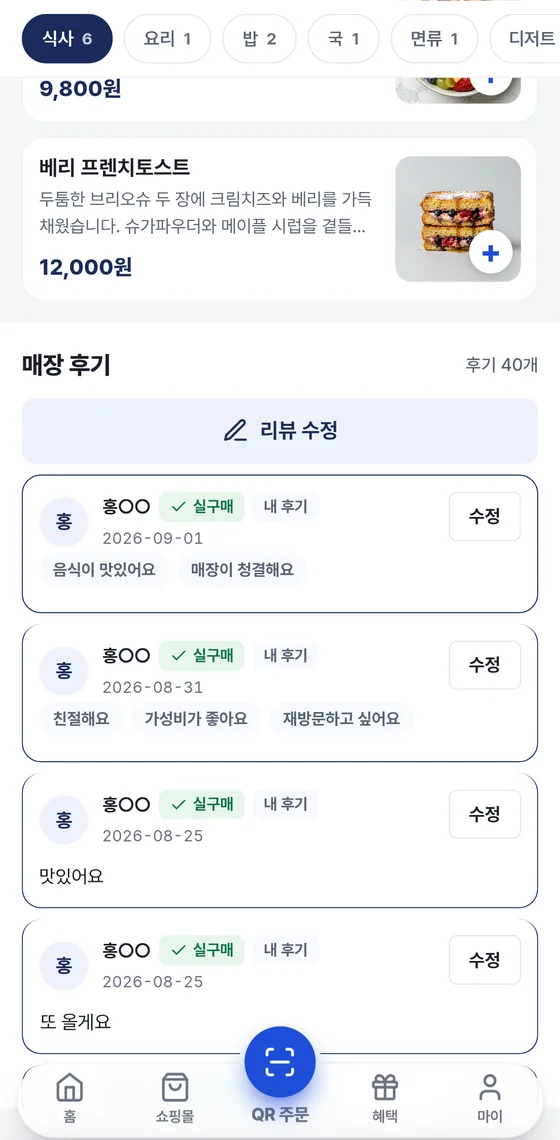
- Review summary card — Above the menu list it shows the number of reviews, the Verified purchase mark and the 2 most recent reviews. Tap the card to jump to the review list below.
- Verified purchase — A mark added to reviews written by members who paid at that store.
- No star ratings — Instead, you choose phrases such as The food is delicious or The store is clean. The phrases you choose are shown as chips above the review.
- Store owner's reply — When the store posts a reply, it appears below that review.
- The name of the person who wrote a review is partly hidden, like Hong ○○.
Write a review
- Tap 리뷰 쓰기 Write a review above Store reviews.
- When the input window opens, tap the phrases under Write a new review that fit. You can choose several, and tapping again deselects it. There are six phrases: The food is delicious · The portions are large · The store is clean · Friendly service · Good value · I want to visit again.
- If you want to say more, write it yourself in the Leave a review field. You can write up to 500 characters.
- Tap 등록 Post. When your review is posted, it appears at the top of the list as My review. To stop writing, tap 취소 Cancel.
Reviews are for customers who have paid at that store. If you have never paid there, your review may not be posted. If you leave both the phrase and the text empty and tap 등록 Post, the app shows the message Choose a phrase or enter a review. You can post a review even if you only choose a phrase.
To change a review you already wrote, tap 수정 Edit next to it. The title of the input window changes to Edit review, and your text is already filled in. After you make your changes, tap 수정 Edit to save.
If you get here by tapping 리뷰 쓰기 Write a review next to an order in 결제 현황 Payment status on the 마이 My tab, your review is posted for that order. Some stores give extra mileage for a review. These stores show Write a review for ○○ KRW more in advance in the cart and in the order details. Mileage is a full-member benefit.
5Cart and takeout orders
Check the quantities and amounts of the menu items you added in the cart, then place your order. For dine-in, scan the table QR. For takeout, choose a pickup time.
5.1 Two ways to order
| Type | How to start | What to do before you order | Payment |
|---|---|---|---|
| Dine-in | On the QR 주문 QR order tab, scan the table QR to open the store. | The table number is attached to your order. | Pay right away. At a pay-later store, you pay when you leave. (6.7) |
| Takeout | Open a store that accepts takeout from Takeout order on the home screen or from the 포장주문 Takeout order chip on the map. You don't need to scan a QR. | Choose a pickup time. | You always pay right away. The same goes for pay-later stores. |
You can place a takeout order only while the store is accepting takeout. You can't add menu items at a store that doesn't accept takeout. For dine-in, you need a table QR to order.
5.2 Checking your cart
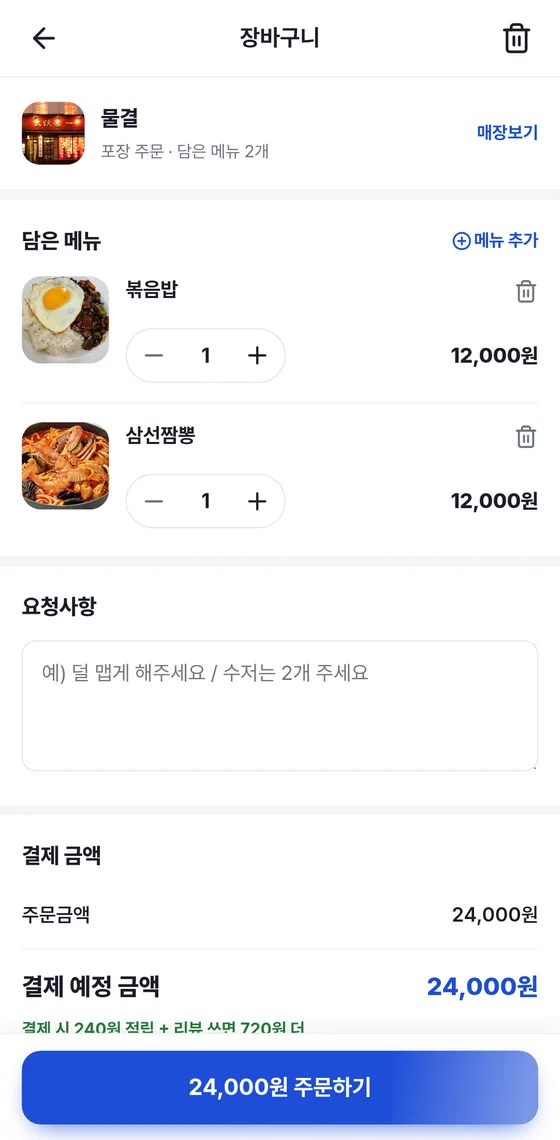
On the store screen, tap the 장바구니 보기 View cart bar to open your cart.
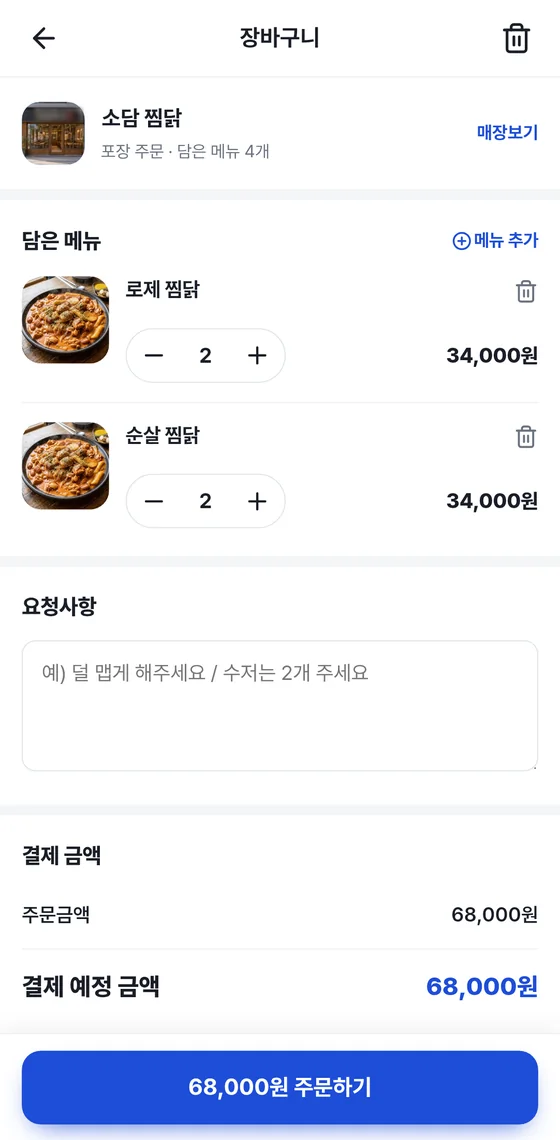
| Area | What you see | What you can do |
|---|---|---|
| Top | Back arrow · Cart · trash can on the right | The arrow goes back to the store menu. The trash can removes all the menu items you added. |
| Store card | Store photo · name · Takeout order · N menu items in cart (if you came in through a table QR: In-store order · Table N) | Tap 매장보기 View store to go back to the store screen. N menu items in cart counts all the quantities added together. |
| Menu items in cart | Menu photo · name · quantity · amount | Add more menu items with 메뉴 추가 Add menu item, change quantities, or remove items. |
| Special requests | An input field with the faint placeholder text e.g. Less spicy, please / 2 sets of utensils, please | Write any requests for the store. |
| Payment amount | Order amount and Amount to pay | Check in advance how much you will pay. (5.3) |
| Bottom | The N원 주문하기 Order for N KRW button | Tap it to move on to payment. (Chapter 6) |
Editing the items in your cart
- Change the quantity — Tap - or + below the menu item. When the quantity is 1, - can't be tapped. When you change the quantity, the item amount and the amount to pay update right away.
- Remove one menu item — Tap the trash can at the top right of the menu item.
- Remove everything — Tap the trash can at the top right of the screen and the Delete all menu items you added? prompt appears. Tap 모두 삭제 Delete all and the app tells you Cart emptied.
- Add more — Tap 메뉴 추가 Add menu item or 매장보기 View store to go back to the store screen and add more menu items.
If you remove all the menu items, an empty screen appears that says No menu items in cart. It also shows the message Scan the table QR and add the menu items you want, and they will appear here. and a QR 스캔하러 가기 Go scan QR button.
5.3 Checking the payment amount and the mileage you will earn
- Order amount — the total of the menu items you added.
- Amount to pay — the amount you pay at this step. If you use mileage, this amount goes down in the next step (6.5).
- The green Earn ○○ KRW at payment + write a review for ○○ KRW more — the mileage you will earn from this order. It is calculated using the store's earning rate and any menu items marked Mileage excluded. Stores that don't give mileage don't show this line.
Expected mileage goes into your own mileage only after you pay and then tap 받기 Receive under “Claim mileage” on the 혜택 Benefits tab. The amount after Write a review is added only after you leave a review. (10.3) Mileage is a full-member benefit.
The amounts on the screen are for checking only. The actual payment amount is recalculated from the store's menu prices when the order is created.
5.4 Takeout orders: choosing a pickup time
A takeout order has no table, so you don't scan a QR. Choose when you will pick it up, then pay right away.
- Choose a store that accepts takeout from Takeout order on the home screen or from the 포장주문 Takeout order chip on the map, and open its store screen.
- On the green Takeout order · Add menu items and pay right away · Pick up at the store bar at the top of the store screen, choose the Pickup time. The choices are 15분 뒤 In 15 min 20분 뒤 In 20 min 30분 뒤 In 30 min 45분 뒤 In 45 min and 1시간 뒤 In 1 hour, and In 20 min is selected at first.
- Below the bar, tap 길찾기 Directions to see the way to the store, or 전화 Call to contact the store. 전화 Call appears only when the store has a phone number.
- Add menu items and go to your cart. The store card shows Takeout order · N menu items in cart.
- Scroll down the cart screen to find the Takeout order card. If the time you chose on the store screen carries over, it shows Pickup in ○○ min · Chosen on the store screen. To change it, tap 바꾸기 Change and choose again from 15분 뒤 In 15 min 20분 뒤 In 20 min 30분 뒤 In 30 min 45분 뒤 In 45 min. If the time did not carry over, choose it with the same buttons below the message Please choose when you will pick it up. You don't need to scan a QR.
- Tap N원 주문하기 Order for N KRW and pay. (Chapter 6)
- When your order is ready, the card for your order in progress on the home screen shows Takeout ready · Pick up your order.
The pickup time is the time you want, and it is set in 5-minute steps. The time your order is actually ready may vary depending on the store, so if you are in a hurry, tap 전화 Call to check.
If the store stops accepting takeout, a yellow notice appears in your cart saying This store is not accepting takeout orders right now. You can order when the store opens takeout again. and the order button is grayed out. If you tap it, you see This store is not accepting takeout orders right now.
5.5 Ordering with the table QR
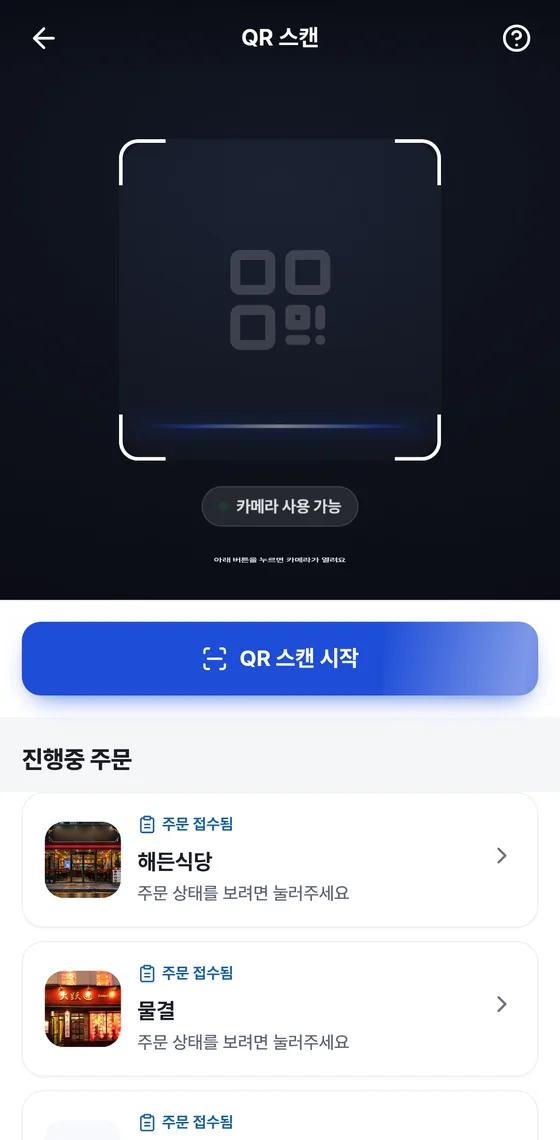
For dine-in, scan the QR on your table. Start the QR scan from QR 주문 QR order in the middle of the bottom tabs.
| Area | What you see | What you can do |
|---|---|---|
| Top | Back arrow on the left · QR scan · question mark button on the right | The question mark button takes you to a guide to the types of QR codes the app can read. |
| Camera guide frame | Camera available, Tap the button below to open the camera | This area is a guide screen. The camera opens when you tap the button. |
| QR 스캔 시작 Start QR scan | Blue button | Tap it to open the camera. |
| Orders in progress | Store photo · store name · Order received or Now cooking | Tap a card to open the status screen for that order. This area appears only when you have an order that is received or being cooked. |
| Other ways | Scroll down to see Merchants near me · Find by merchant name · Find by phone number | Use these to find a store without a QR. |
- Tap QR 주문 QR order in the middle at the bottom of the screen.
- Tap QR 스캔 시작 Start QR scan to open the camera.
- Fit the QR on your table inside the camera view.
- When the QR is read, that store's menu screen opens. The screen shows Table N.
- Add menu items (4.4) and check In-store order · Table N in your cart.
- Tap N원 주문하기 Order for N KRW to pay. (Chapter 6) For a pay-later store, see 6.7.
QR types the app can read
| QR type | When you scan it |
|---|---|
| In-store order QR (table) | You can order straight from that store's menu. |
| Store introduction QR | The merchant information and reviews screen opens. |
| Quick Pay QR | A window for entering the payment amount appears. (6.6) |
| Product purchase QR | That store's product list opens. |
If the QR is not a Gpay QR or has no information, the app tells you in a prompt. If the store's QR is worn out and can't be read, tell the store staff. If you close the camera and come back but the screen doesn't change, you see The scan result didn't arrive on this screen. This means you canceled the scan or an app prompt (amount entry · error) appeared. Check that it is a Gpay QR and tap 다시 스캔하기 Scan again.
You can't order dine-in without a table QR. If you try to order dine-in from a cart that has no table number, you see Please scan the table QR first.
5.6 After you order
- When payment is complete, your order is received by the store. At a pay-later store, it is received as soon as you tap 주문하기 Place order on the order sheet. (6.7)
- Received orders appear under Orders in progress on the home screen and on the QR 주문 QR order tab, showing Order received · Now cooking. Tap a card to open the order status screen. (Chapter 8)
- You can see your past orders and payment history in 결제 현황 Payment status on the 마이 My tab. (Chapter 8)
6Pay
Tapping the order button takes you on to payment. Use mileage, choose a payment method and a card, then finish with your payment password. You can pay with one card or split the payment across up to three cards.
6.1 The payment steps at a glance
- In your cart, tap N원 주문하기 Order for N KRW. (Chapter 5)
- If you have mileage you can use, the Order sheet opens. Decide how much to use and choose a payment method. (6.5) If you have no usable mileage, you skip this step and go straight to the next one.
- On the Select payment card screen, choose a payment method and a card. (6.2 · 6.3)
- The next screen depends on the cards you chose. With 1 card, you choose pay in full or installments; with 2–3 cards, you split the amount between the cards. (6.4)
- Confirm your payment password. Enter your 6-digit payment password; if you have set up a fingerprint or Face ID, you can use that to confirm as well.
- When payment is complete, the Payment complete screen opens. Tap 상세 보기 View details to see your order details, or 홈으로 Go home to go to the home screen. (Chapter 8)
Set and change your payment password under Payment password on the 마이 My tab. (Chapter 11) If you register your cards in advance under Card management on the 마이 My tab, paying is quicker.
6.2 Choosing a payment method
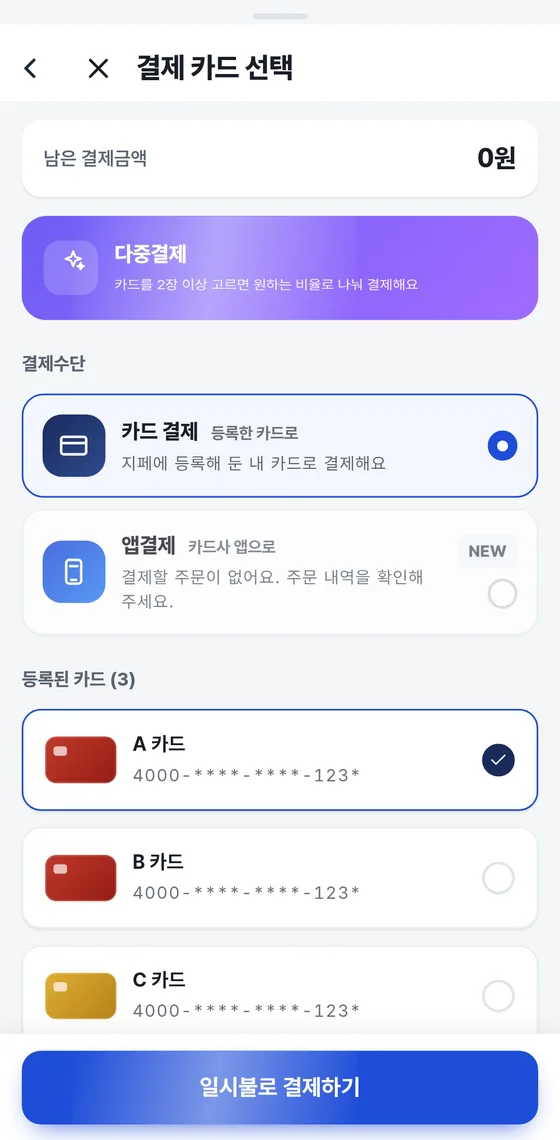
| Payment method | Description | Good to know |
|---|---|---|
| Card payment · with a registered card | Pay with your own card registered in Gpay. | You can use pay in full, installments and multi-card payment, and you can use mileage together with them. |
| App Pay · with your card issuer's app (NEW) | Verify in your card issuer's app and pay right away. | When you choose App Pay, the registered card list is hidden. You can choose it only when you have an order to pay. |
Paying with App Pay
- Under Payment method, tap 앱결제 App Pay. When the order to pay is confirmed, the box shows the amount and Verify in your card issuer's app and pay right away.
- The large button below changes to N원 결제하기 Pay N KRW. Tap it.
- You see Opening the payment window…, and then the payment window for card issuer app verification opens. Verify as instructed and the payment goes through.
Whether you can use App Pay and mileage together depends on the notice on the screen. If the notice says you can't use them together, use your mileage with 카드 결제 Card payment. If you have no order to pay, the App Pay box shows There is no order to pay. Please check your order history. and you can't choose it.
If you have several unpaid orders, the Which order do you want to pay for? list appears first. When you choose the order to pay, you continue with that order's amount. If the payment window doesn't open, you see Couldn't open the payment window. Please tap again in a moment. Tap again, or choose 카드 결제 Card payment.
6.3 Choosing registered cards
- When you tap a card, a check mark appears on its right. Tap it again to deselect it.
- You can choose up to 3 cards. If you tap a 4th card, you see You can select up to 3 cards only.
- If you choose 2 or more cards, 1st · 2nd · 3rd appears next to the card names. This is the order you chose them in. The card order on the next screen follows this order too.
- A card you paid with last time as a single card may already be selected.
- Tap 카드 추가 Add card at the bottom of the card list to go to the screen for registering a card. (Chapter 11)
The large button at the bottom changes like this, depending on the number of cards you chose and the amount to pay.
| Cards chosen | Bottom button | Next screen |
|---|---|---|
| None | 선택 완료 Done selecting (can't be tapped) | You need to choose at least one card. |
| 1 card, remaining payment amount of 50,000 KRW or more | 할부 선택하기 Choose installments | This screen is for choosing the number of installment months. (6.4) |
| 1 card, remaining payment amount under 50,000 KRW | 일시불로 결제하기 Pay in full | Goes on to payment password confirmation. |
| 2 or 3 cards | 2장 분할결제 설정 Set up 2-card split payment or 3장 분할결제 설정 Set up 3-card split payment | This screen is for splitting the amount between the cards. (6.4) |
When there is a problem with the card list
| Message on screen | Meaning | What to do |
|---|---|---|
| No cards registered. Please register a card first to pay. | You have no registered cards. | Register a card with 카드 추가 Add card. |
| Couldn't load the card list. The connection was briefly delayed. Your registered cards are still there. | The list didn't load because of a slow connection. Your cards haven't disappeared. | Tap 다시 시도 Try again. |
| Payment with this card has been declined before. Please register it again under Card management. | Payment with that card has been declined before. | Register the card again under Card management on the 마이 My tab, or choose a different card. (Chapter 11) |
6.4 Multi-card payment and installments
Multi-card payment: split a payment across up to 3 cards
Multi-card payment is a feature for when one card is not enough: you choose 2 or 3 cards and split the amount between them to pay in one go. You set how much each card pays yourself, using sliders. Multi-card payment is a full-member benefit. If the annual membership fee is not paid, some benefits may be limited. (10.5)
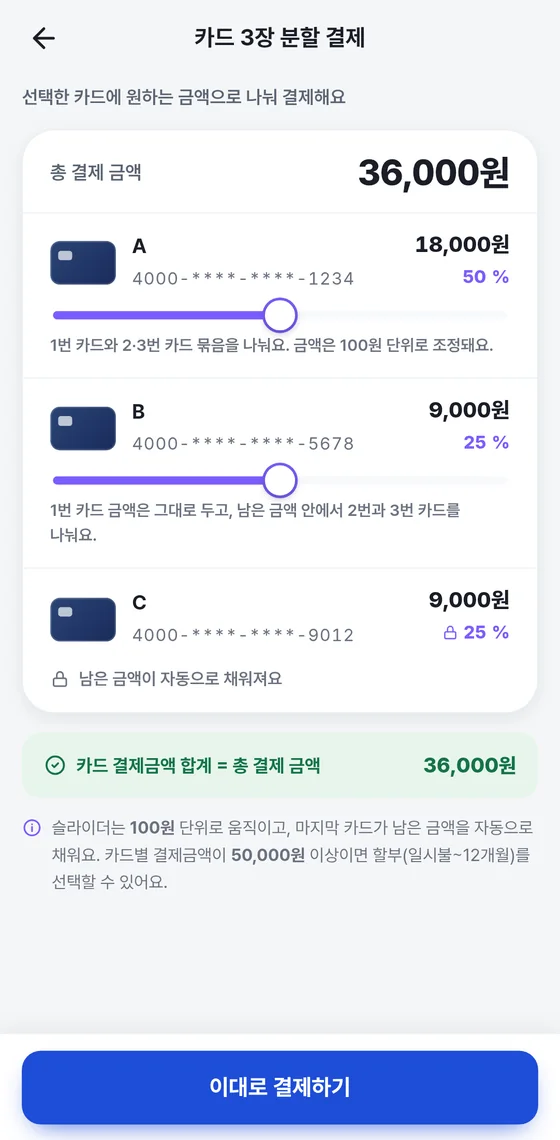
- On Select payment card, choose 2 or 3 cards.
- Tap 2장 분할결제 설정 Set up 2-card split payment or 3장 분할결제 설정 Set up 3-card split payment at the bottom.
- At the top of the split settings screen, check the Total payment amount. At first, the amount is already divided. With 2 cards, it is split half and half. With 3 cards, card 1 gets half, and cards 2 and 3 get 1/4 each.
- Slide the sliders left or right to set the amount for each card. See the table below for how they move.
- Check that the green line Total of card payment amounts = Total payment amount is shown.
- If the amount paid with one card is 50,000 KRW or more, an Installments field appears under that card. Choose the number of months if you need to.
- Tap 이대로 결제하기 Pay as is. When your payment password is confirmed, the payment goes through.
| Number of cards | Sliders | How they move |
|---|---|---|
| Chapter 2 | 1 slider | Move it right to increase the first card's amount, or left to increase the second card's amount. |
| 3 cards | First slider | Splits the amount between card 1 and the group of cards 2 and 3. |
| 3 cards | Second slider | Keeps the amount for card 1 as it is and splits the remaining amount between cards 2 and 3. |
| Last card | No slider (lock icon) | The remaining amount is filled in automatically. |
The sliders move in units of one hundred KRW. Even if the total payment amount does not divide evenly into units of one hundred KRW, the last card takes the leftover last digits, so the total always equals the total payment amount. With 3 cards, when you move the first slider, the second slider resets to half of the remaining amount.
Each card must have an amount. If a card has no amount, the total line changes to a warning and 이대로 결제하기 Pay as is can't be tapped. To take a card out, go back and deselect it.
Pay in full · installments
You can choose installments only when the amount paid with one card is 50,000 KRW or more. The options range from pay in full up to 12 months.
- 1 card — If the amount to pay is 50,000 KRW or more, 할부 선택하기 Choose installments appears, and you choose under Number of months on the Choose installments screen. If it is under 50,000 KRW, you pay in full and go straight to payment password confirmation.
- 2–3 cards — You set this for each card separately. The Installments field appears only under cards with an amount of 50,000 KRW or more. Under 50,000 KRW, it is pay in full.
- If you move a slider and a card's amount drops below 50,000 KRW, that card's installments automatically go back to pay in full.
The installment rule is based on the amount paid with one card, not the total amount of the order. If you split with multi-card payment, each card is judged separately.
6.5 Using mileage
Mileage is a full-member benefit. You can use it only at the store where you earned it, and you can't get it back as cash. (10.4)
- In your cart, tap N원 주문하기 Order for N KRW.
- If you have mileage you can use, the Order sheet screen opens. It shows Ordering store, Order details, Use mileage, Payment method and Payment amount in that order.
- Under Use mileage, check the Available at this store amount, then enter the amount to use in the input field or tap 전액 사용 Use full amount. The amount you enter is adjusted to units of one hundred KRW.
- Under Payment amount below, check the Order amount, Mileage used and Amount to pay. The amount to pay goes down by the amount of mileage you use.
- Under Payment method, choose 카드 결제 Card payment or 앱결제 App Pay. Which payment methods you can combine with mileage depends on the notice on the screen. The card payment line has a Multi-card payment mark and the text You can split the payment across up to 3 cards. You can also register or organize your cards with 카드 관리 Manage cards next to the Payment method title.
- Tap N원 결제하기 Pay N KRW at the bottom to go to the Select payment card screen. (6.3)
If you have no mileage you can use, the Select payment card screen opens right away, without the order sheet. How much you can use depends on the store's policy and the mileage you have.
6.6 Quick Pay: scan a QR and enter only the amount
Quick Pay is a quick in-store payment where you enter only the amount and pay right away, without ordering menu items. You can use it at stores that offer Quick Pay, and it is a full-member benefit.
- On the QR 주문 QR order tab, tap QR 스캔 시작 Start QR scan.
- Scan the Quick Pay QR posted in the store.
- A window for entering the payment amount appears. Enter the amount you need to pay.
- If you have mileage you can use, the order sheet opens. Decide how much to use. (6.5) If you don't, you go straight to choosing a payment card.
- After that, it continues as described earlier, in this order: choosing cards · pay in full · installments · multi-card payment · payment password.
On the store screen of a store with no menu registered, the notice This is a Quick Pay store appears instead of a menu. It says Just enter the payment amount, with no menu order, and you go straight from using mileage to multi-card payment. If you tap 간편결제 하러 가기 Go to Quick Pay, you can continue by choosing between Quick Pay by QR scan and Find the store by phone number.
6.7 Paying at a pay-later store
At a pay-later store, you order first and pay when you leave. This is not available at every store, only at stores that operate on a pay-later basis.
- Come in through the table QR, add menu items, and tap N원 주문하기 Order for N KRW in your cart. The cart shows the notice This store only takes your order. Please pay all at once at the counter when you leave.
- On the Confirm order screen, tap 주문하기 Place order. The app tells you Your order has been placed. Please pay at the counter when you leave. and the order goes to the store. If you want to pay right now, you can also choose 카드 결제 Card payment or 앱결제 App Pay on this screen and tap 지금 결제하기 Pay now.
- A card Not yet paid · Pay at the counter when you leave appears on the home screen. It shows the store name · table number · number of orders, and below it are the 계산하기 Settle bill and 계산 요청 Request bill buttons.
- To pay in the app, tap 계산하기 Settle bill. The orders you placed at this table are combined and the order sheet opens. Use mileage (6.5), choose a payment method (6.2) and pay.
- To pay at the counter, tap 계산 요청 Request bill. A request to call store staff is sent, and the button changes to Staff called.
You can also pay from the order status screen. For a pay-later order that has not been paid yet, you see the 지금 결제하기 Pay now button and the Everything ordered at this table · Request bill button. You can use mileage when you pay. Mileage is a full-member benefit.
Pay later applies only to orders eaten at the table. Takeout orders are paid for right away when you order, even at a pay-later store.
7AI ordering
AI ordering is a feature that lets you find nearby merchants by chat, add menu items and carry on to ordering. Tap a chip for what you want to ask, or write and send your own question, and it searches within the merchant information registered in Gpay.
AI ordering is a full-member benefit. You can check your full-member status from the “Full member · Membership fee paid” mark on the 혜택 Benefits tab or under 마이 My ▸ 회비 결제 내역 Membership fee history.
Opening AI ordering
- Tap 홈 Home in the tabs at the bottom.
- Tap the purple AI 주문 AI ordering card near the bottom of the home screen. It has an “AI” mark on its right. Tapping the AI ordering banner on the home screen opens the same screen.
- If location permission is off, please turn it on. AI ordering finds merchants close to where you are, so it needs to know your location.
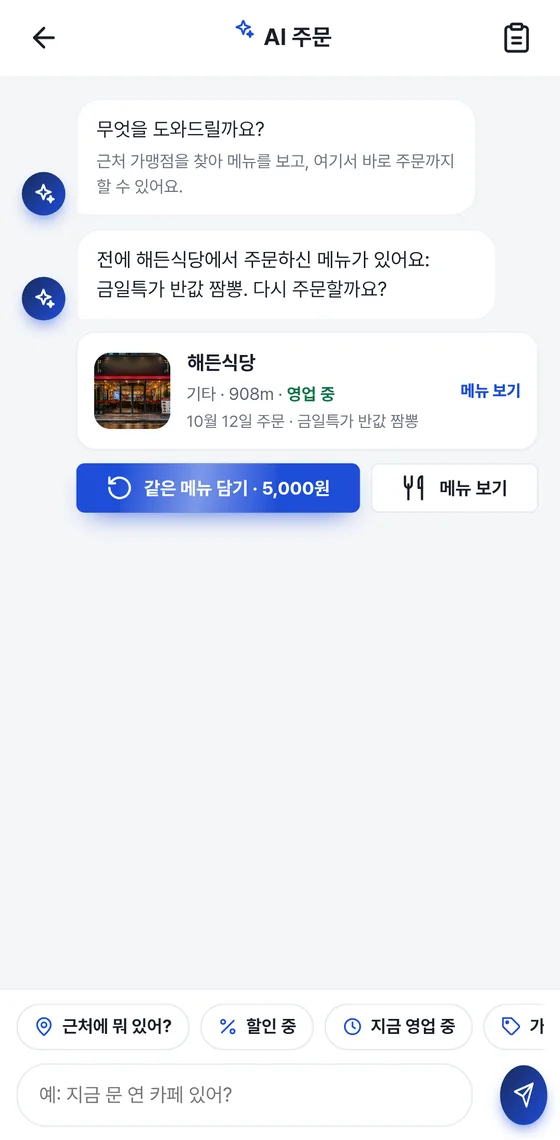
| Position | Name | What you do |
|---|---|---|
| Top | Back · AI ordering · usage history icon | The arrow on the left goes back to the home screen. The icon on the right opens your usage history (Payment status). |
| Chat window | AI chat bubble | The greeting “How can I help you?” and the AI's answers appear. The questions you send pile up as your own chat bubbles. |
| Chat window | Shop card | It shows the shop photo, name, type of business, distance and open/closed status. Tap 메뉴 보기 View menu to open the menu inside the chat window. For search result cards, you can tap anywhere on the card. |
| Bottom | Example question chips | The chips 근처에 뭐 있어? What's nearby? 할인 중 On sale 지금 영업 중 Open now 가격 비교 Compare prices 다시 주문할까요? Order again? are lined up in a single row. If they run past the screen width, swipe sideways to see the next chip. |
| Bottom | Question input field | Hint text such as “e.g. Is any cafe open now?” changes and appears here. Write your question and tap the blue send button on the right. |
Asking with example question chips
Tap a chip once and the question goes up as your own chat bubble; after “Searching…” appears, the answer and shop cards show up.
| Chip | What it shows |
|---|---|
| 근처에 뭐 있어? What's nearby? | Shows merchants within 2 km of your current location as cards. |
| 할인 중 On sale | Shows merchants that have a discount right now. The card has a discount badge. |
| 지금 영업 중 Open now | Shows merchants that are open right now. |
| 가격 비교 Compare prices | Asks “Where can I get jajangmyeon for less?” for you. It gathers merchants that sell the same menu item into a list sorted “cheaper first”, and if there are related shopping mall products, they also appear in the “Shopping mall” row. If you want to know about a different menu item, write the question yourself. |
| 다시 주문할까요? Order again? | Suggests the merchant and menu items you ordered before. If you have no order history yet, it shows popular merchants nearby. |
If there are no results, you see “I couldn't find anything nearby, within 2 km. Shall I try searching again with different words?” Tap another chip or rephrase your question and ask again.
Asking your own question
- Tap the input field at the very bottom of the screen. The hint text shows, one after another, “What are you looking for? e.g. I want something spicy”, “e.g. Where can I get jajangmyeon for less?”, “e.g. Is any cafe open now?”, “e.g. Tell me which places have discounts” and “e.g. A restaurant to go to with kids”. You can write in a conversational way like this.
- Write your question and tap the blue send button on the right. You can also press the search key on the keyboard.
- An AI chat bubble and shop cards appear. Sometimes the shop cards show up first while the answer is being put together.
Only the recent conversation stays on the screen. Older chat bubbles at the top disappear as new questions pile up, so for a shop you want to look at again, tap its card and keep the menu open.
Reading a shop card
| What you see | Meaning |
|---|---|
| Business type · distance | The shop's type of business and its distance from your current location. Under 1 km it is shown in m; otherwise it is shown in km. |
| Open / Closed | The current open/closed status. “Open” is shown in green text. |
| Discount badge | The merchant is offering a discount right now. |
| Info-only store badge | A shop where you can only see the location and phone number. You can't add menu items or pay, and tapping the card opens the shop introduction screen. |
| 메뉴 보기 View menu | Opens the menu inside the chat window. |
| N곳 더 보기 See N more | When there are many results, only some are shown at first. Tap this button to see the rest. |
“Order again?” and adding the same menu items
If you have ordered before, when you open AI ordering the AI first asks “There are menu items you ordered at ○○ before: …. Order again?” Tapping the 다시 주문할까요? Order again? chip shows the same message. There are two buttons under the suggestion card.
| Button | What you do |
|---|---|
| 같은 메뉴 담기 Add same items | The total amount is also written on the button. Tap it and the menu opens with the same menu items and quantities as your previous order already filled in. Only menu items that are on the menu are filled in. |
| 메뉴 보기 View menu | Opens the menu with empty quantities. Use it when you want to choose different menu items this time. |
- On the suggestion card, tap 같은 메뉴 담기 Add same items.
- Check the menu items and quantities that are already filled in on the menu. To change them, tap the + −buttons to the right of each menu item.
- When the bar below the menu shows the number of items added and the total, tap 주문하기 Place order.
- On the “Please check your order.” card, check the menu items, quantities and total, then tap 확인 OK. To make changes, tap 수정 Edit to go back to the menu.
같은 메뉴 담기 Add same items appears only when all the menu items from your previous order can still be ordered now. If a menu item is sold out or has disappeared from the menu, only 메뉴 보기 View menu is shown. In that case, please choose from the menu yourself.
Choosing from the menu and ordering
- Tap 메뉴 보기 View menu on the shop card. For search result cards, tapping anywhere on the card does the same.
- The AI chat bubble says “Here is the ○○ menu (○ items). Tap + on the menu item you want to add.” and the menu opens. The menu item photo, name, description and price are shown by category. Menu items on discount have a line through the original price and a discount rate badge. Sold-out menu items get a 품절 Sold out badge and can't be added.
- To the right of the menu item you want to add, tap +to set the quantity. −reduces it. You can add up to 20 of one menu item.
- As soon as you add even one item, a bar showing the number of items added and the total appears below the menu. Tap 주문하기 Place order.
- On the “Please check your order.” card, tap 확인 OK and the menu items are added to your cart.
The AI ordering menu has no screen for choosing options. If you want to choose options, tap 매장 자세히 Store details below the menu and add items from the store screen.
Your cart can hold menu items from only one store at a time. If you have menu items in the cart from another store, the app tells you “I removed the menu items you added at another store and added the new ones” and clears the previous items.
Choosing dine-in or takeout
When you tap 확인 OK, the AI asks “I've checked your order. Are you eating in the store?”
Dine-in
- Tap 매장 식사 Dine-in.
- When the message “The table number is needed to place your order. Please scan the QR on your table.” appears, tap QR 스캔하기 Scan QR.
- When you scan the table QR, the app takes you to the screen for that store and table. If it is the same store, the menu items you added in AI ordering carry over to your cart. They may disappear if too much time passes, so continue right away.
- In your cart, tap 주문하기 Place order to pay. For payment, see Chapter 6.
Takeout
The 포장 Takeout button appears only at merchants that accept takeout orders. At first you see “Checking whether takeout is available…”, and if it is available, 포장 Takeout appears next to 매장 식사 Dine-in. At a merchant that doesn't accept takeout, the app says “This store isn't taking takeout orders right now — shall we continue as dine-in?”
- Tap 포장 Takeout.
- The AI tells you “For takeout, you don't need a QR. Just choose a pickup time and pay right away.” You don't need to scan a QR at this point.
- Tap 포장으로 주문하기 Order for takeout to open the takeout cart, choose a pickup time and pay. For the detailed steps, see Chapters 5 and 6.
At a pay-later store, the message changes to “Just choose a pickup time.” Pay later is not available at every store, and how you pay differs from store to store.
Going to the store screen to add items
If you first want to see the reviews and business information of a shop the AI recommended, or you want to choose options when adding items, add them yourself on the store screen.
- Tap 매장 자세히 Store details below the menu to go to the store screen. For an info-only store card, tap it to open the shop introduction screen directly.
- On the store screen, tap a menu item, choose the options and quantity, and tap 담기 Add to cart. For the store screen, see Chapter 4.
- Tap the 장바구니 보기 View cart bar at the bottom of the screen to go to your cart.
- Tap 주문하기 Place order to pay. For the cart and payment, see Chapters 5 and 6.
Notice about the external AI service (OpenAI)
AI ordering uses an external AI service (OpenAI). Do not put personal information such as card numbers, passwords or resident registration numbers in your questions.
- The merchants, menu items, prices and business status the AI tells you come from the information registered in Gpay. Before you order, always check the menu items and amount on the confirmation card again.
- The AI helps with searching and adding items. You make the payment yourself on the payment screen after the cart.
- For details on how personal information is handled, go to 마이 My ▸ Support, then 약관 보기 View terms ▸ 개인정보 처리방침 Privacy policy.
Daily question limit and troubleshooting
There may be a limit on how many questions you can type and send in a day. If you go over the limit, a notice appears in the AI chat bubble. Below are the notices that often appear in the AI chat bubble and how to solve them.
| Chat bubble message | What to do |
|---|---|
| Can't determine your location. Please turn on location permission. | In your phone settings, turn on location permission for the Gpay (지페) app, then tap again. |
| I couldn't find anything nearby, within 2 km. Shall I try searching again with different words? | Tap another chip or rephrase your question and ask again. |
| Please try again in a moment. | Appears when the connection is unstable. Send it again a little later. |
| Couldn't load the menu. Please try again in a moment. | Tap 메뉴 보기 View menu again. |
| The menu for ○○ hasn't been registered yet. Shall we check on the store screen? | Tap 매장 화면 보기 View store screen to check on the store screen. |
| There is no history to base a suggestion on yet. Shall we start by browsing merchants nearby? | Browse merchants nearby with 근처에 뭐 있어? What's nearby?. Once you have an order history, “Order again” is shown too. |
| This store is not accepting takeout orders right now | Continue with 매장 식사 Dine-in or choose a different merchant. |
Does the AI also make the payment for me?
On this screen, the AI helps you find merchants and add menu items. For dine-in, you pay yourself in your cart after scanning the table QR; for takeout, you pay yourself on the payment screen after choosing a pickup time.
No merchants nearby show up at all.
Check that location permission is on. AI ordering looks for merchants within 2 km of your current location. Try a different chip or rephrase your question and ask again.
There is no 같은 메뉴 담기 Add same items button.
This happens when you have no previous order, or when a menu item you ordered then is sold out or gone. Choose items yourself with 메뉴 보기 View menu.
I can't see the 포장 Takeout button.
That merchant isn't accepting takeout orders right now, or it is still being checked. If the button is still missing after you wait for “Checking whether takeout is available…” to disappear, continue with 매장 식사 Dine-in.
How do I choose menu options?
You can't choose options in the AI ordering menu. Tap 매장 자세히 Store details to go to the store screen and add items there.
The menu items I added in AI ordering aren't in my cart.
Your cart holds only one store at a time. If you add menu items from another store, the previous items are cleared. For dine-in, scanning the QR carries them over to the cart of the same store.
Can I use it if I'm not a full member?
AI ordering is a full-member benefit. You can check your full-member status on the 혜택 Benefits tab or under 마이 My ▸ 회비 결제 내역 Membership fee history.
8Order status · payment history
Once you place an order, you can see its progress right on the home screen. Check past payments, cancellations and card receipts under Payment status in My.
Viewing orders in progress on the home screen
When an order is received or being cooked, an order card appears at the top of the home screen. The card shows the shop photo and name and the current status.
| Card | What you see |
|---|---|
| Received | It says “Order received”, and “Received” lights up on the Received ▸ Cooking ▸ Done progress bar. The strip on the left of the card and the icon are blue. |
| Cooking | It says “Now cooking”, and the progress bar moves to the “Cooking” step. The color changes to orange. For a table order, “Table N” is also shown. |
| Ready | When the shop reports that the order is ready, it changes to “Ready” and the “Done” step lights up. For a takeout order, it says “Takeout ready · Pick up your order”. |
| Quick Pay | This is a payment of an amount only, with no menu items (Quick Pay is a full-member benefit). There is no cooking step, so only “Quick Pay · Payment complete” appears, without a progress bar. |
| Not yet paid (pay-later store) | Orders from the same shop and the same table are grouped into one card, which shows “Not yet paid · Pay at the counter when you leave” and the total amount. The 계산하기 Settle bill and 계산 요청 Request bill buttons are on it as well. |
- Tap an order card on the home screen to open the order details.
- If you don't need a card, tap ✕at its top right to close it. A closed card reappears when its status changes (for example, from received to cooking).
Home cards show only orders that are received or being cooked. Orders that have been served disappear from the cards, so check them under 주문 내역 Order history below or in Payment status under My. Pay later is not available at every store.
Viewing your usage history in My ▸ Payment status
- Tap 마이 My in the tabs at the bottom.
- Tap 결제 현황 Payment status (“Check payment and order history”). Tapping 전체 보기 View all under 주문 내역 Order history on the home screen opens the same screen. The screen title is “Usage history”.
- In the tabs at the top, choose 결제 현황 Payment status to see food and QR payments, or 상품 주문 Product orders to see shopping mall purchases.
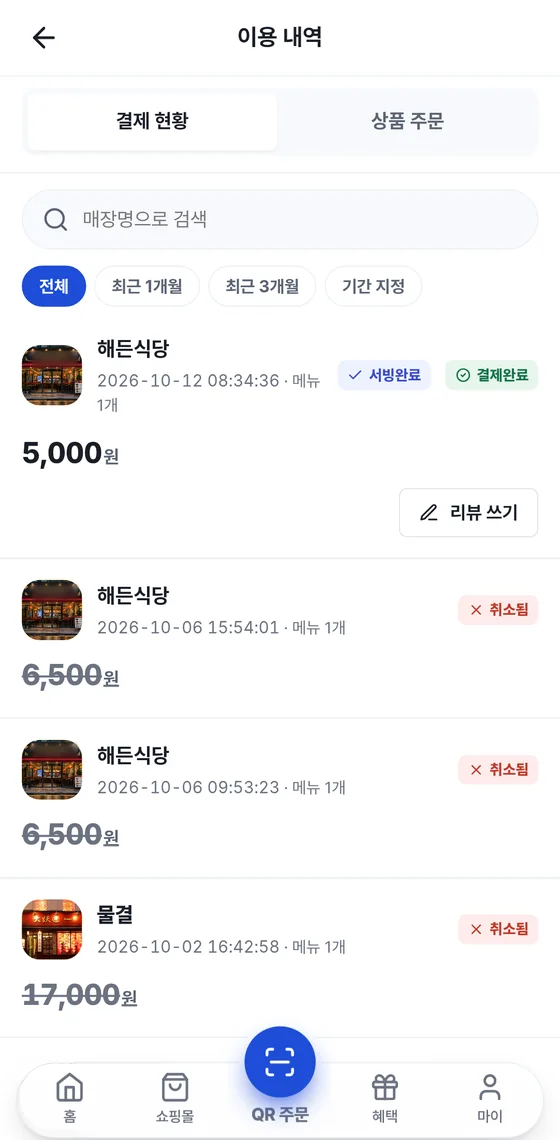
Badges on each row
| Badge | Meaning |
|---|---|
| Received | The shop has received the order. |
| Cooking | The food is being prepared. |
| Ready | The shop has reported that the order is ready. |
| Served | The food has been served. |
| Payment complete | The payment is done. |
| Unpaid · Pay later | An order at a pay-later store that has not been paid yet. |
| Quick Pay | A payment of an amount only, with no menu items. This row has no menu item count. |
| Paid together / Billed together | A badge on a row that was merged with another order from the same table. It may not appear, depending on the app version and the store. On such rows the amount looks faint and 리뷰 쓰기 Write a review is not shown. |
| Canceled | A canceled payment. The amount has a strikethrough. |
On a payment where a full member used mileage, the row shows a “Mileage -○ KRW” tag together with “Total order amount”. Mileage is a full-member benefit and can be used only at the shop where it was earned.
Searching and choosing a period
- Type a shop name in the “Search by store name” field at the top and only that shop's payments remain. If there are none, “No search results · Please check the store name again.” appears.
- On the period chips, tap one of 전체 All 최근 1개월 Last 1 month 최근 3개월 Last 3 months 기간 지정 Custom period.
- When you tap 기간 지정 Custom period, start date and end date fields appear. Choose the dates and tap 조회 Search. If the start date is later than the end date, you see “The start date is later than the end date”.
- When you scroll to the end of the list, the next rows are loaded. If they couldn't be loaded, tap the 더 보기 Show more button that appears.
Payment status shows payments from the last 6 months. Canceled payments are shown as well. If the list can't be loaded, you see “Couldn't load Payment status” and a 다시 시도 Try again button.
Writing a review
Rows for orders that are not in the received or cooking stage and have not been canceled get a 리뷰 쓰기 Write a review button. Tap it to write a review on that shop's screen. For an order you have already reviewed, it changes to 후기 보기 View reviews or 리뷰 수정 Edit review. If you write a review, you can earn extra mileage (full-member benefit).
Product orders tab
The 상품 주문 Product orders tab shows products you bought in the shopping mall. Each row shows the product photo, shop name, product name (“and N more” if there are several), amount, a status badge (Order received · Preparing for shipment · Shipping started · Delivered · Canceled) and the receiving method (courier delivery · in-store pickup). Tap 전체 화면으로 보기 View full screen at the top right to open the product order status, which also shows the shipping steps. For details, see Chapter 9.
Viewing order details
Tap an order card on the home screen or a row in Usage history to open the order details.
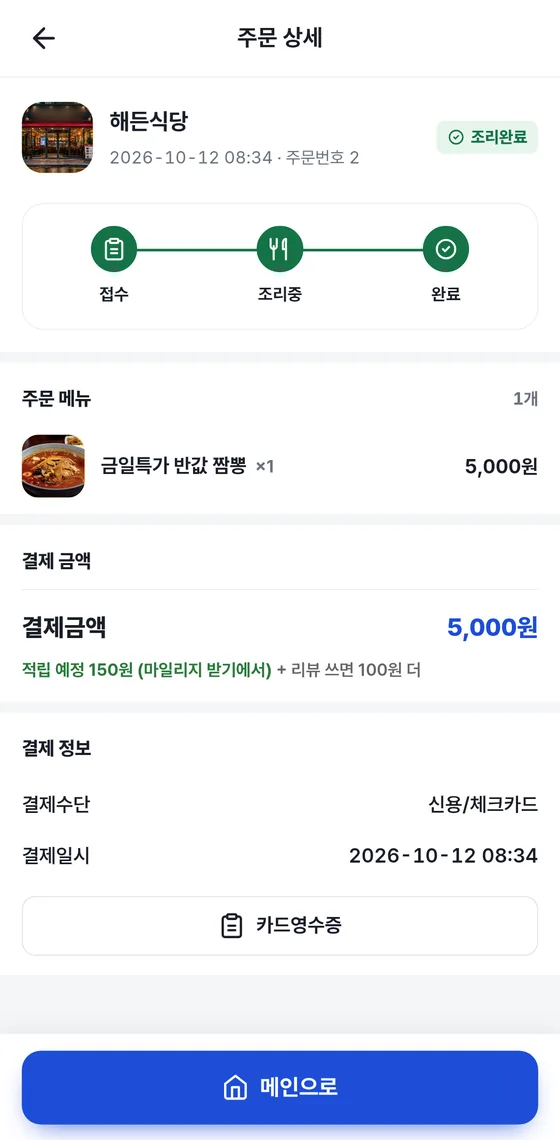
| Area | What you see |
|---|---|
| Top | The shop photo and name, order time, order number and status chip. |
| Progress steps | There are 3 steps: Received ▸ Cooking ▸ Done. Steps that have passed light up in green. While the food is being cooked, you see “About N min left” or “It will be done soon”. |
| Ordered menu items | The menu item photo, name, quantity and amount are shown. Options appear below the menu item as (+amount). If the order has special requests, they appear separately in the “Special requests” area. |
| Payment amount | The large blue text is the payment amount. If it differs from the order amount because you used mileage or similar, it is split into three lines: “Order amount”, “Discount/amount used” and “Payment amount”. |
| Expected mileage | Below the payment amount, you see “Expected ○ KRW (from Claim mileage)” and “+ ○ KRW more if you write a review”. If you have already claimed it, this changes to “○ KRW mileage earned”. It does not appear for canceled orders. |
| Payment information | The payment method (credit/debit card; cash is shown as “Cash (paid at the counter)”) and the payment date and time are shown. Below that is the 카드영수증 Card receipt button. |
| Bottom | Tap 메인으로 Back to main to go to the home screen. On the Quick Pay details screen, 매장 보기 View store and 다시 결제하기 Pay again appear. |
Status chips
| Chip | Meaning |
|---|---|
| Food order received | The shop has received the order. |
| Cooking | Cooking is in progress. |
| Ready | The shop has reported that the order is ready. For takeout orders, this is when you go to pick it up. |
| Cooking done | Cooking is finished. |
| Order canceled | This is a canceled order. Instead of the progress steps, the message “This order has been canceled. The amount you paid will be refunded according to your card issuer's policy.” appears. |
| Checking status | The status could not be loaded yet. Open it again in a moment. |
While an order is received or being cooked, the screen refreshes the status every 5 seconds. When cooking starts, you see “Cooking has started!”, and when the food comes out, “Your food is out!” appears. If you are not looking at the screen, it does not refresh. Notifications may not arrive, depending on your phone settings and how you ordered.
For an order that has not been paid yet, “Amount to pay” is shown instead of “Payment amount”, along with the message “This order hasn't been paid yet.” At a pay-later store, this is followed by “Please pay all at once at the counter when you leave.”, and otherwise by “Your order goes ahead once payment is complete.”
Mileage shown as “Expected” is not added directly from the order details. You get it by tapping the “Claim ○P mileage” card on the 혜택 Benefits tab, which opens the 마일리지 받기 Claim mileage screen, and then tapping 받기 Receive there. Mileage can be used only at the shop where it was earned and can't be refunded as cash.
Viewing the card receipt
- In the payment information near the bottom of the order details, tap 카드영수증 Card receipt.
- Check the approval details on the card receipt screen.
- When you are done, tap 확인 OK to go back.
| Area | What you see |
|---|---|
| Top | The Gpay logo, the merchant name and the “Card approval amount” in large type. A canceled payment gets a 결제취소 Cancel payment badge, and its amount has a strikethrough. |
| Payment breakdown | For an order where you also used mileage, “Order amount”, “Mileage used” and “Card approval amount” are shown. If you did not use mileage, this area is not shown. |
| Transaction info | You see the card type, card number (partly hidden), installments (pay in full or N months), card approval code, payment date and time, order number, and ordered menu items. If there are several menu items, it shows “○○ and N more”. |
| Cancellation info | For canceled payments, the cancellation date and time and the canceled amount appear in red text. |
| Card receipt amount | Shows the supply amount, VAT, and the total amount. |
| Seller info | Shows the business name, representative name, business registration number, phone number, and business address. |
| Bottom | The notice “This screen is for checking card approval details and does not replace a tax invoice.” and the 확인 OK button. |
A payment split across 2 or more cards (multi-card payment) is shown in a separate block for each approval, such as “Transaction info (Payment 1/2)”, and the amount at the top is shown as “Total card approval amount”. Multi-card payment is a full-member benefit, and you can split a payment across up to 3 cards.
A card receipt exists only for orders paid by card. For an order with no card payment, the screen says “This order has no card payment details.” This screen is for checking approval details and does not replace a tax invoice.
The order card on Home has disappeared.
Cards show only orders that have been received or are being cooked. A card disappears once serving is finished or when you close it with ✕ at the top right. Find the order under 마이 My ▸ 결제 현황 Payment status.
I can't see my payment history.
Payment status shows only the last 6 months of payments. Check that the period chip is set to 전체 All and that no shop name is left in the search field.
The 리뷰 쓰기 Write a review button is missing.
Orders that have been received or are being cooked, and canceled orders, have no button. Open the order again after serving is finished.
When do I get my mileage?
The “Expected mileage” amount in the order details is added only when you tap 받기 Receive on the 마일리지 받기 Claim mileage screen in the 혜택 Benefits tab. You can earn more if you write a review. This is a full-member benefit.
What happens to the refund for a canceled order?
A canceled order shows the notice “The amount you paid will be refunded according to your card issuer's policy.” The refund timing depends on the card issuer.
Can I get a tax invoice from the card receipt?
No. The card receipt is a screen for checking card approval details. It does not replace a tax invoice.
9Shopping mall
The Gpay mall is where you choose products that merchants have listed, pay in the app, and receive them by courier. The merchant is the one selling the products. Gpay is a mail-order intermediary, so the seller is responsible for product information and transactions.
Shopping mall home
Tap 쇼핑몰 Shopping mall in the bottom tabs to open the shopping mall home. At the top, to the right of the Gpay mall logo, there are the 장바구니 Cart button (it shows the number of items you added) and the 마이쇼핑 My shopping button.
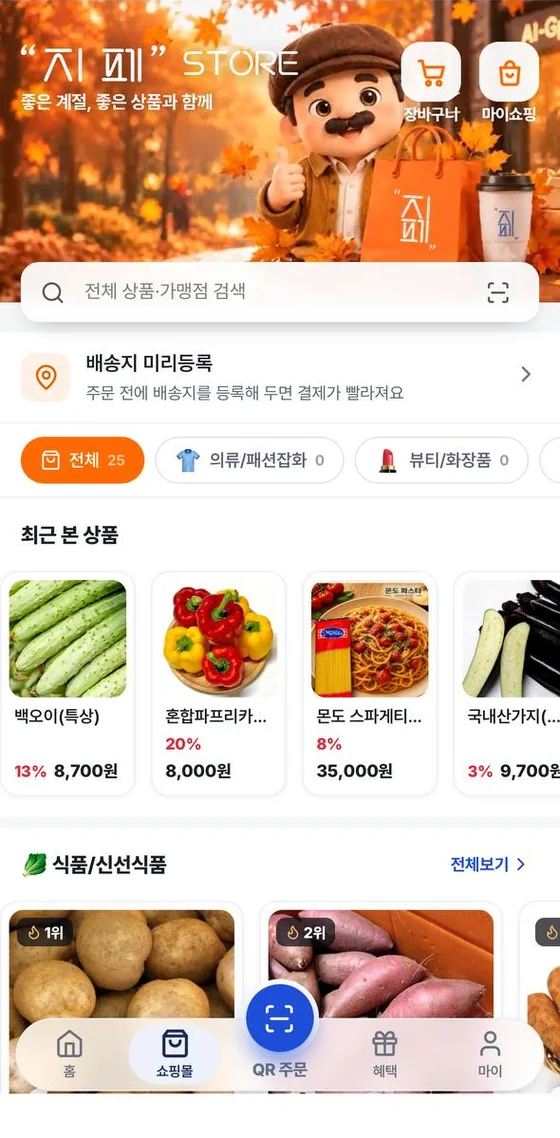
| Area | What you do |
|---|---|
| Search bar | Type a product or merchant name in “Search all products and merchants”. While you type, a button appears on the right. Tap ×, which clears the search text and returns you to Home. Tap the scan icon on the right to open the QR order screen. |
| Recent searches | Your recent search terms appear as chips (up to 5). Tap a chip to search again, and tap the × on a chip to delete just that one. 전체 삭제 Delete all deletes them all. |
| Pre-register address | This is the row that says “Register your delivery address before ordering to pay faster”. Tap it to open delivery address management. |
| Category chips | There is the 전체 All chip and chips for Clothing / Fashion accessories, Beauty / Cosmetics, Food / Fresh food, Processed food / Convenience meals, Health food, Electronics / Digital, Home / Kitchenware, Furniture / Interior, Baby and kids / Maternity, Pets, Sports / Leisure, Stationery / Hobby / Books, and Other. The number next to a chip is the number of products in that category. When you select a chip, the search text is cleared and that category's products appear in a list. |
| Recently viewed products | Products you viewed in the product details are collected on the home screen. |
| Popular products by category | Each category has a horizontal list, and a rank badge sits on top of each photo. |
Reading a product card
| What you see | Meaning |
|---|---|
| Photo · product name · selling merchant | The photo is the product photo uploaded by the selling merchant. If there is no photo or it can't be loaded, a box-shaped icon appears instead. |
| ○% (red text) | The product is on sale. The discount rate and the discounted price appear side by side below the product name. |
| Heart | Tap it to add the product to your saved items. Tap it again to remove it. |
| 할인매장 Discount stores | The merchant has discounted products, or this product is on sale. |
| 리뷰 이벤트 Review event | You can earn extra mileage on this product by writing a review (full-member benefit). |
| 마일리지 ○% Mileage ○% | When a full member buys this product, that percentage is earned as mileage (full-member benefit). The percentage differs by merchant and product. Mileage can be used only at the shop where you earned it, and it can't be refunded as cash. |
| ★ Rating (number of reviews) | The average star rating of product reviews and the number of reviews. |
| ○ left · Sold out | When stock is running low, “○ left” appears in red text. When there is no stock, “Sold out” appears over the photo. |
Searching
- Type a product or merchant name in the search bar.
- Press the search key on the keyboard. The app searches all categories and shows a list titled “Search for '○○' in all products”.
- Scroll down to load more products. You can also tap 더 보기 Show more below the list. If products can't be loaded, 다시 불러오기 Reload appears.
- If there are no results, the message “No results for '○○'. Change your search term or browse all products.” appears. Tap 전체 상품 보기 View all products to return to Home.
If you open a product page and then go back, your search term, category, and scroll position are as you left them. If you re-enter the shopping mall from the bottom tab, you start from Home.
Product details
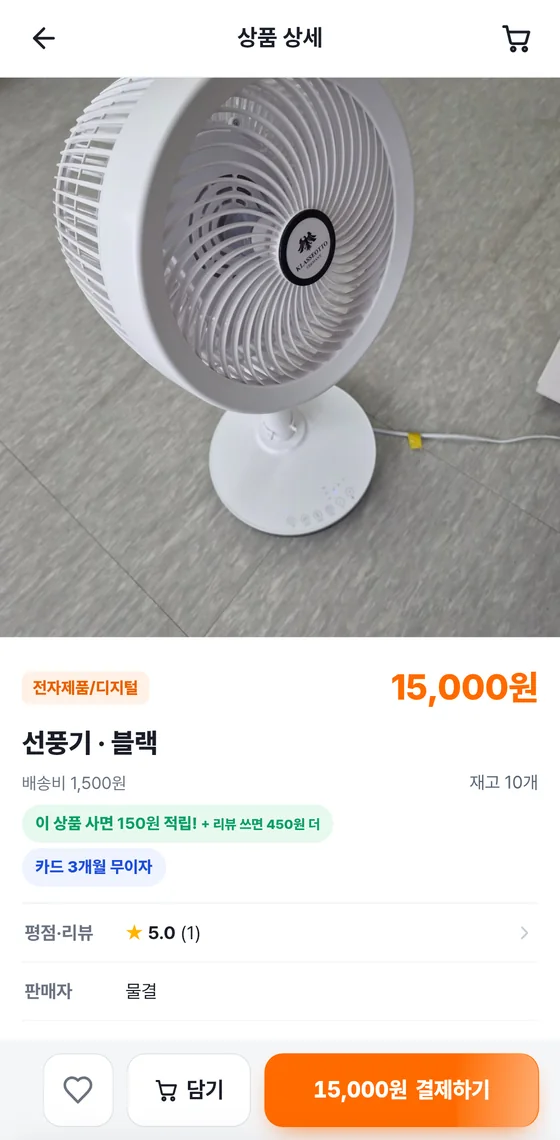
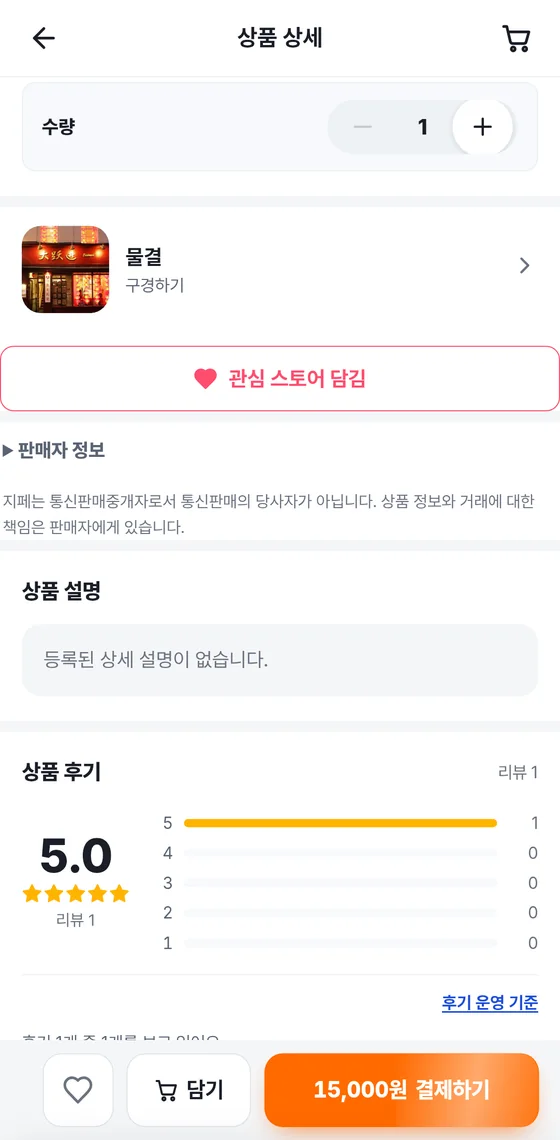
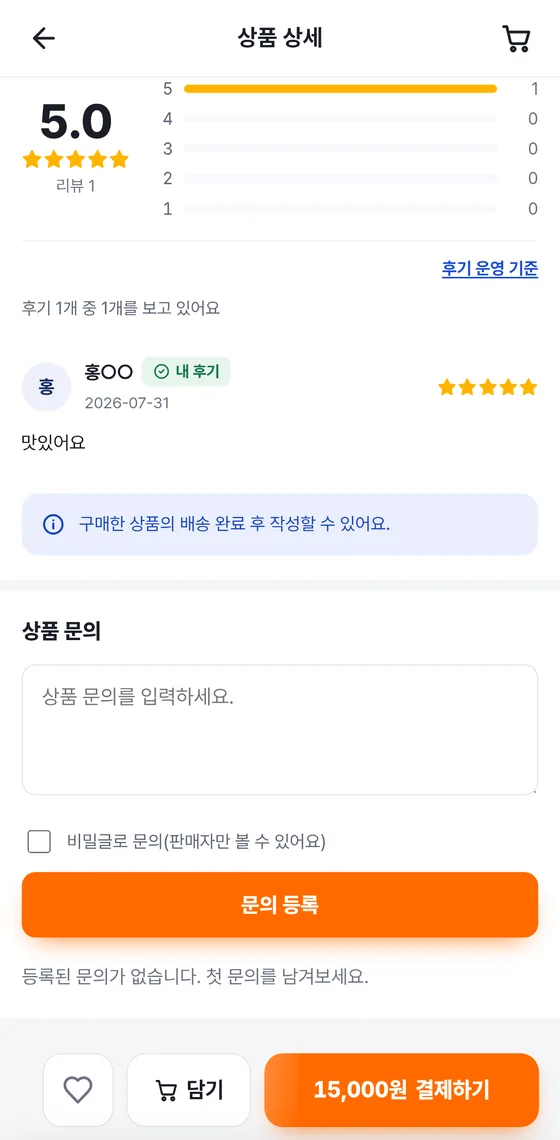
- Tap a product card on the shopping mall home or in the search results to open the product details.
- If there are several photos, swipe left or right to see them. The dots below the photo and the “1 / N” indicator show which photo you are on.
- If the product has options, choose from the chips under “Option”. For an option with many values, tap 옵션 선택 Choose option and choose from the sheet. You can't choose a sold-out option. If you add the product to the cart without choosing a required option, a message says “Please select '○○'.”
- Set the quantity. +stops at the remaining stock, and “Only N in stock” appears.
- Tap 담기 Add to cart to add the product to your cart, or tap 결제하기 Pay to order right away. When you add it, “Added to cart” and 보러가기 Go see appear briefly.
- Tap 구경하기 Browse on the seller card to see other products that seller offers.
When you change the options and quantity, the amount on the 결제하기 Pay button changes with them. For a product with no options you can choose, the message “There are no options available to buy right now. Please choose another product.” appears.
| Area | What you see |
|---|---|
| Top | The back button, the “Product details” title, and the cart icon (with the number of items in the cart). |
| Shipping fee · stock | It shows “Free shipping” or “Shipping fee”, and “○ in stock”. When stock is running low it changes to “○ left”, and when there is none it changes to “Sold out”. |
| Mileage notice | It shows “Buy this product and earn ○ KRW! + ○ KRW more if you write a review” (full-member benefit). A product that doesn't earn mileage has “Mileage excluded” next to its name. |
| Rating · reviews | The average star rating and the number of reviews. Tap it to jump to the reviews below. |
| Seller card | The seller's name and 구경하기 Browse, with the 관심 스토어 Favorite stores button below. Once added, it changes to “Favorite store added”. |
| Seller info | Tap it to expand. It shows the business name, representative, business registration number, mail-order business number, address, contact details, and return address (this may not appear depending on the app version). Even when it is collapsed, the notice “Gpay is a mail-order intermediary and is not a party to the mail-order sale.” is shown below. |
| Product description · details | This is the description uploaded by the seller. If the details are long, tap 상세정보 더 보기 Show more details to expand them and 접기 Collapse to collapse them. If there is no description, “No detailed description has been registered.” appears. |
| Bottom bar | Save (heart), 담기 Add to cart (it changes to “Added” once added), and “Pay ○○ KRW”. If the product is sold out, it changes to one of 품절 Sold out, 재고 없음 Out of stock, or 옵션 품절 Option sold out, and you can't tap it. |
For a product whose seller information has not been registered yet, a notice says it can't be purchased, and 담기 Add to cart and 결제하기 Pay may be blocked (this may not appear depending on the app version). Once the seller registers the information, you can buy it.
Viewing and writing product reviews
- The review area shows the average star rating, the number of reviews for each star rating, and the review list. Reviews you wrote carry a 내 후기 My reviews mark, and when the seller replies, it appears as “Seller reply”. Tap a review photo to see it larger. Use the 후기 운영 기준 Review guidelines link to check the review guidelines.
- Only people who bought the product and whose delivery is complete can write a review. If your delivery isn't complete yet, the message “You can write a review after the purchased product is delivered.” appears.
- If you can write a review, choose a star rating (1 to 5), write your review (up to 500 characters), and tap 후기 등록 Post review.
- You can earn extra mileage by writing a review (full-member benefit). You can also write one from 리뷰관리 Manage reviews in My shopping or from 후기 쓰기 Write review in the order details.
Sending a product inquiry
- Write your inquiry in the “Product inquiry” field (up to 300 characters).
- To let only the seller see it, check 비밀글로 문의(판매자만 볼 수 있어요) Private inquiry (only the seller can see). A private inquiry has a padlock icon.
- Tap 문의 등록 Post inquiry. “Your inquiry has been posted.” appears, and the inquiry is added to the list as “Q.”. Until the seller answers, it shows “Awaiting reply”, and once answered, the answer appears as “A.”.
- Inquiries you wrote carry a 내 문의 My inquiries mark. You can see them all together under 내 문의 My inquiries in My shopping.
Cart
Products you add are grouped by selling merchant. Each group shows the merchant name and number of products, each product's photo, name, and options, the quantity − +, and the price. Products in your cart stay there even if you reopen the app.
- On the product row, change the quantity with + −. You can't add more than the stock, and the message “You can add up to ○ of the selected product.” appears.
- To remove a product, tap × to the right of it. “Product removed” appears together with 되돌리기 Undo, so if you removed a product by mistake, tap the button right away.
- Check the “Product amount” below the group and tap ○○원 주문하기 Order for ○○ KRW. Each merchant has its own order button.
- Orders are created separately for each merchant. Check the shipping fee and payment on the next screen.
- Price and stock are checked again when you order. A sold-out product gets a “Sold out” label and is left out of the order. For a sold-out row, tap ×to remove it.
Paying in the shopping mall
Tap 결제하기 Pay in the product details or 주문하기 Place order in the cart to open the “Order / Payment” screen.
- Check the “Delivery address”. Your default delivery address is filled in automatically. Tap 변경 Change to choose from your saved delivery addresses, or add one with 새 주소 New address. If you have no delivery address, “Please register a delivery address” appears.
- Check the product name, options, and quantity under “Product”. For products where the seller has set a free-shipping threshold, a notice may show how much more you need for free shipping (this may not appear depending on the app version).
- Tap the “Payment method” row, choose 등록카드 결제 Pay with saved card or 앱결제 App Pay, and tap 선택 완료 Done selecting.
- To use mileage, tap 전액 사용 Use full amount under “Mileage” or enter an amount. The usable amount is shown, and mileage can be used in units of one hundred KRW (full-member benefit). If the notice “Step 1 · Choose a payment method. You will use mileage and pay on the next screen.” appears at the top of the screen, tap 다음 Next and use your mileage and pay on the screen that follows.
- Under “Final payment amount”, check the product amount, shipping fee, total purchase amount, mileage used, and the amount to be paid.
- Check “I have reviewed my order and agree to the payment”, then tap ○○원 결제하기 Pay ○○ KRW below. You can tap the notice “When you pay, your shipping information is provided to the seller” to read its details.
| Payment method | What you do |
|---|---|
| Pay with saved card | Pay with a card you have registered in Gpay. Tap 결제하기 Pay to open the card selection screen and choose your cards. If you choose 2 or more cards (up to 3), after 선택 완료 Done selecting you set the percentage for each card yourself. The last card covers any leftover odd amount. Multi-card payment is a full-member benefit. |
| App Pay | Verify in your card issuer's app and pay right away. If an internet (browser) screen opens after verification, return to the Gpay app. The completed payment is shown in the Gpay app. |
For reasons on the card issuer's side, some cards can't be used for saved-card payment in the shopping mall. Such cards are marked under 마이 My ▸ 카드관리 Manage cards with the message “Card payment isn't available with this card in the shopping mall (due to the card issuer). Please use App Pay.” (this message may not appear depending on the app version). When you pay in the shopping mall with such a card, choose 앱결제 App Pay.
When you choose 앱결제 App Pay, the mileage message changes. If you see the message “App Pay can't be combined with mileage right now, so the full amount is charged to your card”, choose 등록카드 결제 Pay with saved card for an order where you want to use mileage.
Delivery address management
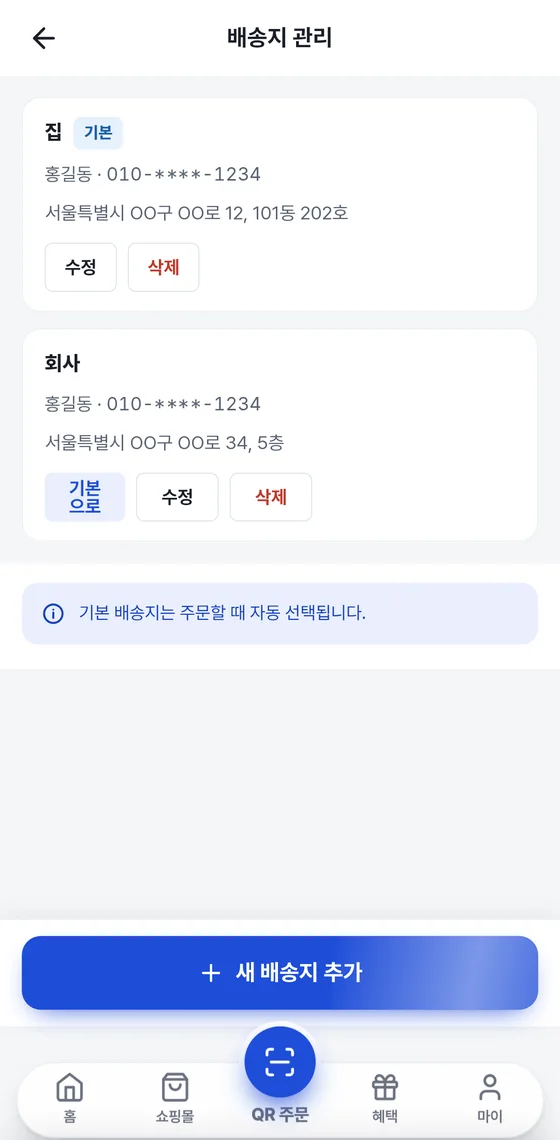
You can open delivery address management in three places: 배송지 관리 Manage addresses in 마이 My, 배송지 미리등록 Pre-register address on the shopping mall home, and 변경 Change ▸ 새 주소 New address for the delivery address on the order / payment screen.
- Tap 새 배송지 추가 Add new address.
- Enter the “Nickname” (for example, Home or Work), “Recipient”, and “Phone number”. The recipient and address are required.
- Under “Address”, tap 주소 검색 Search address and choose the postal code and main address, then enter the building and unit numbers under “Detailed address”. If address search doesn't open, enter the postal code and address yourself.
- In “Delivery note”, you can write something like “Please leave it at the door”. To save your current location, tap 현재 위치(GPS) 담기 Use current location (GPS). Location permission is required.
- If you use this address often, turn on 기본 배송지로 설정 Set as default address. The default delivery address is selected automatically when you order.
- Tap 저장 Save. “Delivery address saved” appears.
- To change your default delivery address, tap 기본으로 Make default on another address.
- To edit an address, tap 수정 Edit. To delete it, tap 삭제 Delete. Deleting asks you once more: “Delete this delivery address? A deleted delivery address can't be restored.”
My shopping
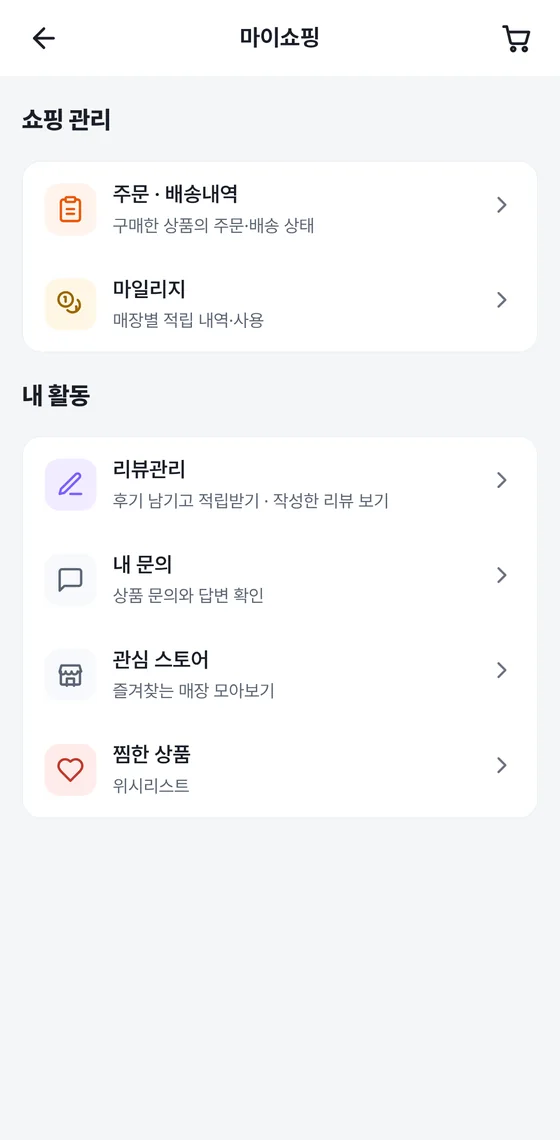
Tap 마이쇼핑 My shopping at the top right of the shopping mall home to open it.
| Menu | What you do |
|---|---|
| Orders · delivery history | Shows the order and delivery status of the products you bought. The 상품 주문 Product orders tab of the usage history opens, and tapping 전체 화면으로 보기 View full screen above the list opens the product order status. |
| Mileage | See the mileage you earned and used at each store (full-member benefit). Mileage can be used only at the merchant where you earned it. |
| Review management | Leave a review and earn mileage. You can also see the reviews you have written. |
| My inquiries | Check your product inquiries and the seller's answers. |
| Favorite stores | See your favorite stores in one place. |
| Saved items | See the products you tapped the heart on (“Wishlist”). |
Product order status
Open it from 상품 주문현황 Product order status (“Check shipping, cancellations, and returns”) under 마이 My. You can also open it with 전체 화면으로 보기 View full screen on the 상품 주문 Product orders tab of the usage history. It has four tabs and a store name search field, and order cards stack up below.
| Tab | Orders shown |
|---|---|
| In progress | Orders whose delivery isn't complete yet. |
| Delivered | Orders whose delivery is complete. |
| Canceled | Orders for which you requested cancellation. |
| Returned | Orders for which you requested a return. |
| Status badge | Meaning |
|---|---|
| Order received | The seller is reviewing the order. |
| Preparing for shipment | The seller is preparing the product. |
| Shipping started | The parcel is on its way. A courier company and tracking number appear. |
| Delivered | Delivery is complete. You can confirm the purchase and write a review. |
| Canceled | The order has been canceled. |
A card shows the order number and time, product photo, store name, product name (“and N more” if there are several), store phone number, the amount and “○ products · shipping fee”, and the receiving method (courier delivery · in-person pickup). The photo is the photo of the product you ordered. Depending on the app version, a step row (Order received, Preparing for shipment, Shipping started, Delivered, Purchase confirmed) appears below the card with the current step lit as a blue dot, and a one-line message that matches the step is shown below the row. A delivered card also shows the 리뷰 쓰기 Write a review and 재주문 Reorder buttons.
Order details
Tap a card to open the order details.
| Area | What you see |
|---|---|
| Order info | The order number, receiving method, and order time. |
| Amount info | The product amount, shipping fee, mileage used, and payment amount. |
| Purchase confirmation | After you receive the product, tap 구매확정 Confirm purchase. When you confirm the purchase, you earn mileage (full-member benefit). After confirmation, 리뷰 쓰고 마일리지 더 받기 Review for extra mileage appears. |
| Shipping info | It shows the delivery address, courier company, and tracking number. Tap 복사 Copy to copy the tracking number, and 배송조회 Track delivery to open the courier tracking screen. Before shipment, a shipping notice appears instead of the tracking number. |
| Product list | Each product shows its quantity, price per item, and options. Next to a product, the 취소 신청 Request cancellation, 반품 신청 Request return, and 후기 쓰기 Write review buttons appear as appropriate. After you submit a request, it changes to “Cancellation requested” or “Return requested”. |
| Card approval details | Tap 카드 정보 보기 Show card info to expand the card, installments, approval code, transaction number, and approval result, and tap 카드 정보 접기 Hide card info to collapse them. If the payment was canceled, the canceled amount and cancellation transaction number are also shown. |
| Seller info | It shows the store name, representative name, business registration number, mail-order business number, phone number, business address, and customer center operating hours. |
| Bottom | 내 취소·반품 내역 보기 View my cancellations and returns and 재주문 Reorder. Reorder adds the products to your cart again at the current price and stock. Sold-out or discontinued products can't be added. |
Confirming a purchase
- When you have received a delivered product, tap 구매확정 Confirm purchase in the order details. The same button may also appear on the list card.
- When “Confirm your purchase? It can't be canceled after confirmation.” appears, tap 구매확정 Confirm purchase.
- “Purchase confirmed” appears, and full members earn mileage.
Requesting a cancellation or return
- In the product list of the order details, tap 취소 신청 Request cancellation or 반품 신청 Request return next to the product.
- Set the “Quantity to request” in the sheet that opens.
- Choose a reason chip or write your own (up to 100 characters). For a cancellation, choose from “I changed my mind”, “I ordered by mistake”, “Delivery is too slow”, and “I want to reorder”. For a return, choose from “The product is damaged or defective”, “I received a different product”, “It differs from the description”, and “I changed my mind”.
- Tap 신청하기 Submit request. “Your cancellation request has been received” or “Your return request has been received” appears.
- You can cancel only before shipping starts. Request a return within 7 days after delivery is complete. If the product is defective or differs from what you ordered, contact the seller even after the deadline.
- After you submit a request, it is added to the “Canceled” or “Returned” tab, and its status changes from “Pending approval” to “Approved” (or “Rejected” with the reason for rejection).
- Refunds are processed after the merchant approves them. Seller approval and the completion of the card refund are different things. Check whether you were refunded and how much under “Card approval details” in the order details and in Payment status.
- At the very bottom of the order details, you can see the progress of all your requests together under 내 취소·반품 내역 보기 View my cancellations and returns. This screen has the notice “After approval, a card refund takes 3 to 5 business days.”
Saved items · Favorite stores
- To save a product, tap the heart on the product card or on the product details. “Saved” appears. Tap it again and “Removed from saved items” appears. A sold-out product has a “Sold out” label on its card.
- To add a favorite store, tap 관심 스토어 Favorite stores on the seller card in the product details. “Added to favorite stores” appears. After you add it, the button changes to “Favorite store added”, and if you tap it again, “Removed from favorite stores” appears.
- The saved items list shows the product name, selling merchant, and price, and the favorite stores list shows the store name, address, and “○ on sale”.
- If a list is empty, “You have no saved items yet” or “You have no favorite stores yet” appears, along with 쇼핑몰 둘러보기 Browse the mall.
Who sells the products in the shopping mall?
They are products sold by merchants that have joined Gpay. Gpay is a mail-order intermediary, so the seller is responsible for product information and transactions. Check the seller's details under 판매자 정보 Seller info in the product details.
My card payment doesn't work.
For reasons on the card issuer's side, some cards can't be used for saved-card payment in the shopping mall. On the order / payment screen, change the payment method to 앱결제 App Pay, then verify in your card issuer's app and pay. In some cases you can find out in advance from the notice below the card row under 마이 My ▸ 카드관리 Manage cards.
When do I earn mileage?
In the shopping mall, mileage is earned when you tap 구매확정 Confirm purchase or write a review. It is a full-member benefit, and it can be used only at the merchant where you earned it. It can't be converted into cash.
Can I order products from different merchants at once?
You can put them in one cart, but orders are created separately for each merchant. Each merchant has its own 주문하기 Place order button, and shipping fees are calculated separately.
How can I see where my delivery is?
Under 마이 My ▸ 상품 주문현황 Product order status, tap the order to open the order details. Once shipping starts, the courier company and tracking number appear, and tapping 배송조회 Track delivery opens the courier tracking screen.
I ordered by mistake. How do I cancel?
If shipping hasn't started yet, request a cancellation with 취소 신청 Request cancellation in the order details. If it has already been shipped, request a return with 반품 신청 Request return within 7 days after delivery is complete.
Do I have to confirm my purchase?
Purchase confirmation means you confirm that you received the product properly. Mileage is added only when you confirm the purchase (full-member benefit), and you can't cancel after confirming. Tap the button after you have checked the product.
10Benefits · mileage
In the Benefits tab, you can see your mileage at a glance and claim the mileage earned after payments or reviews yourself. Mileage is a full-member benefit.
10.1 Benefits tab layout
Tap 혜택 Benefits in the tabs at the bottom of the screen to open it. From the top, you see the mileage card, the claim mileage strip, the shopping mall shortcut, and the member status strip, in that order.
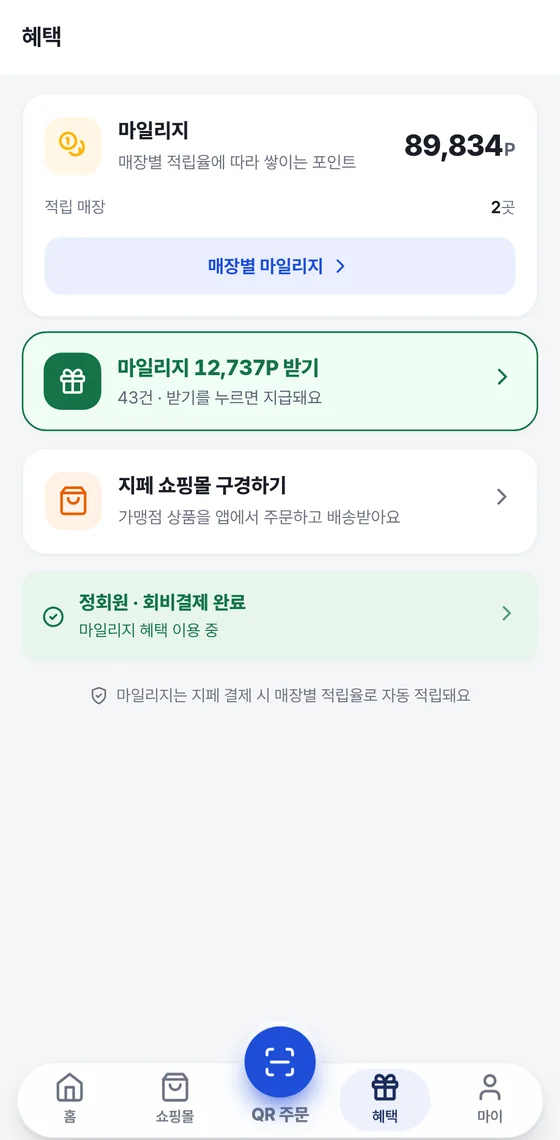
| Area | What you see on the screen | When you tap it |
|---|---|---|
| Mileage card | Mileage title and the large number on the right (your total mileage), and Earning stores: the number of stores where you have earned mileage | Tap 매장별 마일리지 Mileage by store to go to the mileage by store screen (10.2). |
| Green claim strip | Claim ○○P mileage and, below it, ○ items · Mileage is credited when you tap Receive | It goes to the claim mileage screen (10.3). When there is nothing to claim, it says There is no mileage to claim right now. |
| Browse the Gpay mall | Order merchant products in the app and have them delivered | Goes to the shopping mall screen. |
| Member status strip | For full members: Full member · Membership fee paid and Using mileage benefits | Goes to the membership fee history screen. |
| Notice at the very bottom | Mileage is earned automatically at each store's earning rate when you pay with Gpay | This is a message, not a button. Earned mileage is added to your own mileage only when you tap 받기 Receive (10.3). |
Mileage is a full-member benefit. If the annual membership fee has not been paid, the strip at the bottom changes to Annual fee unpaid · Pay to get your benefits and a 결제하기 Pay button appears. Multi-card payment, AI ordering, and Quick Pay are also full-member benefits (10.5).
10.2 Viewing mileage by store
Mileage builds up separately for each store. Check how much you have at which store on the mileage screen.
- In the bottom tab 혜택 Benefits, tap 매장별 마일리지 Mileage by store on the mileage card. Tapping 마일리지 Mileage in the 마이 My tab opens the same screen.
- Check the Total mileage on the navy card at the top. The card contains the notice Earned through “Claim mileage”, purchase confirmation, and review writing.
- In the line below the card, you can see the mileage earned through QR payment and the mileage earned through the shopping mall separately.
- In the Mileage by store list, check each store's photo, name, phone number, and the mileage earned there.
- Tap a store to open its earning history.
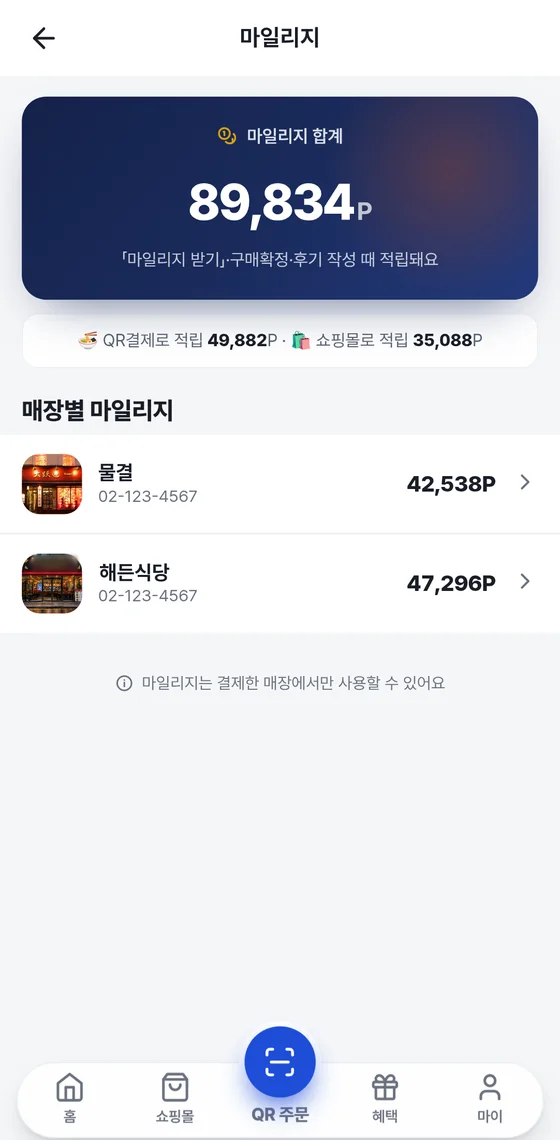
The total is the sum of the mileage at all stores. When you actually spend mileage, you can use only the amount earned at the store where you are paying (10.4).
| Screen state | Message you see | What to do |
|---|---|---|
| When you have no mileage | You have no mileage | After you pay or leave a review, claim your mileage under Claim mileage (10.3). |
| When it fails to load | Couldn't load your mileage · Please try again in a moment | Check your connection and reopen the screen. |
10.3 Claiming mileage
When a payment or purchase confirmation is complete, your share builds up as Mileage you can claim. It is added to your mileage when you tap 받기 Receive.
- Tap the green Claim ○○P mileage strip in the 혜택 Benefits tab. Below the strip, you can first see how many items you can claim.
- On the card at the top of the Claim mileage screen, check the mileage you can claim. Below the card, the QR payment amount and the shopping mall amount are shown separately.
- In the QR결제 QR payment tab, look at the Claim now list. Each item shows the store name, date, Earned from in-store payment, and the mileage you can claim.
- Tap 받기 Receive on the right of the item you want to claim. The mileage is added as soon as you tap the button.
- In the Review to get mileage list, tap 리뷰 쓰기 Write a review to leave a review. The extra mileage is added when you leave the review.
- Check products you bought in the shopping mall on the 쇼핑몰 Shopping mall tab. If you received the product properly, confirm the purchase with 확정하기 Confirm. After you confirm, this item disappears from the list, and the review mileage for the same order appears in 리뷰 쓰고 받기 Review to get mileage.
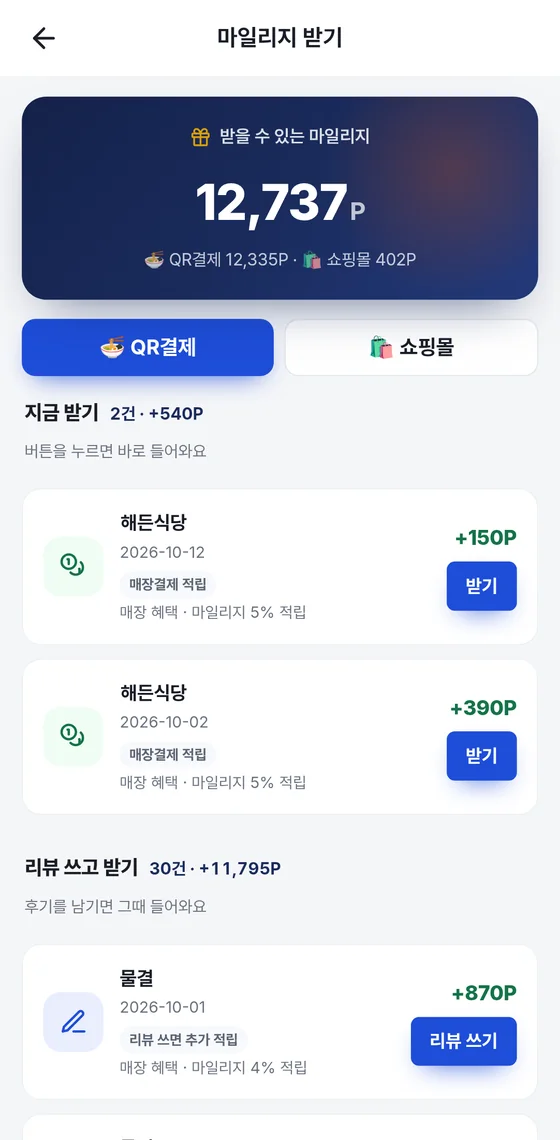
| Mark in the list | Button | When mileage is added |
|---|---|---|
| Earned from in-store payment (QR payment) | 받기 Receive | As soon as you tap the button |
| Extra mileage for a review (QR payment) | 리뷰 쓰기 Write a review | When you leave a review |
| Earned on purchase confirmation (shopping mall) | 확정하기 Confirm | When you confirm the purchase |
| Extra mileage for a review (shopping mall) | 리뷰 쓰기 Write a review | When you leave a review |
You can't cancel after you confirm the purchase. Tap the button after you have received and checked the product.
Mileage in Review to get mileage has not been received yet. The total on the card above includes this amount too, but it is added only after you leave a review. Items you have claimed disappear from the list.
- Each item shows that store's earning rate, such as Store benefit · ○% mileage earned. The earning rate differs by store.
- The order details screen also tells you your share in advance with To be earned … (in Claim mileage).
- When there is nothing to claim, You have no mileage to claim and It builds up here when you pay. Write a review to earn even more. appear.
10.4 Mileage usage rules
| Rule | Description |
|---|---|
| Where you can use it | Mileage can be used only at the store where you paid. You can't use it at other stores. |
| How to use it | Enter the amount to use in the Use mileage field on the payment screen, or tap 전액 사용 Use full amount. Amounts are entered in units of one hundred KRW. |
| How much you can use | How much you can use at one time depends on the store's policy and your mileage balance. When you can't use any, There is no mileage available to use appears. |
| Remaining amount | The amount left after paying with mileage is paid by card. You can split a payment across up to 3 cards at a time (full-member benefit). |
| Converting to cash | Mileage can't be converted into cash. |
| What earns mileage | QR payment, purchase confirmation in the shopping mall, and writing a review. You claim all of them in 10.3. |
| Earning and expiration rules | In the 마이 My tab, check the Mileage operation rules (earning · use · recovery · expiration) under 약관 보기 View terms. |
| Leave membership | The Leave membership screen warns that your mileage will disappear. Use it up before you leave. |
- In the cart, tap 주문하기 Place order to go to the payment screen.
- In the Use mileage area, check the Available at this store amount.
- Enter the amount to use, or tap 전액 사용 Use full amount.
- Choose a payment method and pay the remaining amount. The payment process is explained in detail in Chapter 6.
If you choose 앱결제 App Pay, a notice may appear saying that you can't use mileage together with it and the full amount is paid by card. To use mileage in that case, choose 등록카드 결제 Pay with saved card.
Mileage is a full-member benefit. Gpay mileage is points that build up store by store, so you can't use it outside the store where you paid.
10.5 Full-member benefits
A member who has paid the annual membership fee is a full member. Full members get the following benefits.
| Benefits | Description |
|---|---|
| Multi-card payment | Split a single payment across up to 3 cards in the proportions you want. You set each card's amount yourself (a slider for food orders, choosing a percentage in the shopping mall). |
| AI ordering | Get menu recommendations and place orders by chat or voice. It uses an external AI service (OpenAI). |
| Quick Pay | A quick in-store payment where you enter only the amount and pay right away. You can use it at Quick Pay stores. |
| Mileage | When you pay, mileage builds up at each store's earning rate, and you can use it again at the store where you earned it. |
The annual fee applies for 1 year from the payment date. Check the amount on the membership fee payment screen in the app.
Checking whether you are a full member
- If the strip at the bottom of the 혜택 Benefits tab says Full member · Membership fee paid, you are a full member.
- To the right of 회비 결제 내역 Membership fee history in the 마이 My tab, one of Paid, Unpaid, or Expired is shown.
- On the membership fee history screen, you can see the Last payment date and the Next payment date.
To pay the annual fee
- If the fee is unpaid, tap 결제하기 Pay on the strip at the bottom of the 혜택 Benefits tab.
- When the fee is unpaid, a Membership fee payment notice strip appears at the top of the 마이 My tab. You can also reach the same screen with 결제하기 Pay on that strip.
- On the membership fee payment screen, choose the card to pay with and tap 결제하기 Pay.
If the annual fee is not paid, some full-member benefits may be restricted. Check whether you are using your benefits on the strip at the bottom of the 혜택 Benefits tab.
11My
The My tab is a screen that gathers your cards, payment history, mileage, and account settings in one place. From the top, it is divided into Payment, Assets and activity, Account, and Support.
11.1 My screen layout
Tap 마이 My in the tabs at the bottom of the screen to open it. It is long, so scroll down and you will see that the menu is divided into four groups.
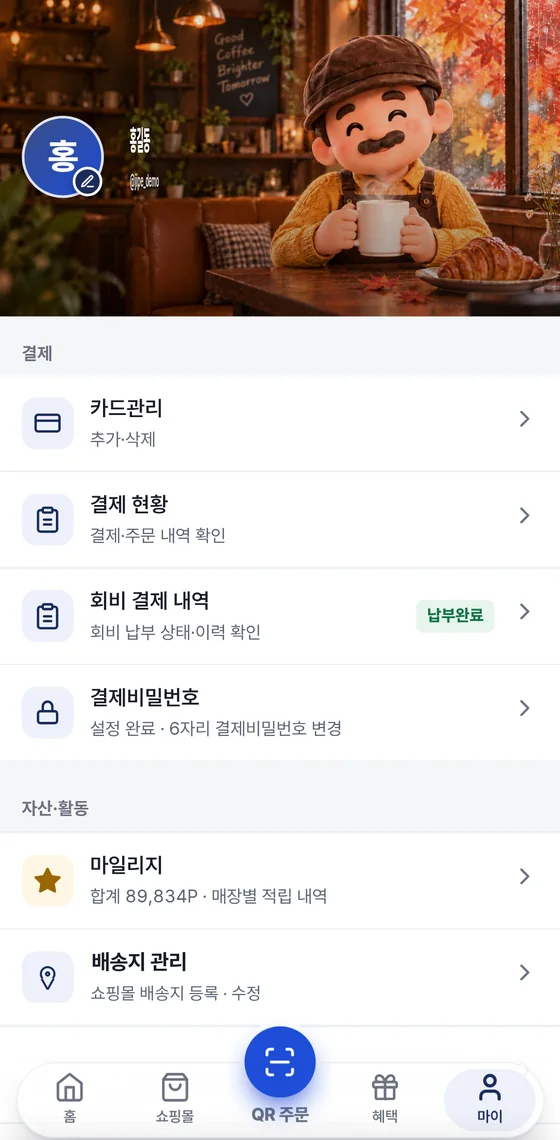
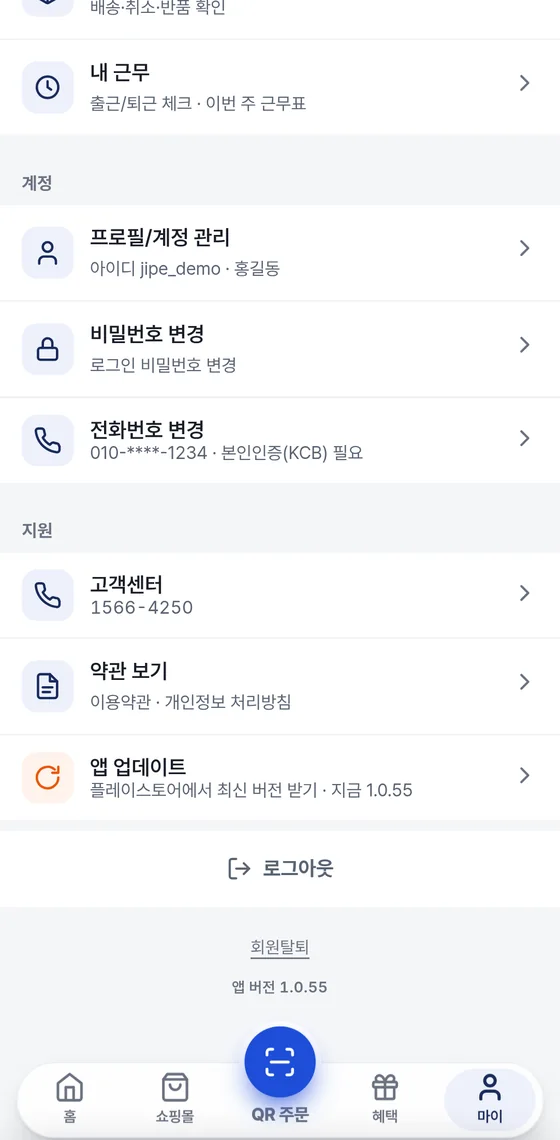
| Group | Menu | What you do |
|---|---|---|
| Payment | 카드관리 Manage cards · 결제 현황 Payment status · 회비 결제 내역 Membership fee history · 결제비밀번호 Payment password | Register and delete cards, see your payment history and membership fee status, and change your payment password. |
| Assets and activity | 마일리지 Mileage · 배송지 관리 Manage addresses · 상품 주문현황 Product order status · 내 근무 My work | Check your total mileage (full-member benefit), delivery addresses, shopping mall order status, and the attendance check of members who work as staff members. |
| Account | 프로필/계정 관리 Profile / account · 비밀번호 변경 Change password · 전화번호 변경 Change phone number | Manage your ID, nickname, email, password, and phone number. |
| Support | 고객센터 Customer center · 약관 보기 View terms · 앱 업데이트 App update | The inquiry phone number, the terms, and getting the latest version. |
The menus you see depend on your situation. For example, the 지문으로 결제 Pay with fingerprint row appears only on phones that support fingerprint or Face ID, and if your annual fee has not been paid, a membership fee payment strip appears under your profile. If your member information can't be loaded, it says Couldn't load your member information. Please try again in a moment.
11.2 Profile area
Your profile appears at the very top of the My tab. It shows a circle with the first letter of your name, your nickname (or your name if you have none), and your @ID, in that order.
- Tap the profile circle. There is a pencil mark at the lower right of the circle.
- In the Profile photo window, choose one of ten characters. It appears in the circle right away.
- Tap 완료 Done to close the window. To go back to the first letter of your name, tap 기본으로 Make default.
The character you choose is saved on the phone you are using now. If you change phones, you have to choose again. The 기본으로 Make default button appears only when you have already chosen a character.
11.3 Card management
This is where you register and delete the cards you use for payment. Among your registered cards, you can choose up to 3 and split a single payment across them (multi-card payment, full-member benefit). “Up to 3 cards” is the number of cards you can split a single payment across.
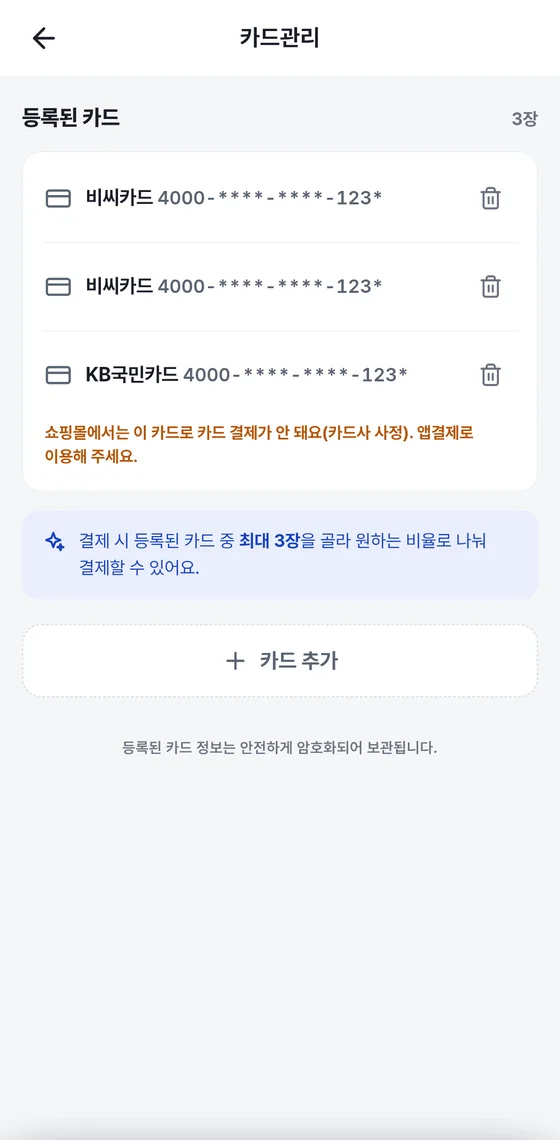
Registering a card
- In the 마이 My tab, tap 카드관리 Manage cards.
- Tap 카드 추가 Add card. The Enter your card information. window slides up.
- Enter the card number, expiry date, the first 2 digits of the card password, and your date of birth (or business registration number), in that order.
- Tap 추가하기 Add. When registration is complete, the new card appears in the list.
| Input field | How to enter |
|---|---|
| Card number | It is divided into four fields, and when one is full the cursor moves to the next. If you copied the card number, you can paste it into one field and it is split across the fields. For a 15-digit card (such as Amex), enter 3 to 7 digits in the last field. |
| Expiry date | Enter the month (MM) and the year (YY) separately. |
| First 2 digits of the card password | Enter only the first two digits of the card password. The digits you enter are hidden as ●●. |
| Date of birth or business registration number | For personal and sole-proprietor cards and corporate cards with a name on them, enter the cardholder's 8-digit date of birth (for example, 19900101). For corporate cards with no name, enter the 10-digit business registration number. |
Deleting a card
- In 카드관리 Manage cards, tap the trash icon on the right of the row of the card you want to delete.
- In the Delete this card? window, check the card name and number. A deleted card can't be used for payment.
- Tap 삭제 Delete. If you change your mind, tap 취소 Cancel.
| Notice below the card row | Meaning | What to do |
|---|---|---|
| This card's payment was declined. Delete it and register it again. | A card whose payment has been declined before. | After you tap 삭제 Delete, check the information and register the card again. |
| This card hasn't been used for payment yet. Please check that the information is correct. | A card that has been registered but never used for payment. | Check that the card number and expiry date are correct. If they are wrong, delete the card and register it again. |
| Card payment isn't available with this card in the shopping mall (due to the card issuer). Please use App Pay. | Cards from some card issuers can't be used for card payment in the shopping mall (this notice may not appear depending on the app version). | In the shopping mall, pay with the App Pay payment method (the card issuer's app). |
You can register and delete cards only in the app. Once you delete a card, you can't pay with it any more.
11.4 Payment status · Membership fee history
Payment status
Tap 결제 현황 Payment status in the 마이 My tab to open the Usage history screen. It has Payment status and Product orders tabs, and you can see your payment status for the last 6 months. Payment cancellations are shown as well. The period filter (All, Last 1 month, Last 3 months, Custom period), store name search, and card receipts are explained in detail in Chapter 8.
Membership fee history
The membership fee status is shown to the right of 회비 결제 내역 Membership fee history. It is one of Paid, Unpaid, or Expired. Tap it to open the membership fee history screen.
| Screen area | What you see |
|---|---|
| Gpay annual fee card | It shows the Member annual fee name and the current status badge (Paid · Unpaid · Expired). The payment amount is shown on this card as well. |
| Last payment date · Next payment date | It shows the date of your last payment and the next payment date. The number of days left (D- followed by a number) appears next to the next payment date. |
| Payment history | One row is added each time you pay. A card-approved payment shows Approved and an approval code, and a canceled one is marked Canceled. |
| Payment confirmed by administrator | A membership fee paid by bank transfer or similar is marked Payment confirmed by administrator after an administrator confirms it. |
If the fee is unpaid, a 결제하기 Pay button and a notice appear in the card area. You need to pay the annual fee to use full-member benefits such as multi-card payment, AI ordering, Quick Pay, and mileage (10.5).
11.5 Payment password · Fingerprint / Face ID
The payment password is the 6-digit number you use when you pay. It is different from your login password. If you turn on fingerprint or Face ID, you verify with your fingerprint or face instead of the number.
Changing your payment password
- In the 마이 My tab, tap 결제비밀번호 Payment password. Below the row it says Setup complete · Change 6-digit payment password.
- On the Confirm login password screen, enter your app login password and tap 다음 Next.
- On the New 6-digit payment password screen, enter the new 6-digit number on the numeric keypad.
- On the Please enter it once more screen, enter the same number again.
- When Your payment password has been changed appears, tap 확인 OK.
If you haven't created a payment password yet, the row says Not set yet · Set a 6-digit password. In that case, you skip the login password check and start directly by entering the new 6-digit number. If you forget your payment password, you don't need the old number either; just enter your login password and you can set a new one.
If the two entries differ, it says The passwords don't match. Please start over and goes back to the step for entering the new number. The number can only be 6 digits.
Turning on fingerprint / Face ID payment
- In the 마이 My tab, turn on the toggle in the 지문으로 결제 Pay with fingerprint row. This row appears only on phones that support fingerprint or Face ID, and on iPhone it is shown as Face ID.
- When the Pay with fingerprint? prompt appears, read it and tap 지문 등록하기 Register fingerprint. If you don't want to do it now, tap 나중에 Later.
- When you finish the fingerprint (or Face ID) check on your phone, it says Fingerprint payment is on.
- To turn it off, tap the same toggle again. It turns off right away.
- Your payment password is stored securely only on this phone. It opens only with your fingerprint and is not sent anywhere else.
- If your fingerprint doesn't work, you can always pay with your password.
- If you change your password or log out, what was saved is deleted. To use it again, turn the toggle back on.
- Payment goes through with any fingerprint registered on this phone. Don't register anyone else's fingerprint.
The 지문으로 결제 Pay with fingerprint row appears only when your phone supports fingerprint or Face ID and you have set a payment password. This row is not visible in the My screen example above.
11.6 Assets and activity
| Menu | What you see | When you tap it |
|---|---|---|
| 마일리지 Mileage | Total ○○P · Earning history by store | The mileage screen opens (Chapter 10, full-member benefit). |
| 배송지 관리 Manage addresses | Add / edit delivery address | A screen opens where you manage the addresses for receiving shopping mall products. The default delivery address is selected automatically when you order (Chapter 9). |
| 상품 주문현황 Product order status | Check shipping, cancellations, and returns | A screen opens where you see the status of shopping mall orders: In progress · Delivered · Canceled · Returned (Chapter 9). |
| 내 근무 My work | Clock in / clock out · This week's work schedule | This screen is where a member invited by a merchant as staff clocks in and out and views the work schedule. |
내 근무 My work is a menu for members registered as staff. If you're not staff, opening it only shows “You are not registered as staff at any store yet”, so you don't need to use it.
11.7 Account — profile and account management
Tap 프로필/계정 관리 Profile / account in the 마이 My tab to open the Profile/Account screen. From the top, you will see the groups Account info, Personal info and Security.
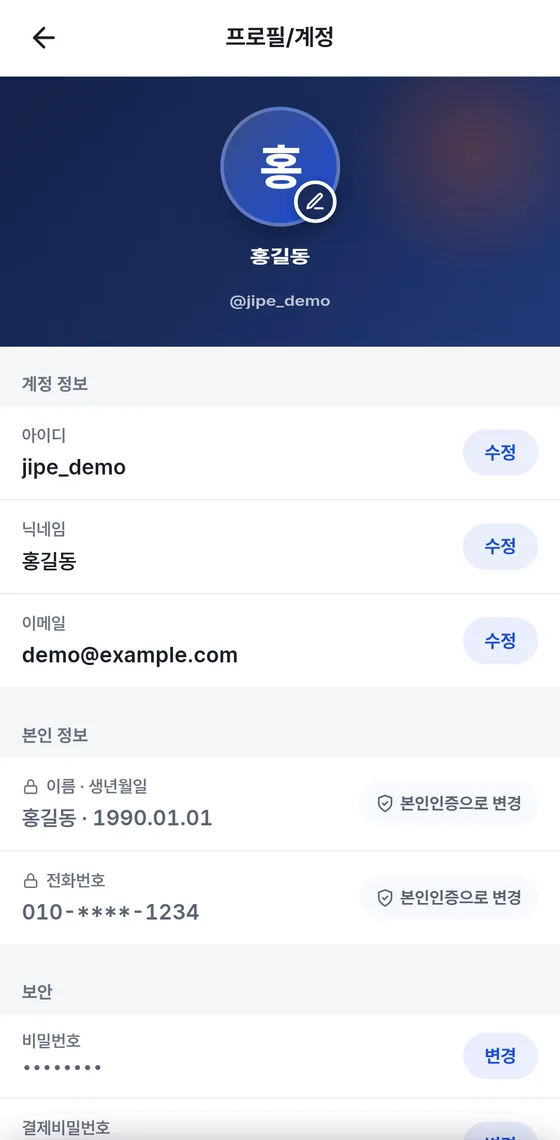
| Item | How to change it | Input rules |
|---|---|---|
| ID | 수정 Edit → enter a new ID → 중복확인 Check availability → when “This ID is available” appears → 저장 Save | Only English letters, numbers and _ are allowed, and the ID must have 4 or more characters. You must run the availability check first, or the ID won't save. |
| Nickname | 수정 Edit → enter a new nickname → 저장 Save | Enter 2 or more characters. |
| 수정 Edit → enter a new email (for example, example@email.com) → 저장 Save | Enter it in email address format. | |
| Name · date of birth | 본인인증으로 변경 Change via identity verification | These items are marked with a lock icon. You can't edit them directly; change them with phone identity verification (KCB). |
| Phone number | 본인인증으로 변경 Change via identity verification | The number is partly hidden, like 010-****-1234. Identity verification (KCB) is required. |
| Password (for logging in) | 변경 Change → current password, new password, new password again → 저장 Save | It must have 8 or more characters, with at least 1 each of English letters, numbers and special characters. |
| Payment password | 변경 Change | Takes you to the same screen as in 11.5. |
You can also open the same functions directly from the 비밀번호 변경 Change password and 전화번호 변경 Change phone number rows in the 마이 My tab. The row for changing your phone number says “Identity verification (KCB) required”.
If the new password and the re-entered one differ, it isn't saved and the app says “The new password and the re-entered password do not match.” If you change your ID, enter the new ID from your next login.
11.8 Support — customer center, terms and app updates
Customer center
The 고객센터 Customer center row shows the inquiry phone number 1566-4250. Tap the row to copy the number, and the app says “Customer center number copied”. Paste it into your phone app to call. Hours are 09:00–18:00 KST on weekdays, with lunch 11:30–12:30.
View terms
In 약관 보기 View terms, you can read the terms and policies of the Gpay service. This screen is only for reading, with no consent step, so tapping an item doesn't change anything.
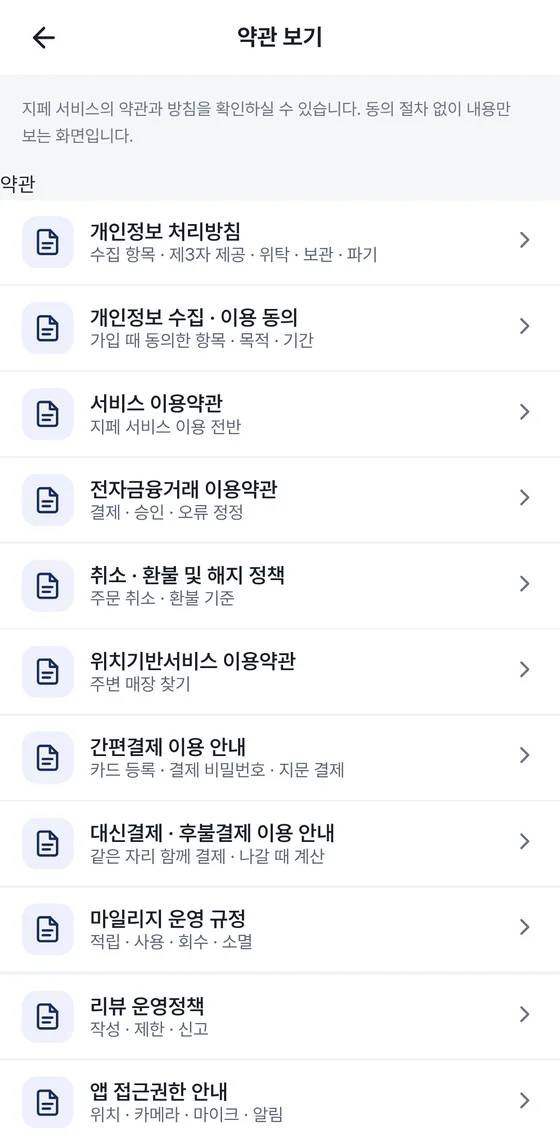
| Terms · policies | Content |
|---|---|
| Privacy policy | Items collected · provision to 3rd parties · outsourcing · retention · destruction |
| Consent to collection and use of personal information | Items · purpose · period you agreed to at sign-up |
| Terms of service | General use of the Gpay service |
| Terms of electronic financial transactions | Payment · approval · error correction |
| Cancellation, refund and termination policy | Order cancellation and refund rules |
| Location-based service terms | Finding nearby stores |
| Quick Pay usage notice | Card registration · payment password · fingerprint payment |
| Paying for others · pay-later usage notice | Paying together at the same table · pay when you leave (pay-later stores) |
| Mileage operating rules | Earning · use · recovery · expiration |
| Review policy | Writing · restrictions · reporting |
| App permissions notice | Location · camera · microphone · notifications |
| Youth protection policy | Harmful content blocking · reporting |
App update
- In the 마이 My tab, tap 앱 업데이트 App update. The row shows “Get the latest version from the Play Store” and the version that is currently installed.
- The Gpay app page in the app store opens: Google Play on Android, the App Store on iPhone.
- If you see an Update button on the app store page, tap it to download the update. If there is no button, you already have the latest version.
You can also check the installed version under App version at the very bottom. Tell us this version when you contact us to get help faster.
11.9 Log out and leave membership
Log out
- Scroll the 마이 My tab all the way down and tap 로그아웃 Log out.
- When the “Do you want to log out?” window appears, tap 로그아웃 Log out. To stop, tap 취소 Cancel.
- To use the app again, you need to log in with your ID and approval code.
Leave membership
At the very bottom of the 마이 My tab, below Log out, 회원탈퇴 Leave membership appears in small text.
- Tap 회원탈퇴 Leave membership. In the Gone when you leave notice, check that your mileage and payment records will be deleted.
- Under Reason for leaving, choose one of Not using it, Not enough benefits, Privacy concerns or Other. If you choose Other, write your reason yourself.
- Enter your login password in the Confirm password field.
- Tap 탈퇴하기 Leave and an “Are you sure you want to leave?” window appears. If you are sure, tap 탈퇴하기 Leave.
- When “Your withdrawal is complete” appears, tap 확인 OK.
When you leave, your card information is deleted and your existing member information can't be recovered. Your mileage and payment records are also deleted. Use up any remaining mileage before you leave. For the annual membership fee and refund rules, check Cancellation, refund and termination policy in 약관 보기 View terms.
12Frequently asked questions
We've gathered questions that come up often while using the app. The answers cover only what we confirmed on the screen, and each one lists the chapter number for more detailed steps.
12.1 Payment · cards
How many cards can I use for multi-card payment?
You can use up to 3 cards in one payment. If you select 2 or more cards on the payment card selection screen, multi-card payment starts. If you select a 4th card, the app says “Up to 3 cards can be selected.” You decide how much each card pays. For food orders, the slider moves in steps of one hundred KRW and the last card automatically covers the remaining amount. In the shopping mall, you choose the share each card pays, and the last card takes the leftover odd amount. Multi-card payment is a full-member benefit (6.4).
How do I register and delete a card?
Do it in 카드관리 Manage cards in the 마이 My tab. To register a card, tap 카드 추가 Add card, enter the card number, expiry date, the first 2 digits of the card password, and your date of birth (for a corporate card with no name, the business registration number), then tap 추가하기 Add. To delete a card, tap the trash icon on the right of the card row, then tap 삭제 Delete. You can register and delete cards only in the app (11.3).
It says I can't pay with this card in the shopping mall.
This is a card that shows “Card payment isn't available with this card in the shopping mall (due to the card issuer). Please use App Pay.” below the card row on the Manage cards screen. You don't need to delete the card. In the shopping mall, choose App Pay (the card issuer's app) as the payment method. This notice may not appear, depending on your app version (Chapter 9).
I forgot my payment password.
You don't need the old number. Tap 결제비밀번호 Payment password in the 마이 My tab, enter your app login password, tap 다음 Next, and enter a new 6-digit number twice to set it (11.5). If you also forgot your login password, use 비밀번호 찾기 Find password on the login screen and complete phone identity verification (KCB).
I want to pay with a fingerprint or Face ID, but I can't see the setting row.
The 지문으로 결제 Pay with fingerprint row in the 마이 My tab appears only if your phone supports fingerprint or Face ID and you have set a payment password. Create the payment password first, and turn on the toggle when the row appears. If fingerprint doesn't work, you can always pay with the password. If you change your password or log out, the saved fingerprint setting is erased, so turn it on again.
12.2 Mileage and full members
Where can I use mileage, and can I get it in cash?
You can use mileage only at the store where you paid. In the Use mileage field on the payment screen, enter up to the amount shown as Available at this store, or tap 전액 사용 Use full amount. Pay the rest by card. The amount you can use depends on the store's policy and your mileage balance. You can't get mileage back as cash or withdraw it. Mileage is a full-member benefit (10.4).
I paid, but my mileage didn't increase.
When you pay, you get mileage to claim, and it goes into your mileage balance only when you tap 받기 Receive. Tap the green Claim ○○P mileage band in the 혜택 Benefits tab, then tap 받기 Receive in the Claim now list in the QR결제 QR payment tab. Leaving a review earns extra, and for shopping mall products mileage is added when you confirm the purchase. If there is nothing to claim, the app says “There is no mileage to claim right now”. Mileage is a full-member benefit, so if your annual membership fee has not been paid, also check the band at the bottom of the Benefits tab (10.3).
What are full-member benefits? Where can I see whether I'm a full member?
A member who has paid the annual membership fee is a full member and can use multi-card payment (up to 3 cards), AI ordering, Quick Pay and mileage. If the band at the bottom of the 혜택 Benefits tab says Full member · membership fee paid, you are a full member. In 회비 결제 내역 Membership fee history in the 마이 My tab, you can see your status (paid, unpaid or expired), the most recent payment date and the next payment date. The annual membership fee applies for 1 year from the payment date (10.5).
12.3 Orders · receipts
I want to cancel food I ordered at a store.
There is no button to cancel food ordered at a store directly in the app. The order details have no cancel button either, only viewing buttons such as 카드영수증 Card receipt. If you need a cancellation, tell the store where you ordered. When the store cancels it, 결제 현황 Payment status shows Canceled, and the order details say “This order has been canceled. The amount you paid will be refunded according to the card issuer's policy.” You can see the refund rules in Cancellation, refund and termination policy under 약관 보기 View terms.
I want to cancel or return a shopping mall product.
On the product row in the order details, tap 취소 신청 Request cancellation. You can cancel only until shipping starts. After you receive the item, tap 반품 신청 Request return within 7 days of delivery. If the product is defective or not what you ordered, contact the seller even after 7 days. The refund is processed after the merchant approves it, and you can check whether and how much was actually refunded under “Card approval history” in the order details and in Payment status. Once you confirm the purchase, you can't cancel (Chapter 9).
Where can I see my receipt?
In 결제 현황 Payment status in the 마이 My tab, tap a payment to open the order details. Near the bottom, under Payment info (payment method, payment date and time), there is a 카드영수증 Card receipt button. Payment status shows the last 6 months of history. The card receipt is for checking the card approval and does not replace a tax invoice.
How do I set the pickup time for a takeout order?
In the Takeout order area of your cart, choose from 15분 뒤 In 15 min, 20분 뒤 In 20 min, 30분 뒤 In 30 min or 45분 뒤 In 45 min. If you chose a time earlier on the store screen, it shows as Pickup in ○ min and you can change it with 바꾸기 Change. On the store screen, you can also choose 1 hour. A takeout order doesn't require scanning a QR code, and you always pay now. If the store isn't accepting takeout, the app says “This store isn't accepting takeout orders right now”. When the store has finished preparing your order, Takeout ready · Please pick up appears on the order card on Home (5.4).
How is what I enter in AI ordering handled?
AI ordering is a full-member benefit, and conversations are processed using an external AI service (OpenAI). What you ask is sent to that service, so don't enter sensitive information such as card numbers or passwords. The AI gives guidance based on nearby merchants and menu information. Choosing a menu item takes you to your cart, and you pay on the payment screen as usual. For the rules on outsourcing personal information and providing it to 3rd parties, check Privacy policy in 약관 보기 View terms.
12.4 Account · app
I forgot my ID or password. My phone number has changed.
On the login screen, tap 아이디 찾기 Find ID or 비밀번호 찾기 Find password and complete phone identity verification (KCB). After verification, the app shows your ID in a prompt, and you set a new password in the prompt. If your phone number has changed, log in, then change it with identity verification (KCB) under 전화번호 변경 Change phone number in the 마이 My tab (11.7).
How do I update the app?
Tap 앱 업데이트 App update in the 마이 My tab to open the Gpay app page in the app store: Google Play on Android, the App Store on iPhone. Check the version currently installed on the same row and under App version at the very bottom. Depending on your app version, a new-version notice may appear in the app first (11.8).
What happens if I leave my membership?
Do it with 회원탈퇴 Leave membership at the very bottom of the 마이 My tab. Choose a reason for leaving and enter your login password. When you leave, your card information is deleted and your mileage and payment records are gone. Your existing member information can't be recovered, so use any remaining mileage first (11.9).
Inquiries
For problems not covered here, contact the customer center. When you contact us, include your ID (the name that starts with @), the app version (at the very bottom of the My tab), and which message appeared on which screen, and we can check faster.
| Type | Content |
|---|---|
| Customer center phone | 1566-4250 |
| Hours | Weekdays 09:00–18:00 KST (lunch 11:30–12:30) |
| Copy the number in the app | Tap the 마이 My tab ▸ 고객센터 Customer center and the number is copied. |
This guide was made from screens of the Gpay member app as of October 19, 2026. Names, IDs, phone numbers and card numbers shown on screen have been replaced with fictitious values, and merchant names and photos are examples. The app may differ in some places after updates. Multi-card payment · AI ordering · Quick Pay · mileage are full-member benefits. Please direct inquiries to the contact center at 1566-4250 (weekdays 09:00–18:00 KST, lunch 11:30–12:30).