
User guide · revised October 12, 2026
Gpay POS guide
For store operators and staff · For installation, see the installation guide
0Quick start
These are the five things you need on your first day. For everything else, see the relevant chapter.
- Install: Run the installer, then launch the program with the G-PAYMENTS POS icon on your desktop. For detailed steps, see the installation guide.
- Log in: Select [POS] and log in with your store ID and password. 1.2
- Printer: Go to Settings > Printer connection > 고르기 Choose, select your receipt printer, and check it with 시험 인쇄 Test print. 1.3
- Order: Click an empty table, or click the 포장 · 기타 주문 Takeout · other orders button on the right, to enter the menu items. 3
- Payment: Click 결제 QR 띄우기 Show payment QR, and the customer scans the QR with the Gpay app and pays. When payment is complete, the window closes automatically. For cash, use 현금 받기 Take cash. 4
During business hours, do not log out. You cannot receive orders while logged out. After closing, you can also leave the program running.
1Initial setup
These items only need to be set up once. Following the steps below takes about 30 minutes. For daily operations, start with Chapter 2.
| Reorder | What to set up | How to check |
|---|---|---|
| 1.1 · 1.2 | Install, log in with the store account | “Receiving orders” (green) appears at the top left of the table screen |
| 1.3 | Select the receipt printer, paper width | 시험 인쇄 Test print prints correctly |
| 1.4 | Cash drawer | The drawer opens with 열어 보기 Open |
| 1.5 | Kitchen order slip printing method, kitchen printer | 테스트출력 Test print prints on the kitchen printer |
| 1.6 | POS screen: auto-launch, full screen, customer screen, text size | Settings are kept after you relaunch the program |
| 1.7 | Staff permissions, staff PIN, store (POS) password, store owner password (owner login required) | Payment cancellation is restricted when logged in as staff |
| 1.8 | Table layout | Matches the actual store layout |
| 1.9 | Notification badge, alert sound | The badge appears on top of other windows |
| 1.10 | Test order | Order → kitchen order slip → cash payment → receipt → cancellation |
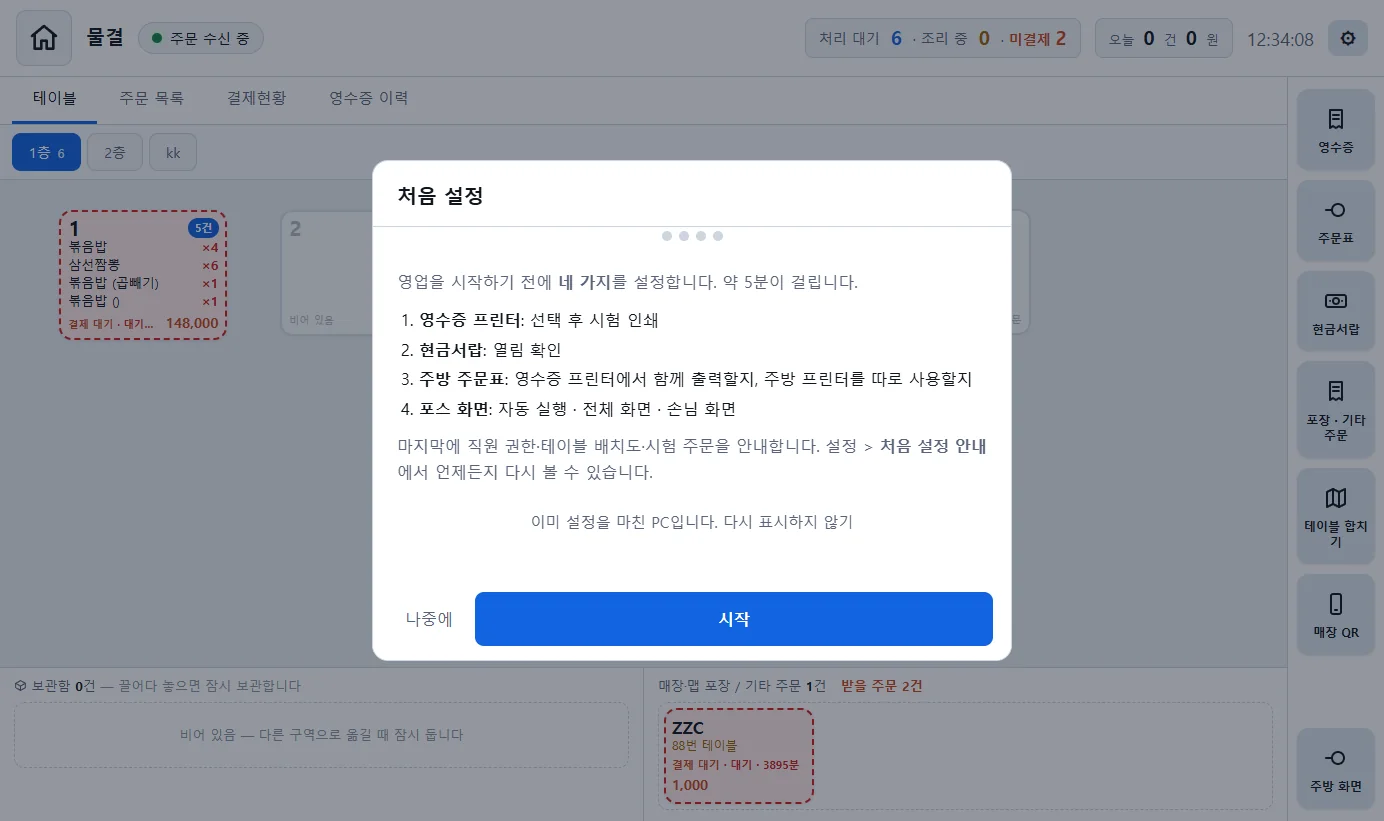
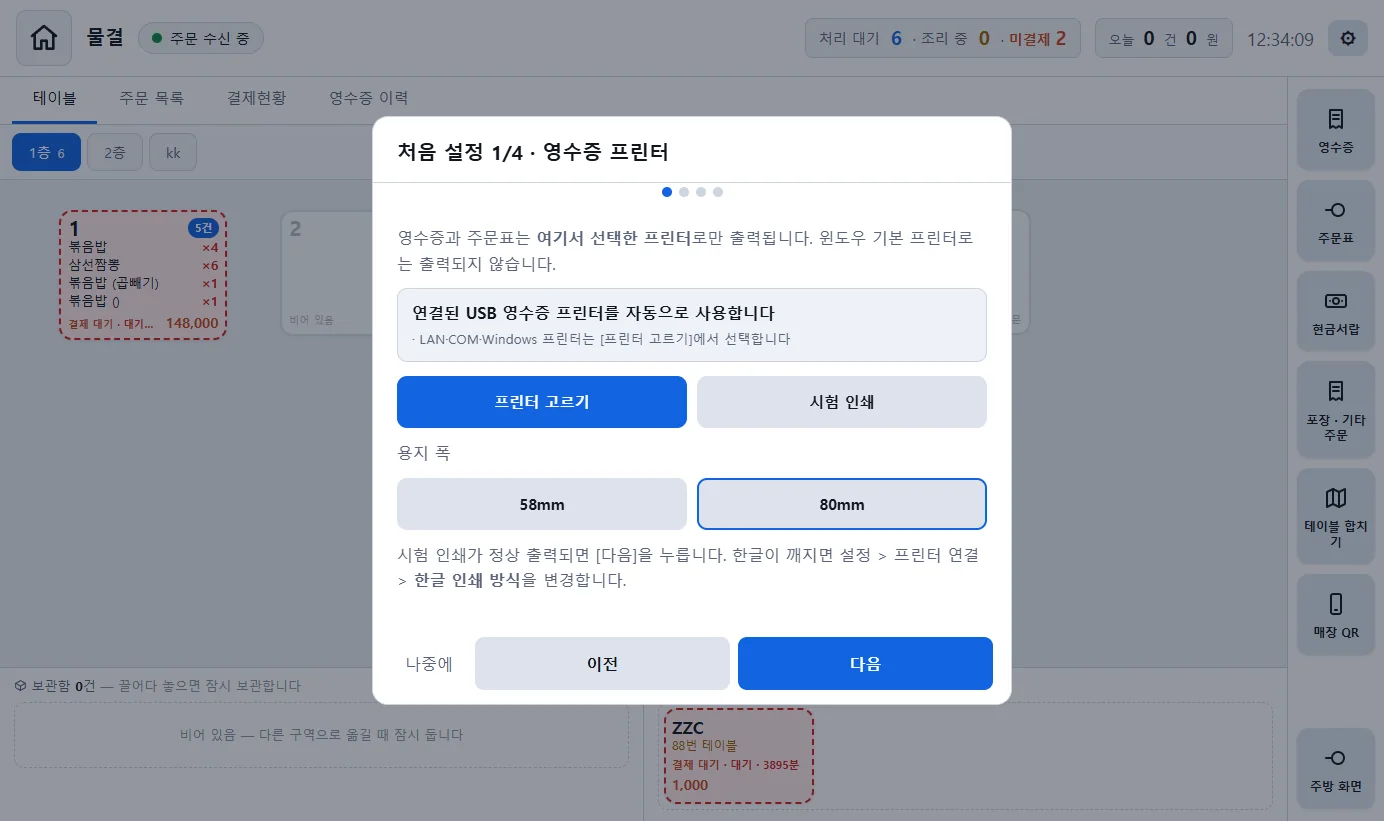
When you launch POS for the first time, the “First-time setup” prompt appears, and you can set up sections 1.3 to 1.6 in order. To see it again after closing it, go to Settings > 처음 설정 안내 First-time setup guide.
1.1 Installation and first launch
The installation steps, recommended specifications, reinstalling, replacing your PC, the no-install version, and Windows 7 and 8 environments are covered separately in the installation guide. Here is a summary.
- PC requirements: Windows 10 or 11 (touch monitor recommended) and an internet connection. When you run the installer
https://ai-gpayments.com/apkexe/AigpaymentsSetup.exe, a G-PAYMENTS POS shortcut is created on your desktop. Administrator rights are not required. - On first launch, the program automatically downloads the latest version and the screen files, and then the login screen appears. If an update notice appears, click 지금 다시 켜기 Restart now. 1.12
- The Home button at the top left minimizes the POS window. If you reopen it from the taskbar, it stays in full screen. At the top right of the login screen, 전체 화면 Full screen (F11) hides the window border, and ✕ 종료 ✕ Quit quits the program.
1.2 Logging in
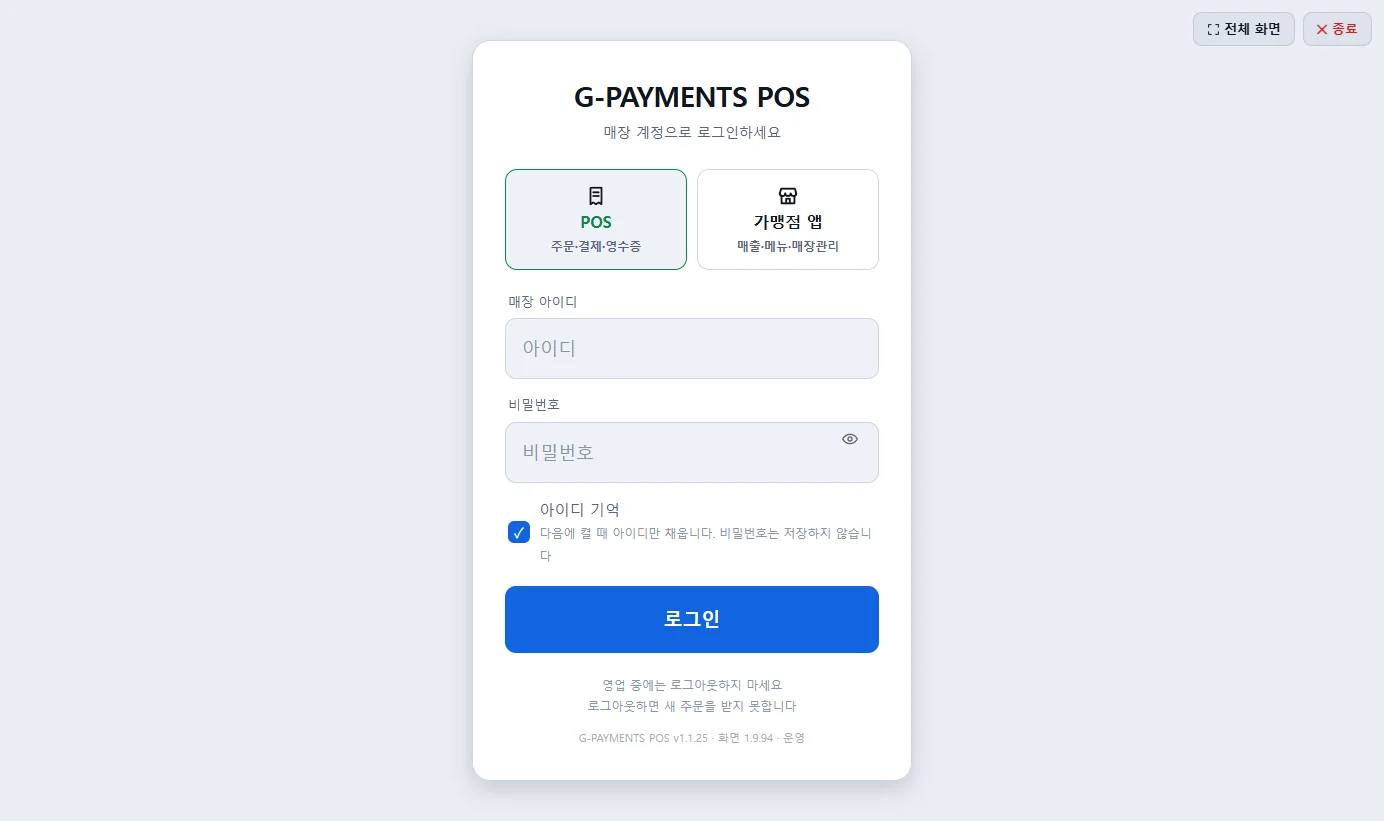
| Mode | User · account | Screen after login |
|---|---|---|
| [POS] Orders, payments, receipts | Staff · store ID (store account) | The table screen appears right away. Stay in this state during business hours. |
| 가맹점 앱 Merchant app Sales, menu, and store management | Owner · merchant account (same as the phone app) | The merchant app screen (sales, menu, and store management) appears. Click the [POS] button to go to the table screen. |
- If you turn on Remember ID, your ID is filled in automatically the next time you launch the program. Your password is not saved.
- Staff permissions, staff PIN, and password changes are possible only after the owner (merchant account) logs in. Canceling paid orders and opening the cash drawer are restricted when logged in as staff, according to the method the owner has set (Store owner only · PIN · Same day only · Allow staff). Owner login is done at Settings > Merchant features > 로그인 Log in. 1.7
- After login, “Receiving orders” (green) should appear at the top left. If it is red, check your internet connection.
1.3 Receipt printer settings
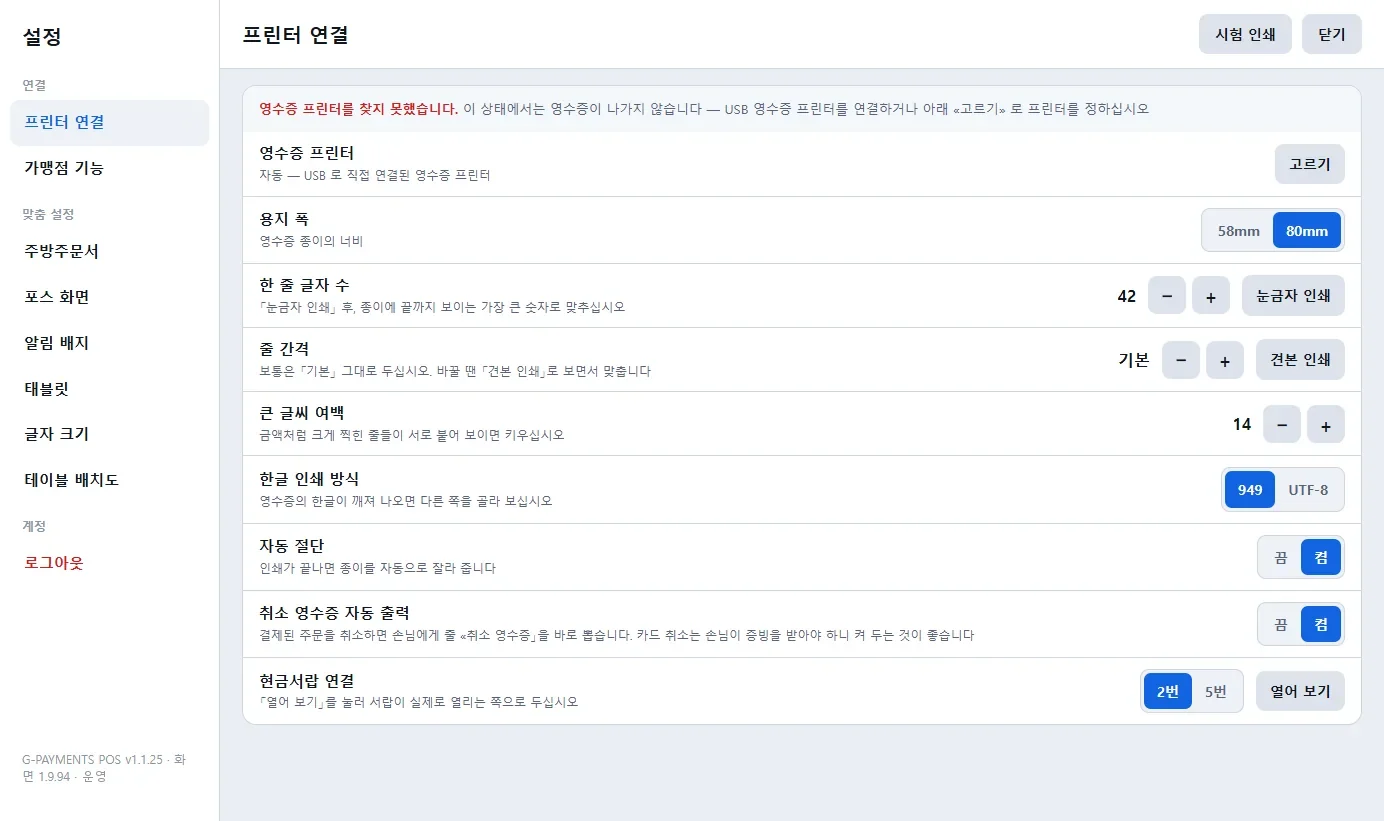
- Go to Settings > Printer connection and click 고르기 Choose. Then select a connection method.
- Select USB printer directly: Choose from the list of connected USB printers.
- Windows printer: Choose by the name of a printer installed in Windows.
- Connect by LAN · IP: Click LAN 프린터 찾기 Find LAN printer to search for printers on the same network (this takes up to 30 seconds). If no printer is found, enter the IP address yourself.
- Connect by serial · COM: Choose from the list of COM ports.
- Select the Paper width (58mm / 80mm) that matches the paper you use. Click 눈금자 인쇄 Print ruler, then enter the largest number that printed all the way to the edge of the paper in Characters per line.
- Check the output with 시험 인쇄 Test print at the top of the screen. If Korean text is garbled, change Korean text printing mode to a different value (949 or UTF-8). Keep Auto print cancellation receipts set to 켬 On. When you cancel a card or app payment, you need to give the customer the sales cancellation slip.
- If your store does not use a printer, select No printer (do not print) as the connection method. Receipts and order slips are not printed, and no print-failure notice is shown. The cash drawer is opened through the printer, so you cannot use the two together. 프린터 없이 사용 Use without printer in the “First-time setup” prompt is the same setting.
Receipts and order slips print only on the printer you select here. They do not print on the Windows default printer. This prevents receipts from accidentally printing on an office printer. If only one USB receipt printer is connected, it is detected automatically without any separate selection.
1.4 Cash drawer settings
- Connect the cash drawer to the drawer port on the receipt printer (DK port). Go to Settings > Printer connection > Cash drawer connection, click 열어 보기 Open, and select the signal that actually opens the drawer (No. 2 / No. 5).
- The drawer opens automatically on cash payments. To open it without a payment, use the 현금서랍 Cash drawer button on the right. You decide whether to allow staff to do this in section 1.7.
- If your store does not use a cash drawer, skip this section.
1.5 Kitchen order slip and kitchen printer settings
When a new order is received, an order slip is printed in the kitchen. First, choose the printing method that suits your store.
| Store setup | How to set up |
|---|---|
| One printer (checkout counter) | Go to Settings > Kitchen order sheet and set Auto print to 켬 On. Order slips are printed on the receipt printer as well. Leave the kitchen printer as “Same as receipt printer”. |
| Dedicated kitchen printer | Go to Settings > Printer connection > Kitchen printer, click 고르기 Choose, and select the kitchen printer (USB, LAN or COM). Then go to Settings > Kitchen order sheet and set Auto print to 켬 On. |
| Using a kitchen tablet | Set Auto print to 끔 Off. Orders are sent to the kitchen screen on the tablet. 6.2 |
The kitchen screen (POS and tablet) shows paid orders and pay-later orders (including orders that staff enter on the POS). Pay-first orders waiting for payment (orders for which a payment QR is shown but payment has not yet been made) appear once payment is confirmed. Until then, the message “N pay-first orders waiting for payment” is shown at the bottom of the kitchen screen. The “Pending” count at the top of the screen uses the same criteria.
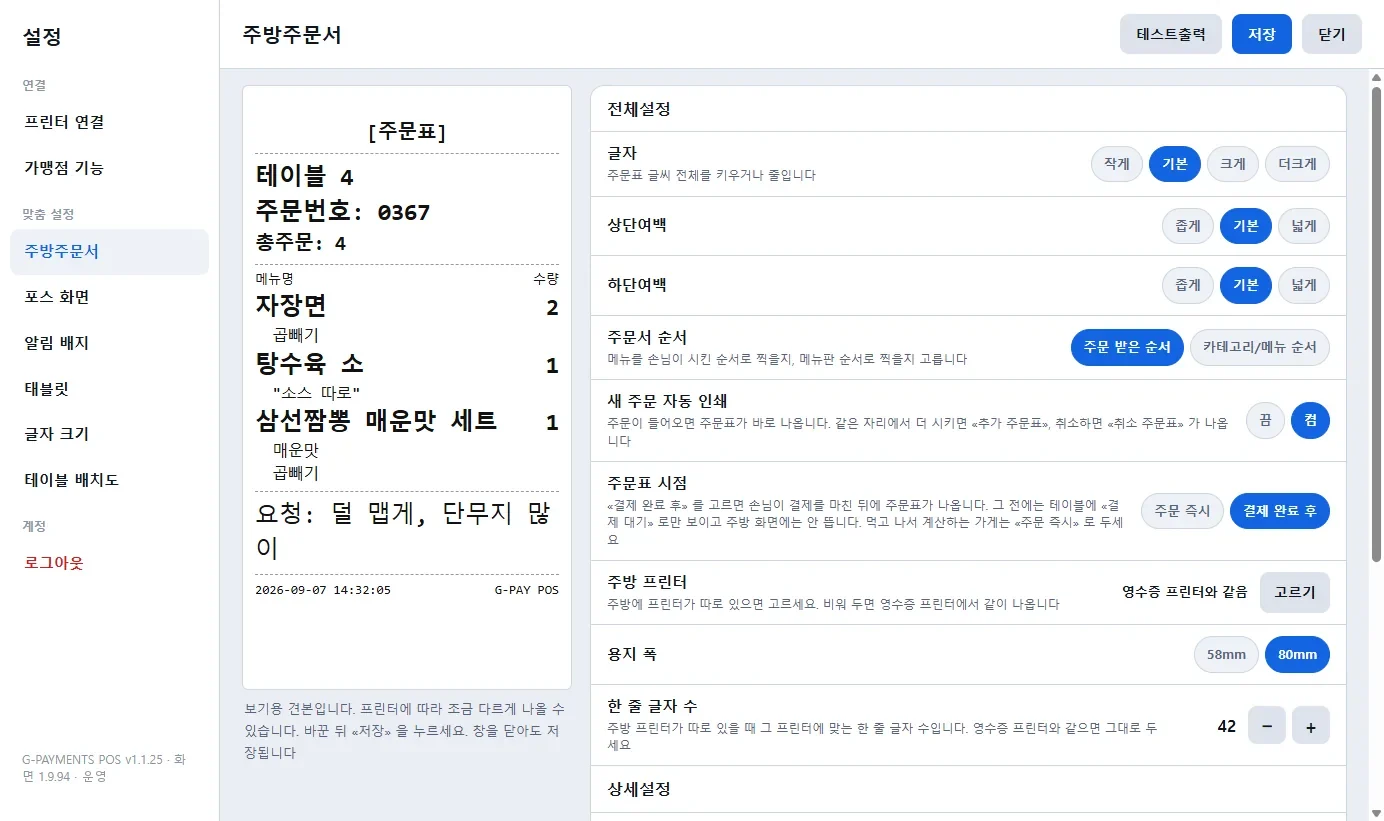
- Check the actual printout with 테스트출력 Test print under Settings > Kitchen order sheet. Adjust the text size, margins, and menu order while watching the preview on the left, then click 저장 Save. For a description of each item, see section 5.3.
- If you delete a menu item or reduce its quantity, a separate “Revised order slip” is printed so the kitchen can see the change.
1.6 POS screen and text size settings
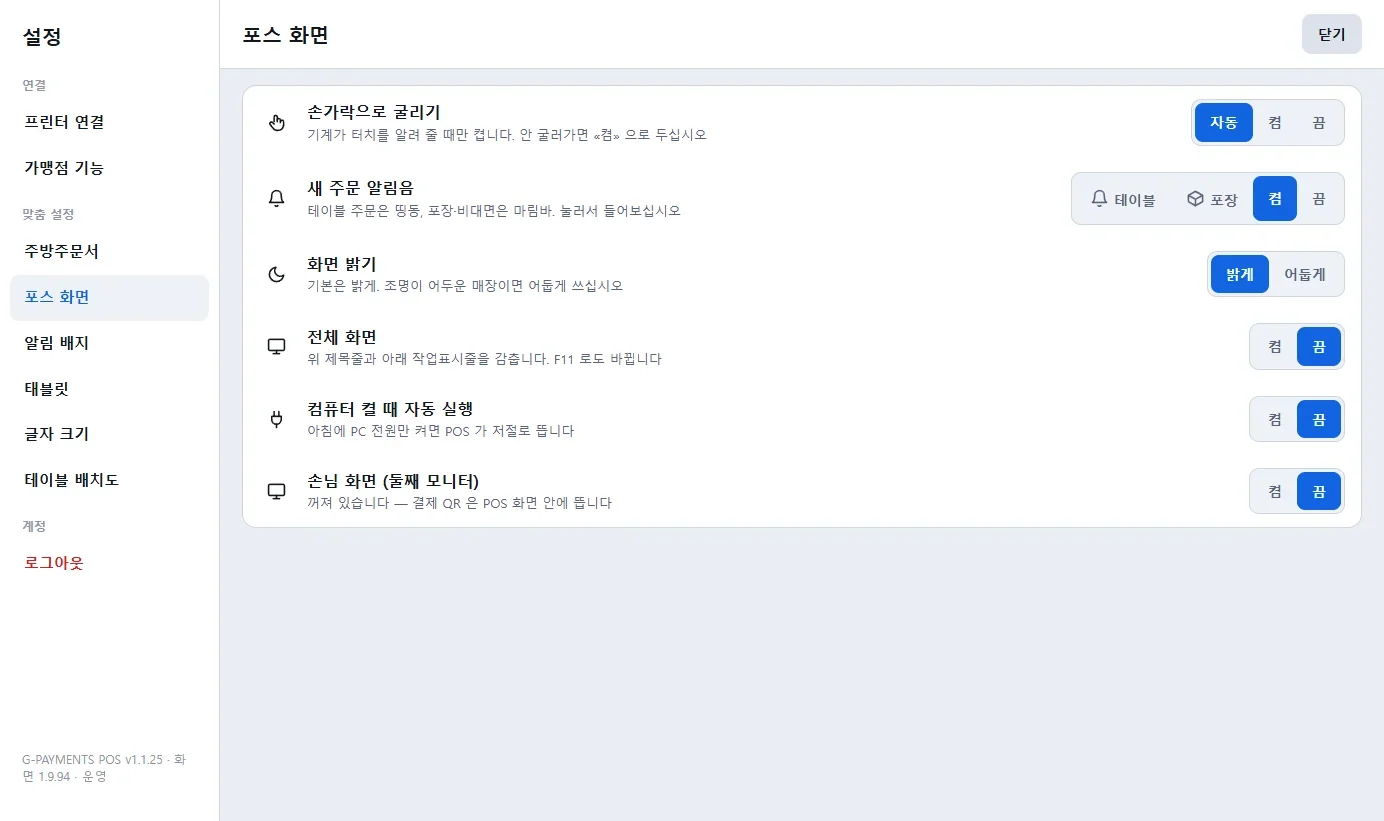
- If you set Launch automatically when the computer starts to 켬 On, POS launches automatically when the PC boots. If you set Full screen to 켬 On, the title bar and taskbar are hidden (F11).
- Customer screen (second monitor): If there is a customer monitor at the checkout counter, set it to 켬 On. The payment QR and amount are shown on the customer monitor. If there is no monitor, the QR is shown inside the POS screen. 6.1
- Scroll with finger: On a touch screen, swipe the screen to scroll. If scrolling does not work, set it to 켬 On. New order alert sound: Table orders use a “ding-dong” sound, and takeout and contactless orders use a “marimba” sound. Screen brightness: Bright / Dark.
Text size
- Go to Settings > Text size and adjust the text size separately for three areas: Tables (text in the table tiles), Order details, and Lists and history. Your choice is saved immediately. Click 모두 100%로 Set all to 100% to return to the default values.
1.7 Staff permissions, staff PIN, and passwords
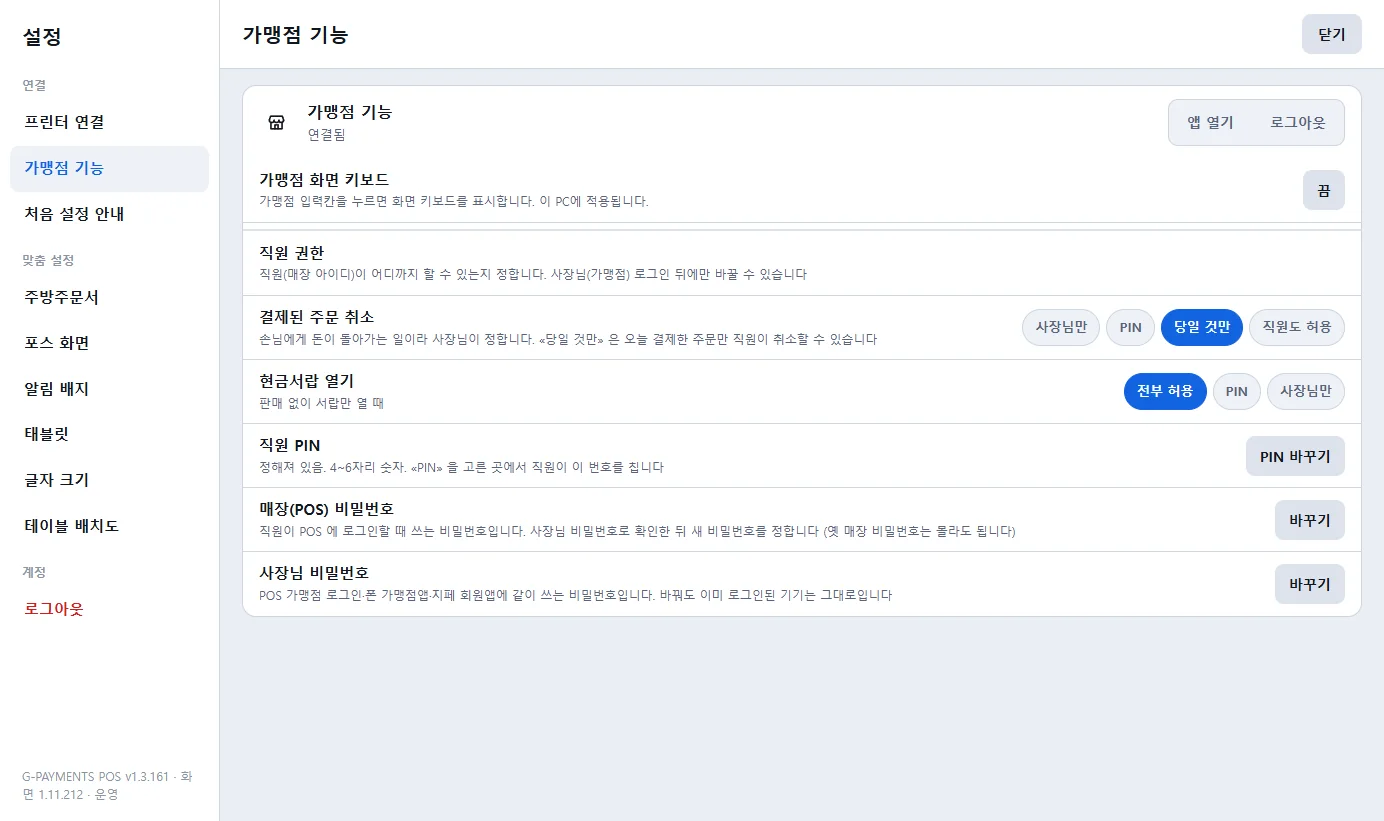
- Owner login: Go to Settings > Merchant features, click 로그인 Log in, and log in with the merchant account (the same account as in the phone app). After you log in, the button changes to 로그아웃 Log out, and the staff permission, PIN, and password buttons below are enabled. The POS screen you were using with the staff login stays as it is.
- Merchant features 앱 열기 Open app: Opens the merchant app (sales, menu, and store management) inside POS. You manage the number of tables and the menu in the merchant app. Merchant screen keyboard sets whether the on-screen keyboard appears when you click an input field on the merchant app screen (applies to this PC only).
Staff permissions
The owner decides how much staff (logged in with the store ID) can do. You can change this only after logging in as owner.
| What to set up | Optional | What happens when logged in as staff |
|---|---|---|
| Canceling paid orders This sends money back to the customer (default: Store owner only) | Store owner only | Staff cannot cancel. A message appears saying that owner login is required. |
| PIN | A “Staff PIN — cancel paid order” window opens, and the order is canceled when you enter the staff PIN. | |
| Same day only | Staff can cancel orders paid today without a PIN. Only the owner can cancel orders from yesterday or earlier. | |
| Allow staff | Staff can cancel without restrictions. | |
| Opening the cash drawer For opening only the drawer, without a payment. The 수정 Edit button for a menu item in the order details follows the same method | Allow all | Staff can open it right away (default). |
| PIN | A “Staff PIN” window opens, and if the number is correct, you are not asked again for about 90 seconds. | |
| Store owner only | No input window appears; instead the message “Store owner login is required. Log in at Settings → Merchant features” is shown. |
- Staff PIN PIN 정하기 Set PIN / PIN 바꾸기 Change PIN: A single number of 4 to 6 digits. For the items above where you chose “PIN”, staff enter this number. If no PIN has been set yet and you choose “PIN”, a window opens first for setting the number.
- While the owner is logged in, everything goes through without any input, whichever method is set.
Changing passwords
You change the two passwords separately. For both, 바꾸기 Change is enabled only after owner login, and a window opens three times in sequence.
| Item | Where it is used | Entry order and rules |
|---|---|---|
| Store (POS) password | Used when staff log in to POS. | ① Confirm the store owner password → ② New password (4 to 20 characters: letters, numbers, and symbols. Not allowed: spaces and & = < >) → ③ Enter the new password once more. You do not need to know the old store password. The staff screen that is currently logged in stays as it is, and the new password is used from the next staff login. |
| Store owner password | Shared by the merchant login in POS, the merchant app on the phone, and the Gpay member app. | ① Current store owner password → ② New password (8 to 30 characters, with at least one letter, one number, and one special character. Not allowed: Korean characters, spaces, & = < > % +, quotation marks, and backslashes) → ③ Enter it once more. If the new password is the same as the current one, it is rejected. If you enter the current password incorrectly 5 times, you must wait 30 seconds before trying again. Even after you change it, devices that are already logged in stay as they are, and the new password is used from the next login. |
If you change the store owner password, you must also log in with the new password in the merchant app on your phone and in the Gpay app. Write the new password down somewhere separate so you do not forget it.
1.8 Table layout
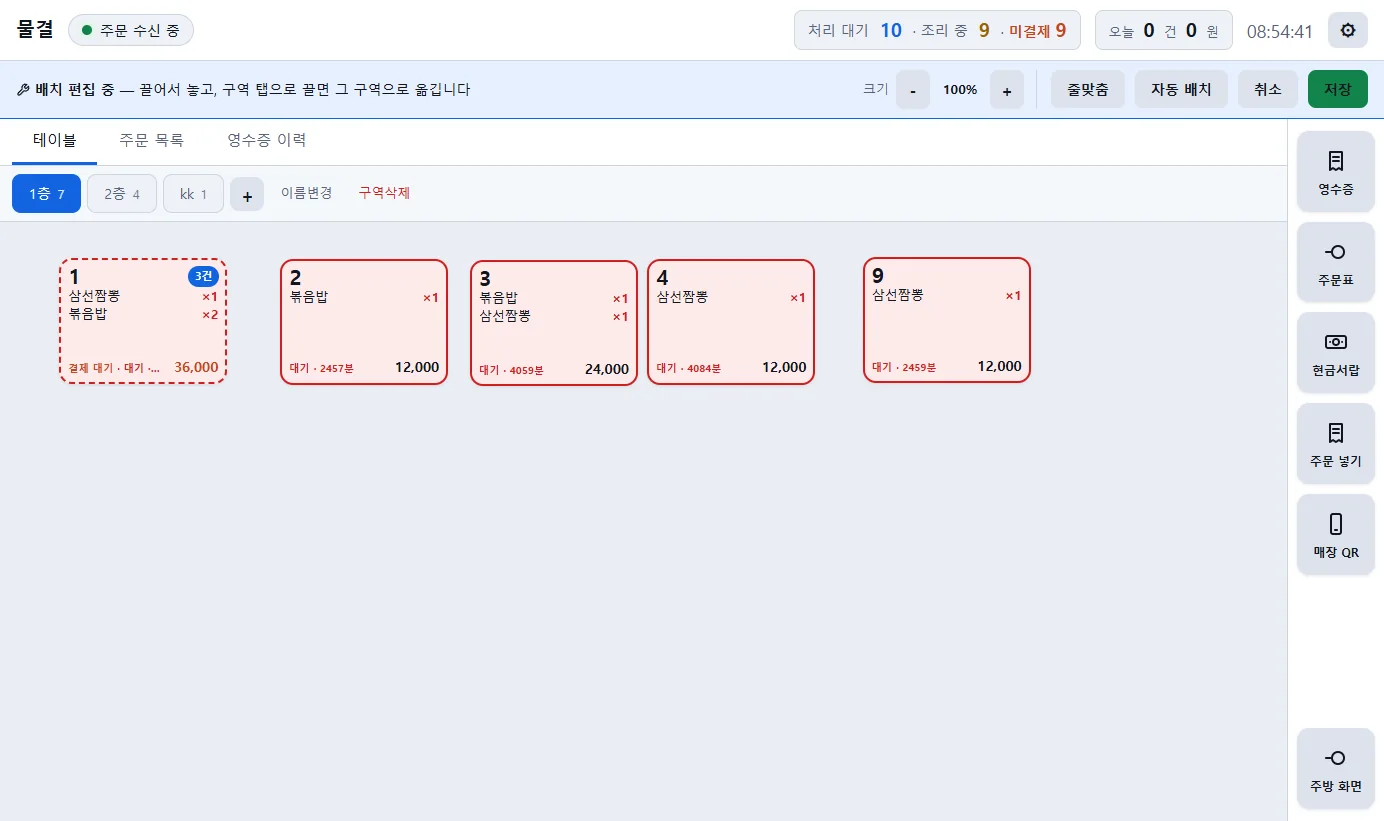
- Drag the tables to place them the same way as your actual store layout. If you drag a table onto a zone tab, it moves to that zone.
- Click [+] next to the zone tabs to add a zone (1st floor, 2nd floor, terrace, and so on), and manage zones with 이름변경 Rename and 구역삭제 Delete zone.
- Adjust the table size with Size [−]/[+], align the current zone with 줄맞춤 Align, and return to the initial layout with 자동 배치 Auto-arrange. When you finish editing, click 저장 Save; to cancel, click 취소 Cancel.
- Set the number of tables in the merchant app (store management). When you change it, the POS layout updates automatically.
1.9 Notification badge and alert sound
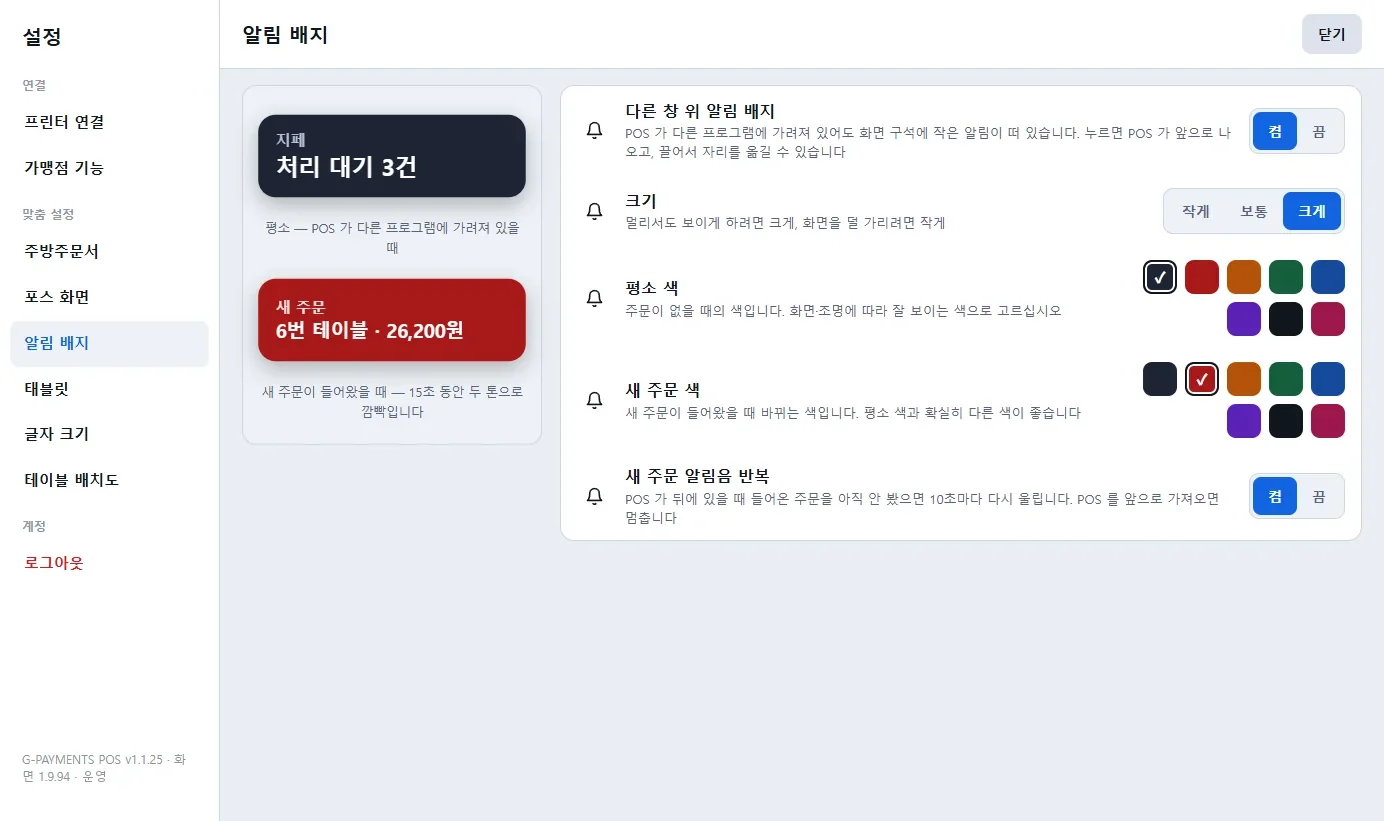
- Even when POS is hidden behind other programs, a small badge appears in a corner of the screen. When a new order is received, the badge changes color and blinks, and clicking the badge brings POS to the front. You can drag the badge to move it.
- Set the size (small, medium, large), Normal color, New order color (a color clearly different from the normal color is recommended), and Repeat alert sound (repeats every 10 seconds while there is an order you have not checked).
- If your store uses a tablet for the customer screen or kitchen screen, connect it at Settings > Tablet. 6.2
1.10 Test order
Check that setup is complete by going through a real order flow. Depending on the staff permission settings (section1.7), canceling the payment in the last step may require owner login or the staff PIN, so the test goes smoothly if you do it while logged in as owner.
- Click an empty table, select one menu item, and click 주문만 넣기 Add order only. The order appears on the table, and if auto print is turned on, the kitchen order slip is printed.
- Open the table and click 조리 시작 Start cooking, then 서빙 완료 Served. The table color changes at each stage.
- Click 현금 받기 Take cash. The cash drawer opens and the receipt is printed.
- An order that has been paid and served disappears from the table screen. On the Receipt history tab, click the row of the order you just paid to open it, click 결제 취소 Cancel payment, and then click 결제 취소 Cancel payment again in the confirmation window. The cancellation receipt is printed and “Canceled” appears on the history row. 4.7
- If you turned on the customer screen, click 결제 QR 띄우기 Show payment QR in an order for an empty table, check that the QR appears on the customer monitor, and then click 닫기 Close.
If everything works up to this point, you can start doing business. Because you canceled the test order, it remains in your sales only as a cancellation record. If you have a problem, see Chapter 7, Troubleshooting.
1.11 Screen layout
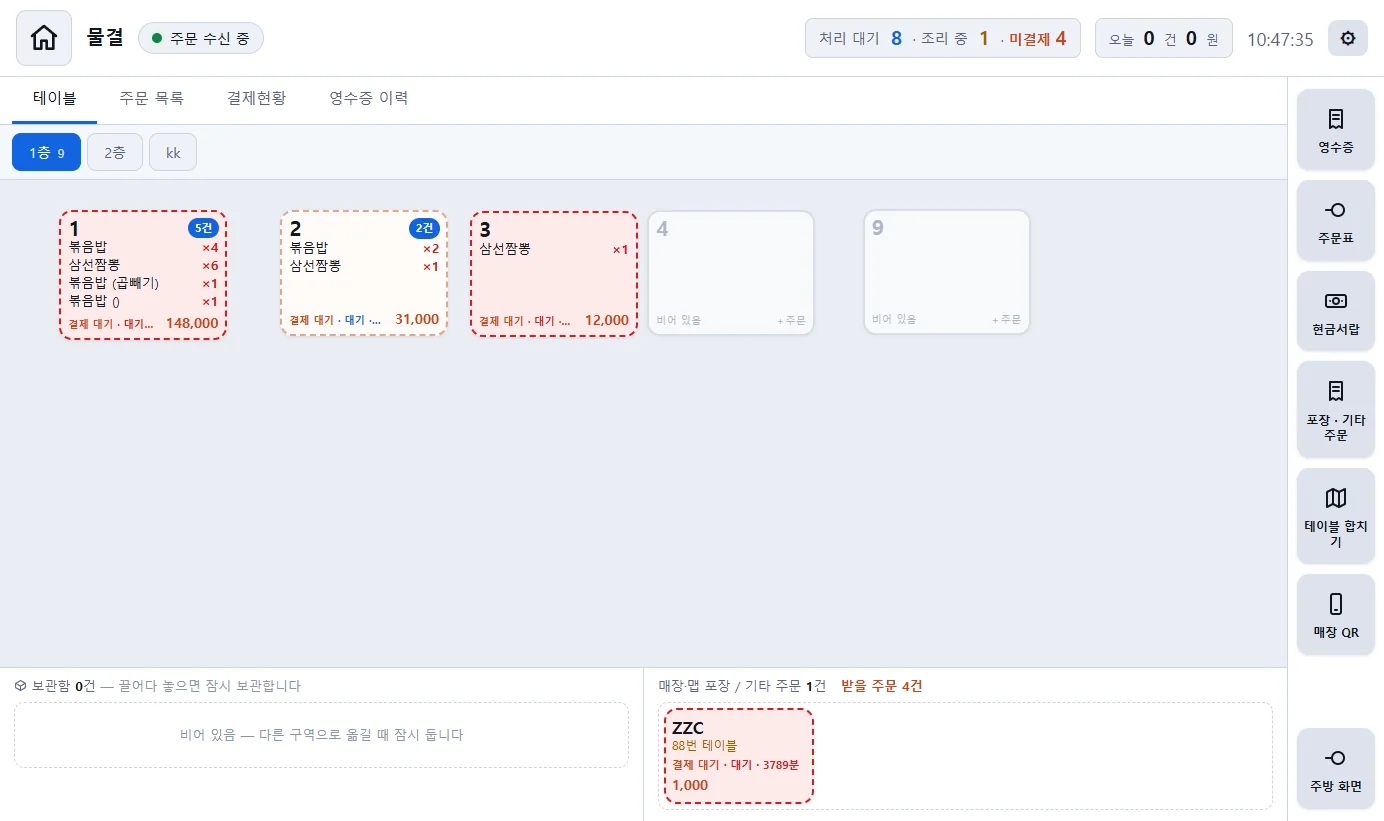 1
2
3
4
5
6
7
8
9
10
11
- 1Store name
- 2Receiving orders: Green means the program is connected to the server and ready to receive new orders.
- 3Pending · Cooking · Unpaid counts (Unpaid is shown in red)
- 4Number and amount of orders paid today
- 5Settings (gear icon)
- 6Tabs: Tables / Order list / Payment status / Receipt history. “Payment status” is a list for checking the payment status of Quick Pay payments received without menu items (“Simple Quick Pay”).
- 7Zone tabs (1st floor, 2nd floor, and so on). The number is the number of orders in that zone.
- 8Table: number, menu items, status, amount 2.1
- 9Holding area: a place where tables are put temporarily while you move them
- 10In-store and map takeout / Other orders: orders without a table number. Each entry shows its source (“Takeout from store · Table N”, “Map takeout”, “Simple Quick Pay”, “POS order”).
- 11Function buttons: Receipt · Order slip · Cash drawer · Takeout · Other orders · Merge tables · Store QR · Kitchen screen
1.12 Automatic updates
POS checks for a new version every time it launches. If there is a new program, it downloads it first, and then a message appears on the login screen: “A new version (version number) has been downloaded — click 'Restart now' to apply it” (the number of the downloaded version appears in the parentheses). Click 지금 다시 켜기 Restart now to restart with the new program, and the screen files are downloaded next. While the update message is displayed, the login button is locked and reads “Log in after update”.
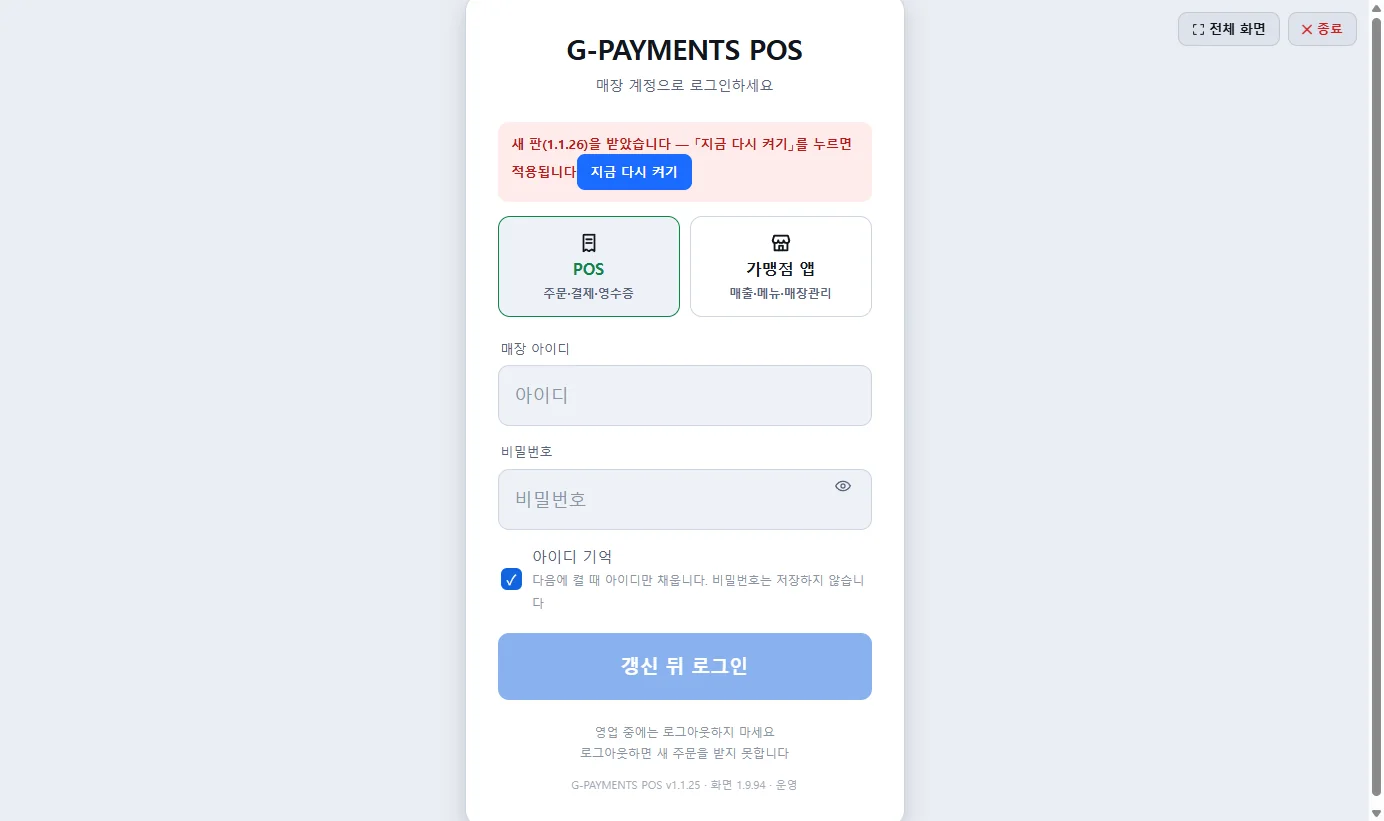
지금 다시 켜기 Restart now may appear twice. For a version where both the program and the screens have changed, the program restarts first, and after it restarts, a message appears: “The program started with the new version (version number) · The new screens (version number) have also been downloaded — click 'Restart now' one more time and you are done”. Click once more at that point and you are done. For a version where only the screens have changed, “The new screens (version number) are ready — restart to apply them” is shown, and they take effect when you restart. The current version (program and screens) is shown at the very bottom of the login screen. Printer, table layout, and permission settings are kept after the update.
2Table screen
This is the basic screen for doing business. Each table has one tile, and that table's current order is shown inside it.
2.1 Table status indicators
A table tile shows the table number, menu items and quantities, status · elapsed time, and amount. If a table has several orders, an “N orders” badge appears at the top right and the amount shown is the total. When an additional order that you have not checked is received, the badge changes to “N orders +1” and the tile is highlighted in orange. The highlight clears when you open that table.
| What you see | Status |
|---|---|
| Empty table (faded tile): Click it to open the order entry screen for that table. | |
| Waiting (solid red line): A paid order has been received and cooking has not started. The tile blinks for 2 minutes after the order is received. | |
| Awaiting payment / Unpaid (dotted orange line): An order that has not been paid yet. The amount is shown in red. | |
| Cooking (yellow): An order for which 조리 시작 Start cooking was clicked | |
| Served (gray): An order for which 서빙 완료 Served was clicked. When payment is also complete, the order disappears from the tile. |
“12 min” in the status line is the time that has passed since the order was received. For an order that has waited a long time, the tile turns a darker red.
If the text is too small, you can enlarge only the “Tables” item separately at Settings > Text size. You change the table size and layout in 1.8 Table layout.
2.2 Order details
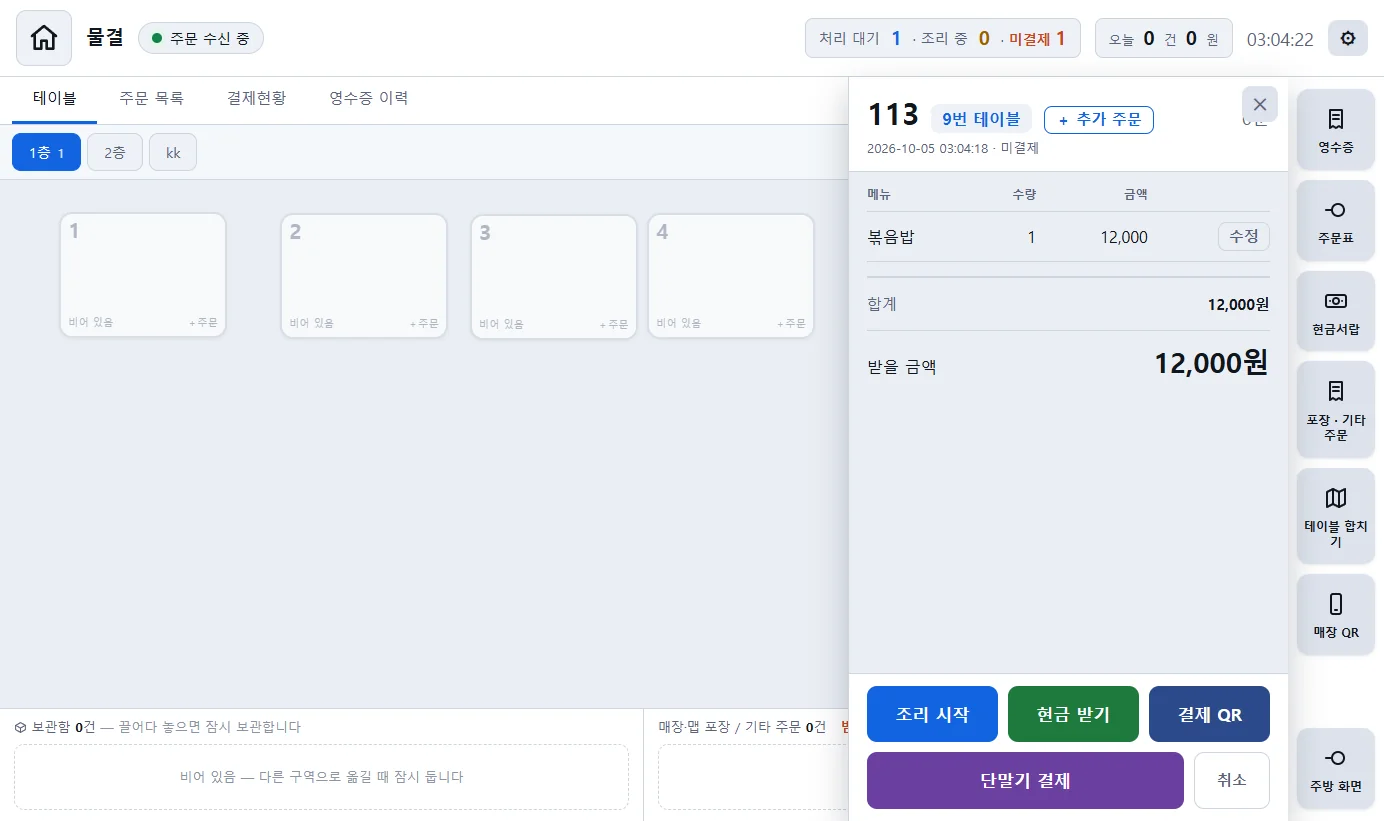
- The large number at the top is the order number. Before payment it shows “Received #number”; after payment it shows the order number for the day (1, 2, 3 …).
- + 추가 주문 + Add order: Adds an order to the same table. The order entry screen for that table opens. 3
- Buttons at the bottom: 조리 시작 Start cooking (changes to 서빙 완료 Served when clicked, and to 전달 완료 Handed over for takeout orders) · 현금 받기 Take cash · 결제 QR Payment QR · 단말기 결제 Card terminal payment (purple, shown only on orders before payment; see section 4.9) · 취소 Cancel
- Takeout orders have a 준비완료 알림 Ready notification button. When you click it, a ready notification is sent to the customer's phone and the button changes to “✓ Ready”. In pay-later stores, you can click it even before payment.
- Delete some menu items or change quantities: In the menu table, click 수정 Edit on that row, set the quantity to keep with [−]/[+], and click 적용 Apply. If the quantity is 0, click 전부 빼기 Remove all. This is possible only for orders before payment, and a “Revised order slip” is printed in the kitchen. While the payment QR is displayed, this button is hidden. When logged in as staff, the same method as the “Opening the cash drawer” setting applies. With the PIN method, the staff PIN window appears; with the Store owner only method, the message “Store owner login is required” is shown. 1.7
- For an order that another customer paid for, “Paid by ○○ · Paid on behalf” is shown below the total. 4.1
- If a table has several orders, the 전체 All tab opens first when you click the table, and you can view each order with its numbered button. For how to pay in bulk, see section 4.4.
To close the details, click [✕] at the top right or click an empty area of the screen.
2.3 Moving tables, merging tables, and the holding area
- When customers move to a different table, drag the table tile and drop it on that table. If the table is empty, the order moves right away; if the table has an order, a “Swap tables” confirmation appears, and then the orders of the two tables are swapped.
- To move to another zone, first drag the tile to the holding area at the bottom, switch zone tabs, and then drag it from the holding area to the new table.
- Orders in the In-store and map takeout / Other orders area are orders without a table number. If you drag one onto an empty table, it becomes an order for that table.
Merging tables (sharing a table)
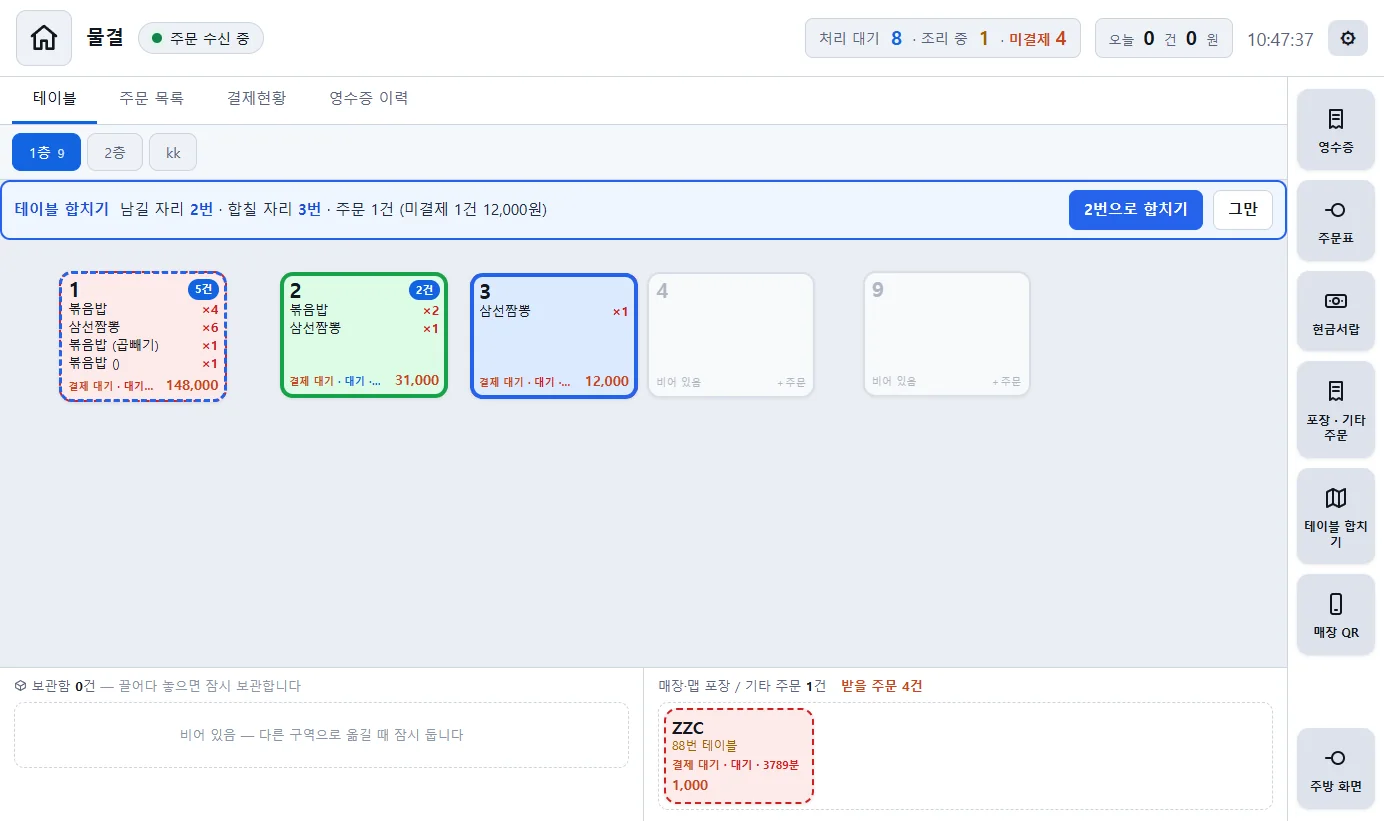
- Click 테이블 합치기 Merge tables on the right. If the order details were open, that table is preselected as the “table to keep”.
- Click the table to keep. You can also select an empty table. Use this when you gather customers from several tables onto one large empty table.
- Click the table to merge (you can select several). Click again to deselect. The notice bar shows “N orders (M unpaid … KRW)”.
- Click N번으로 합치기 Merge into table N. The orders of the tables to merge all move to the table to keep, and the merged tables become empty. To stop, click 그만 Stop.
Even after merging, each order stays as it is (including its cooking status and kitchen order slip). So customers can still pay separately; to pay everything at once, use 미결제 전부 결제 QR All unpaid by payment QR or 미결제 전부 현금 All unpaid in cash on the 전체 All tab. 4.4 Orders that were canceled or have already been merged into another order are not moved, and the number of such orders is shown in a message.
2.4 New order notifications
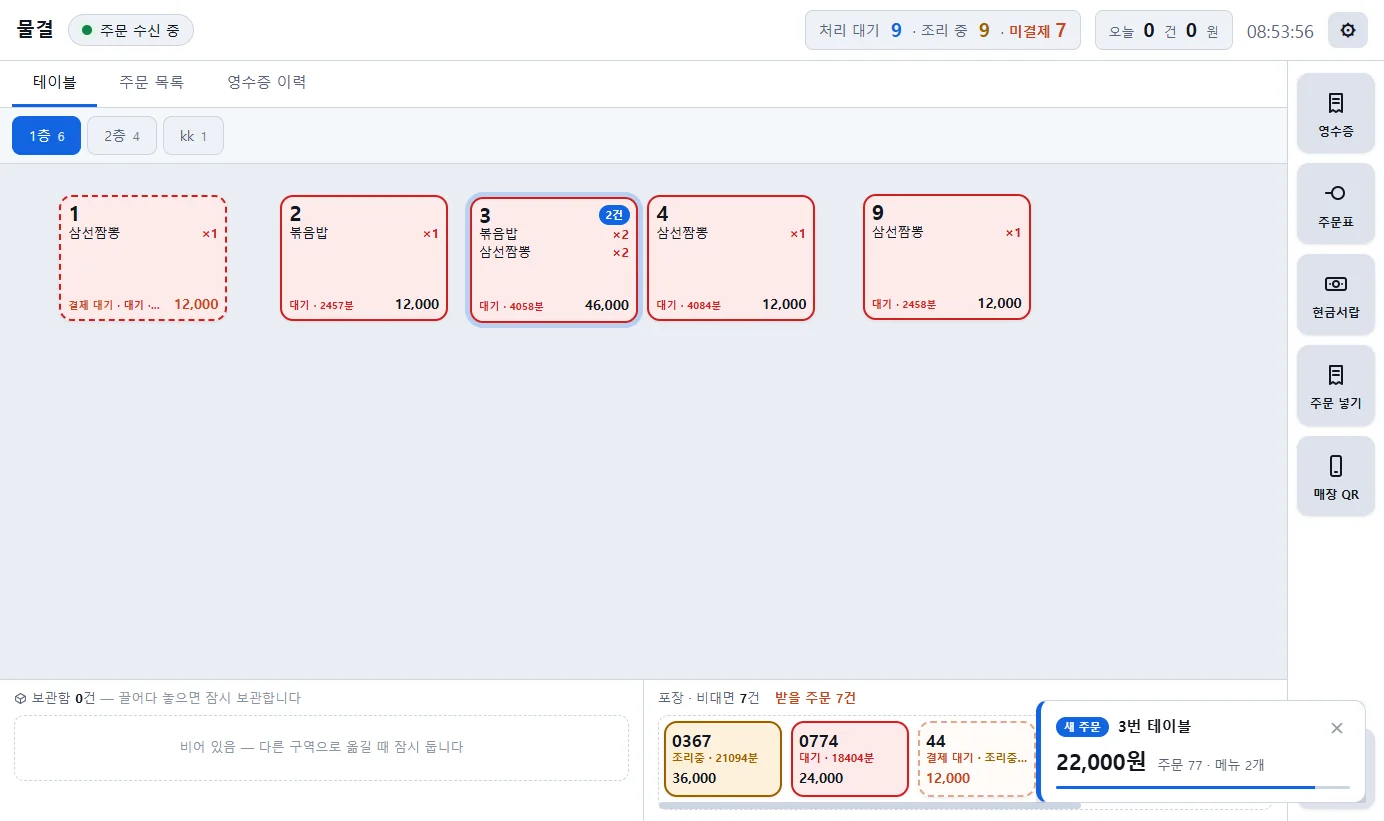
- Click the card to open that order. The card disappears automatically after a short while.
- In pay-later stores, orders before payment are also shown as “New order” cards, and when the customer completes payment in the app, a separate “Table N payment complete” card is shown (the alert sound is also different).
- If POS is hidden behind another window, the notification badge in the corner of the screen alerts you instead. When a new order is received, it changes color and blinks, and if there is an order you have not checked, the alert sound repeats every 10 seconds. Clicking the badge brings POS to the front. For color, size, and alert sound settings, see section 1.9.
3Entering orders
This is the screen for entering orders you took yourself into POS. You can open it in three places: an empty table (an order for that table), + 추가 주문 + Add order in the order details (adds to the same table), and 포장 · 기타 주문 Takeout · other orders on the right (takeout, contactless, and other orders without a table).
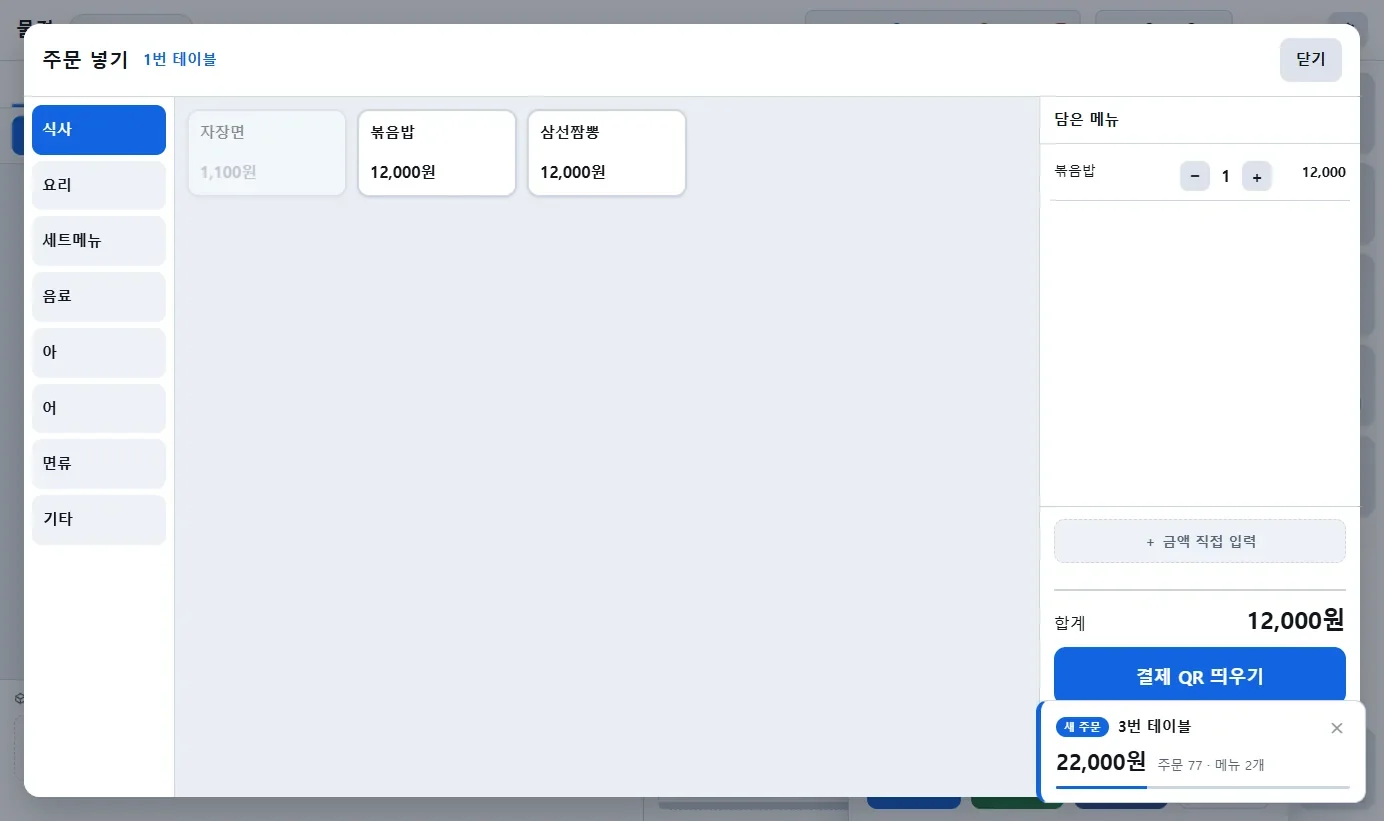
- Select a category on the left and click a menu item in the middle. A menu item shown faded is sold out. If a menu item shows “Choose option”, the options window opens first when you click it.
- In the added items on the right, change the quantity with [−]/[+]. When the quantity reaches 0, the item is removed from the list.
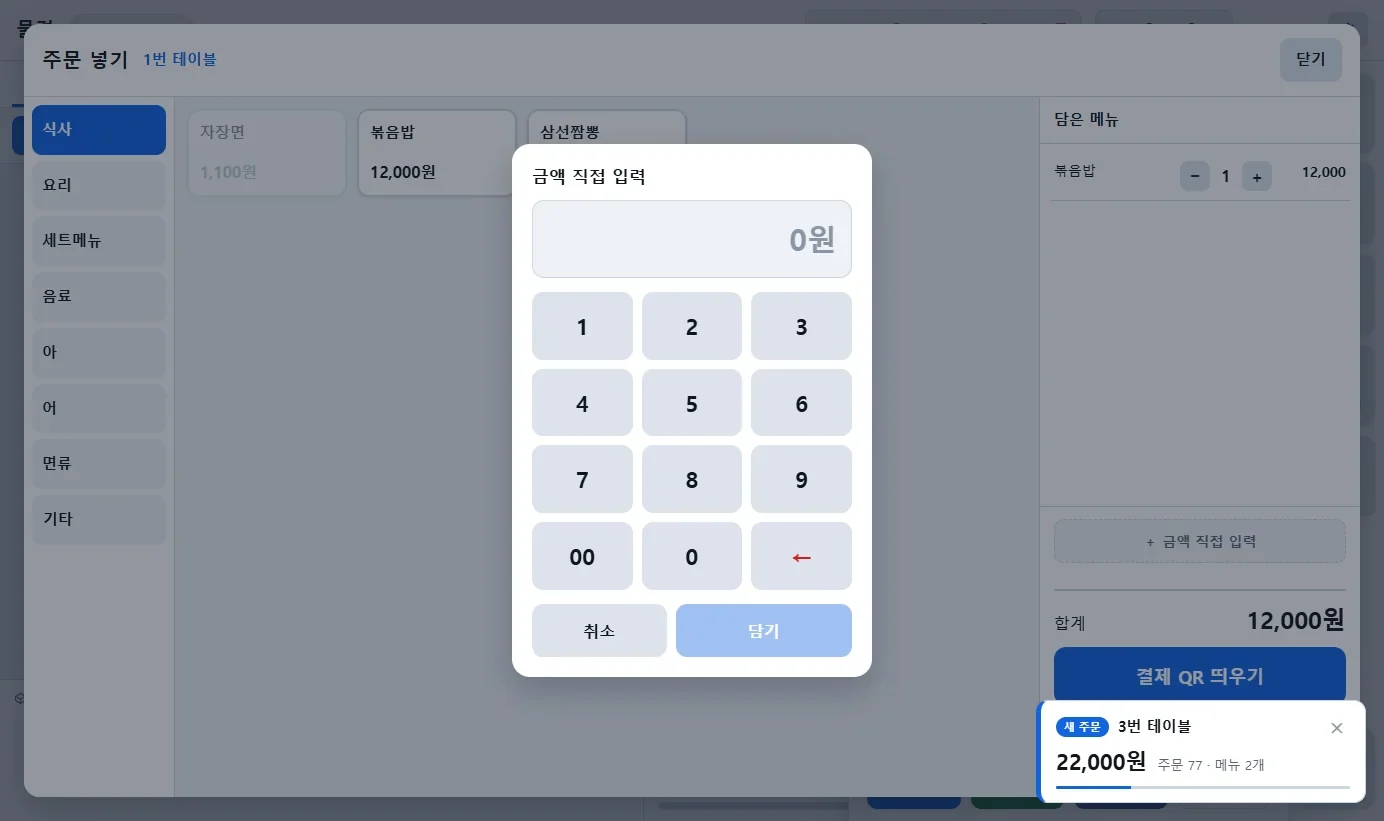
- For an amount that is not on the menu (such as a service charge), click + 금액 직접 입력 + Enter amount and enter it on the number keypad.
- Finish entering the order with one of the following.
- 결제 QR 띄우기 Show payment QR: Enters the order and immediately shows the payment QR for that amount (pay-first order). 4.1
- 주문만 넣기 Add order only: Enters only the order and takes payment later (pay later or cash). At “Place the order for table N?”, click 예 Yes.
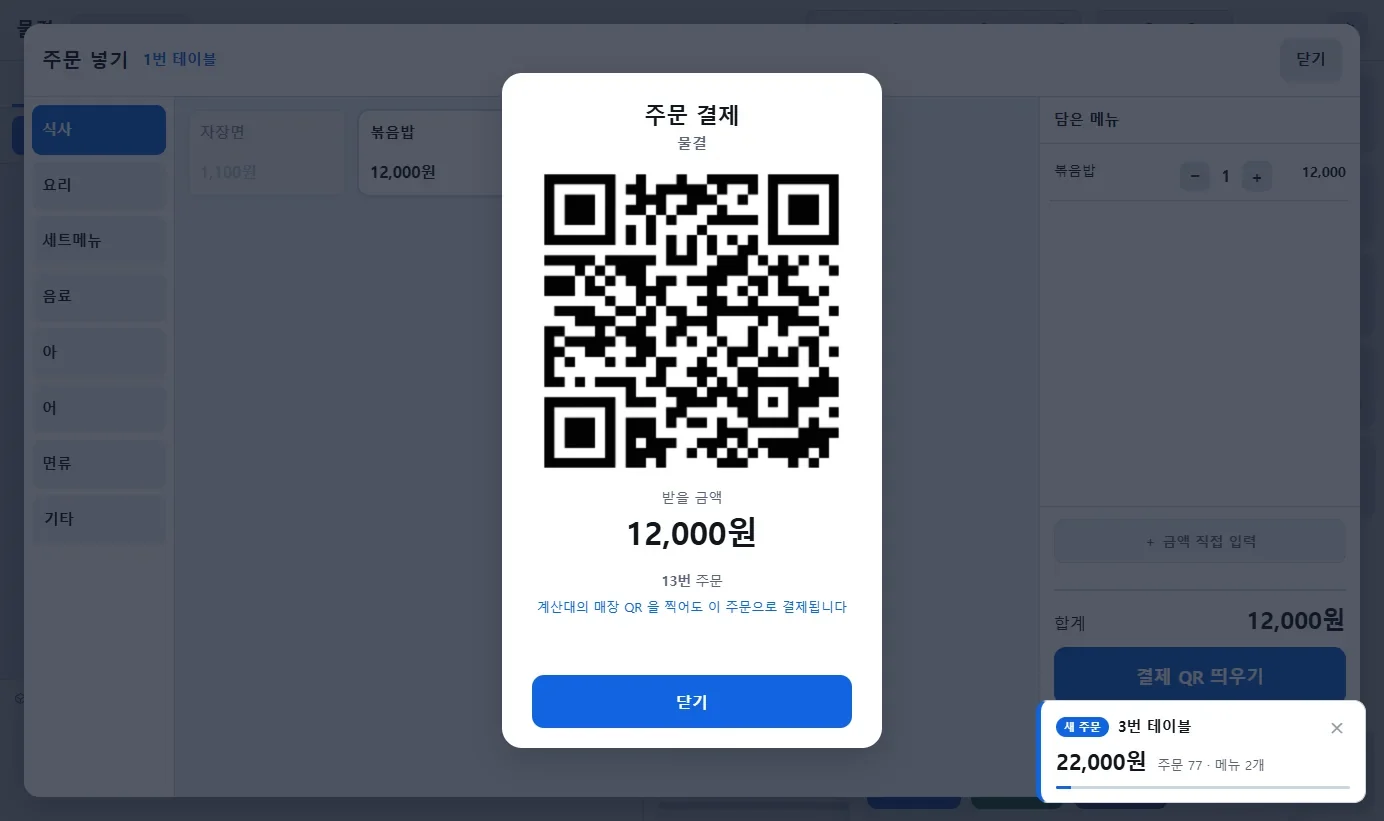
If you close the window after showing the payment QR but before the customer has paid, a confirmation window appears: “Payment has not been made. Cancel this order?” If you are taking cash, click 아니오 No and use 현금 받기 Take cash in the order details. To delete the order, click 예 Yes.
4Payment
There are three ways to pay. The customer scans the payment QR with the Gpay app, pays in cash, or scans the store QR (sticker) at the checkout counter. Whichever method is used, the payment is reflected in POS immediately once it is complete. Stores that use a card terminal separately from POS can also leave a closing record with 단말기 결제 Card terminal payment (4.9).
4.1 Payment QR
- Click 결제 QR 띄우기 Show payment QR on the order entry screen, or click 결제 QR Payment QR in the order details.
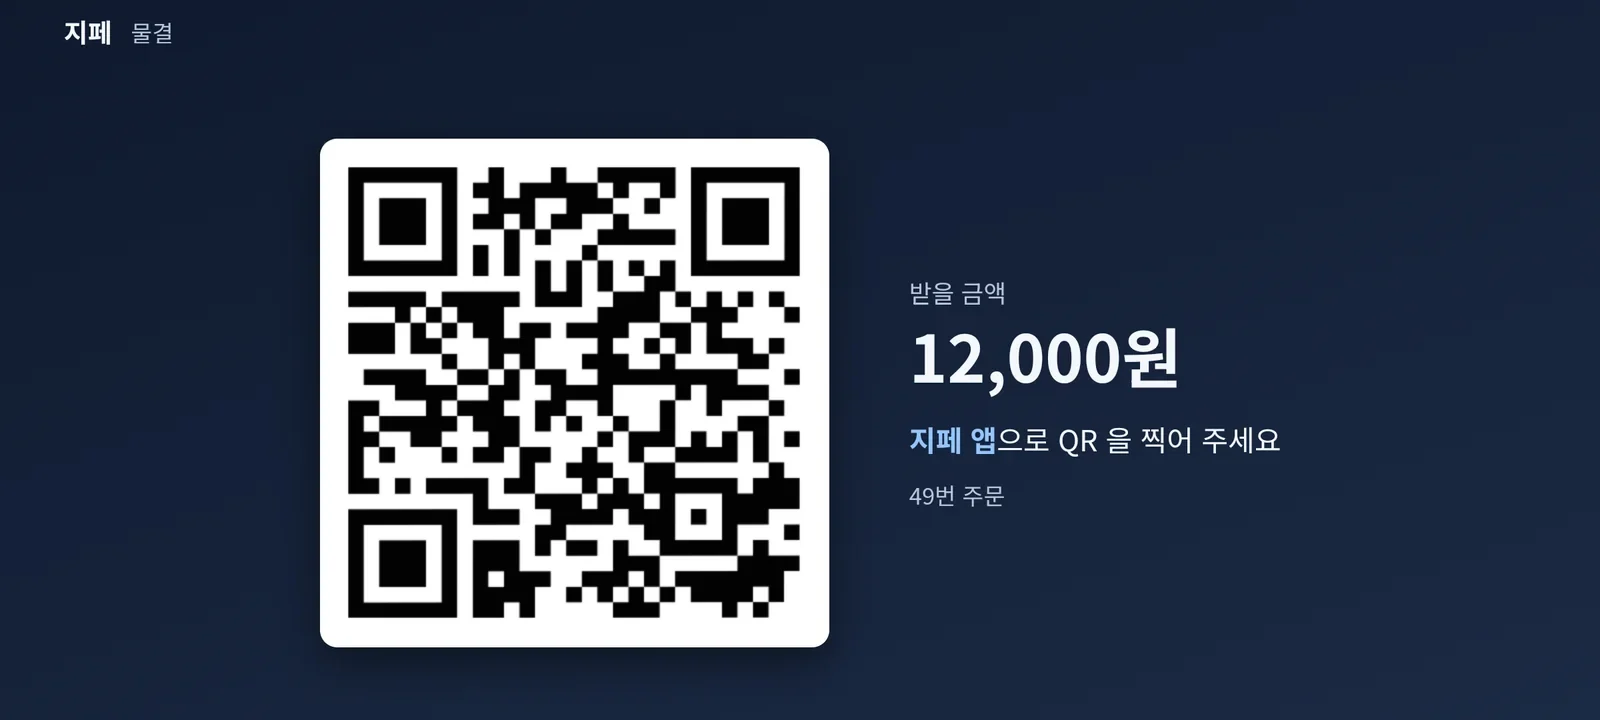
- The QR and the amount due are shown in large size on the screen. When the customer scans the QR with the Gpay app, a payment screen for that amount opens on the customer's phone. The customer cannot change the amount.
- When the customer enters the payment screen, POS shows “The customer is paying”. When payment is complete, “Payment confirmed” is shown, then the window closes automatically and the receipt is printed.
- If you have a customer monitor or tablet, the same QR is also shown in large size on the customer screen. 6
- The QR is for that order only. You cannot save it as a photo and use it later.
- Someone in the party can pay for everyone. Even at a table where several customers each ordered in their own app, one person can scan the payment QR and pay for the whole table (latest version of the Gpay app). The order history stays with the people who ordered, and earned mileage goes to the person who paid. POS lists and details show “Paid on behalf (○○)”.
4.2 Store QR (sticker)
Every store has its own store QR. It is the same as the sticker QR attached at the checkout counter, and when you click the 매장 QR Store QR button on the right, the same QR is shown on the screen (use it instead when you do not have the sticker).
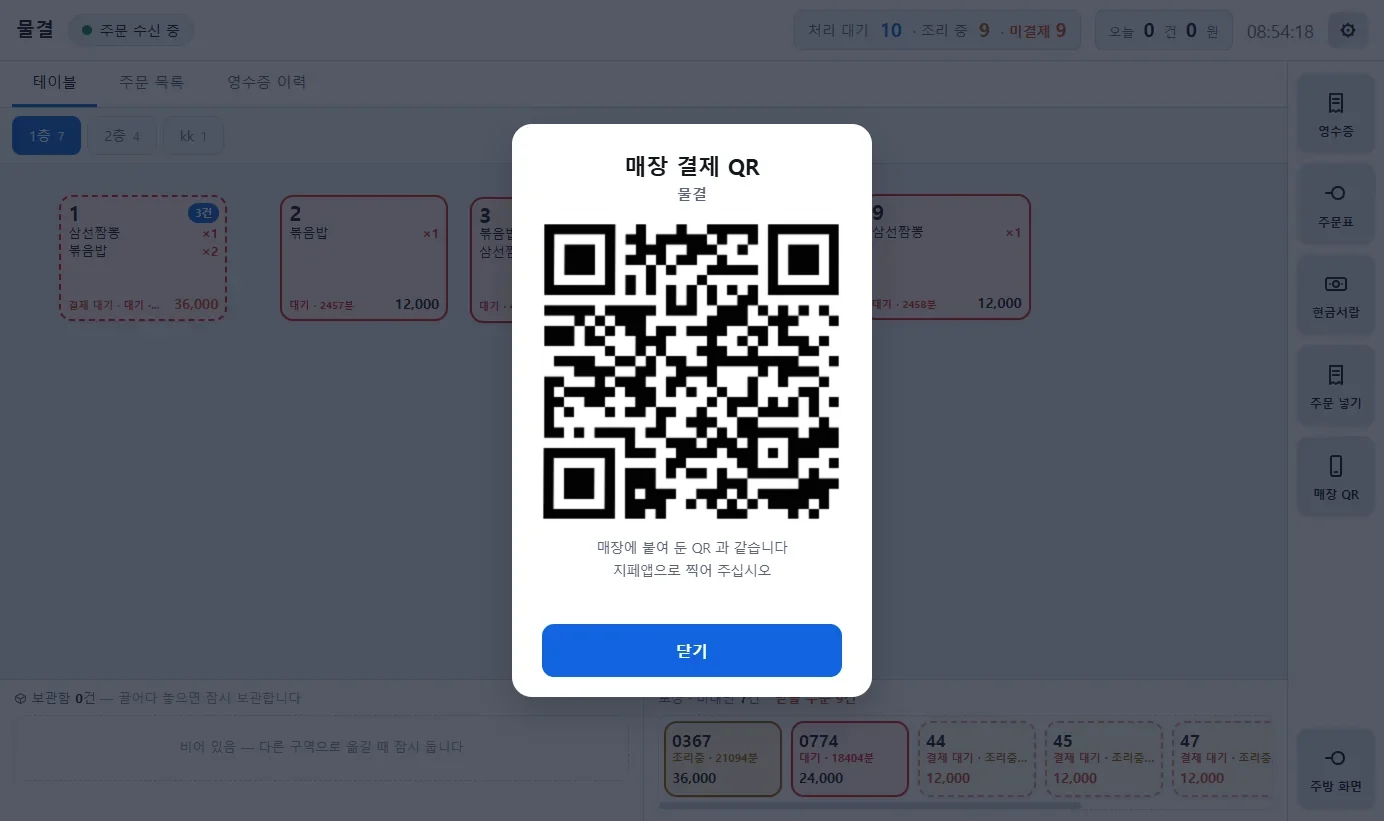
- Normally: When a customer scans the sticker, a payment screen where the customer enters the amount opens in the Gpay app. The customer enters the amount and pays. Be sure to check the payment amount.
- While POS is showing a payment QR: Even if a customer scans the sticker, a payment screen opens with the amount of that order fixed. Whether the customer scans the QR on the screen or the sticker at the checkout counter, payment goes to the same order. In this state, the payment QR window shows “Scanning the store QR at the checkout counter also pays for this order”.
- The customer's phone first shows the store, table, order number, and amount, and has only 결제 Pay / 나가기 Exit buttons. If another customer scans the sticker and someone else's order appears, tell them to close it with 나가기 Exit and let the checkout counter know. When you close the payment QR window in POS, the sticker immediately returns to its normal behavior (entering an amount).
This feature works when the customer's Gpay app is the September 2026 version or later. With an earlier version of the app, scanning the sticker always opens the amount entry screen. In that case, tell the customer to scan the payment QR on the screen.
4.3 Cash payment
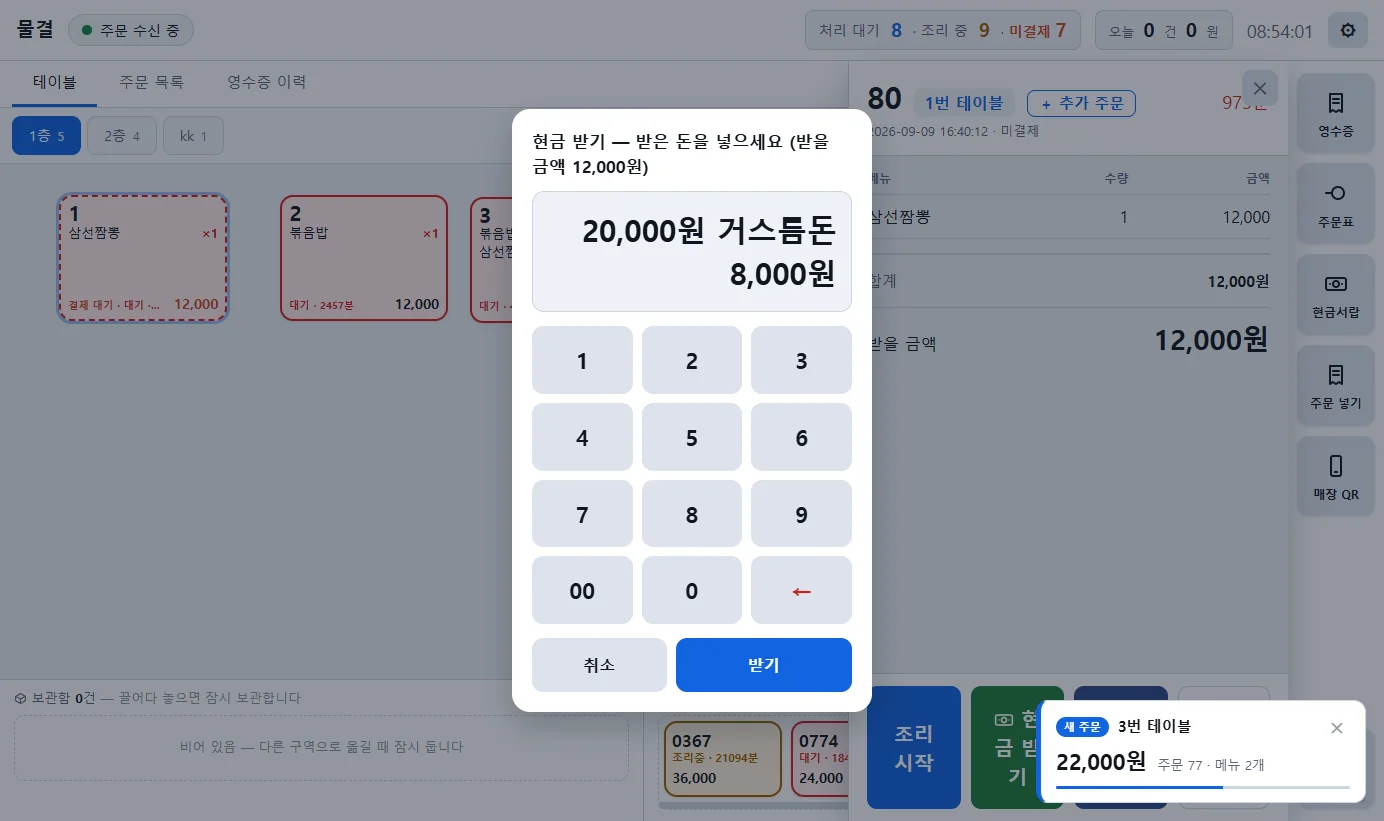
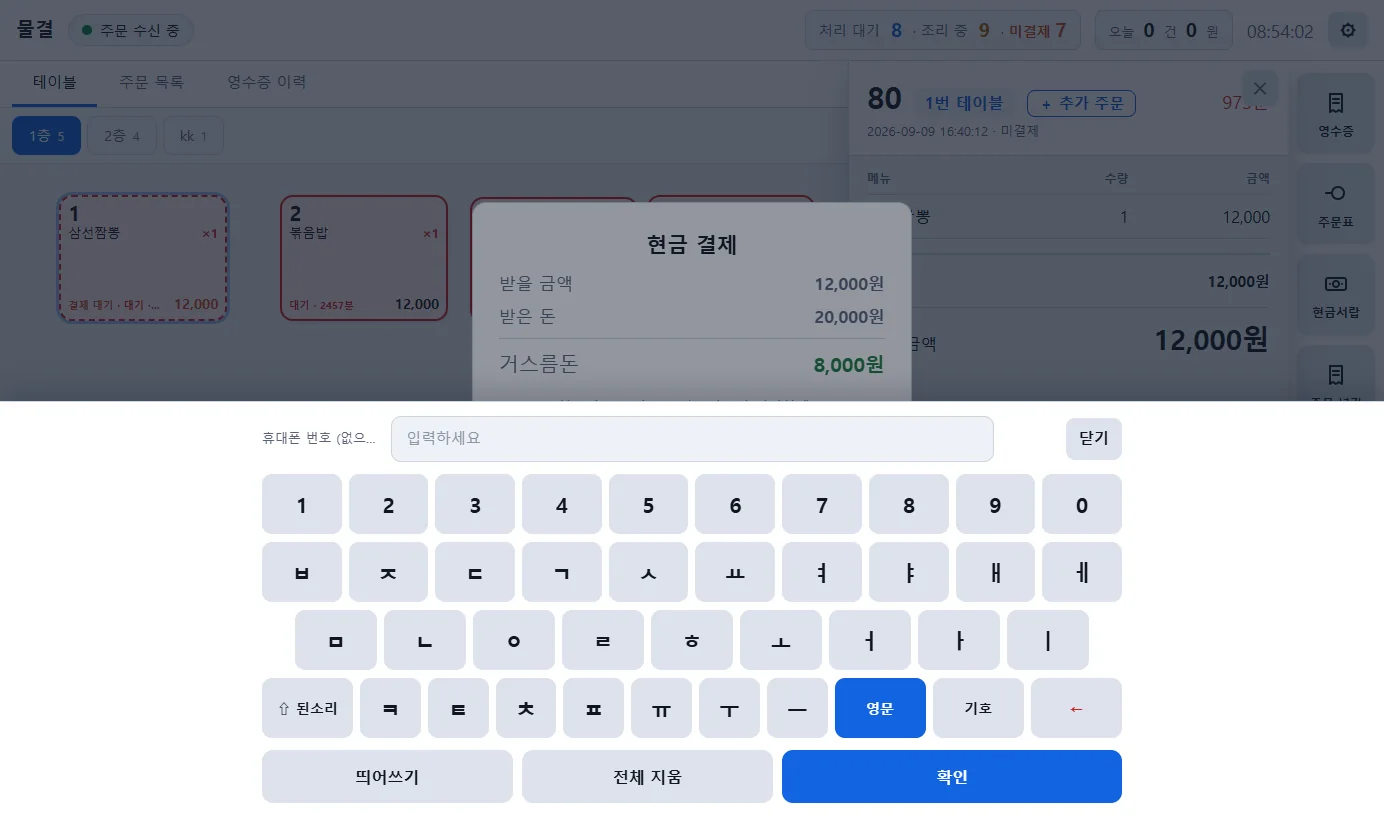
- Click 현금 받기 Take cash in the order details.
- Enter the amount received on the number keypad. If it is more than the amount due, the change is shown; if it is less, “Not enough” is shown. Click 받기 Receive.
- In the “Cash payment” window, check the amounts again. If the customer asks for a cash receipt, enter their phone number; if not, leave it blank and click 확인 OK.
- If a cash drawer is connected, the drawer opens and the receipt is printed. The order status changes to “Paid”.
4.4 Bulk payment for a table
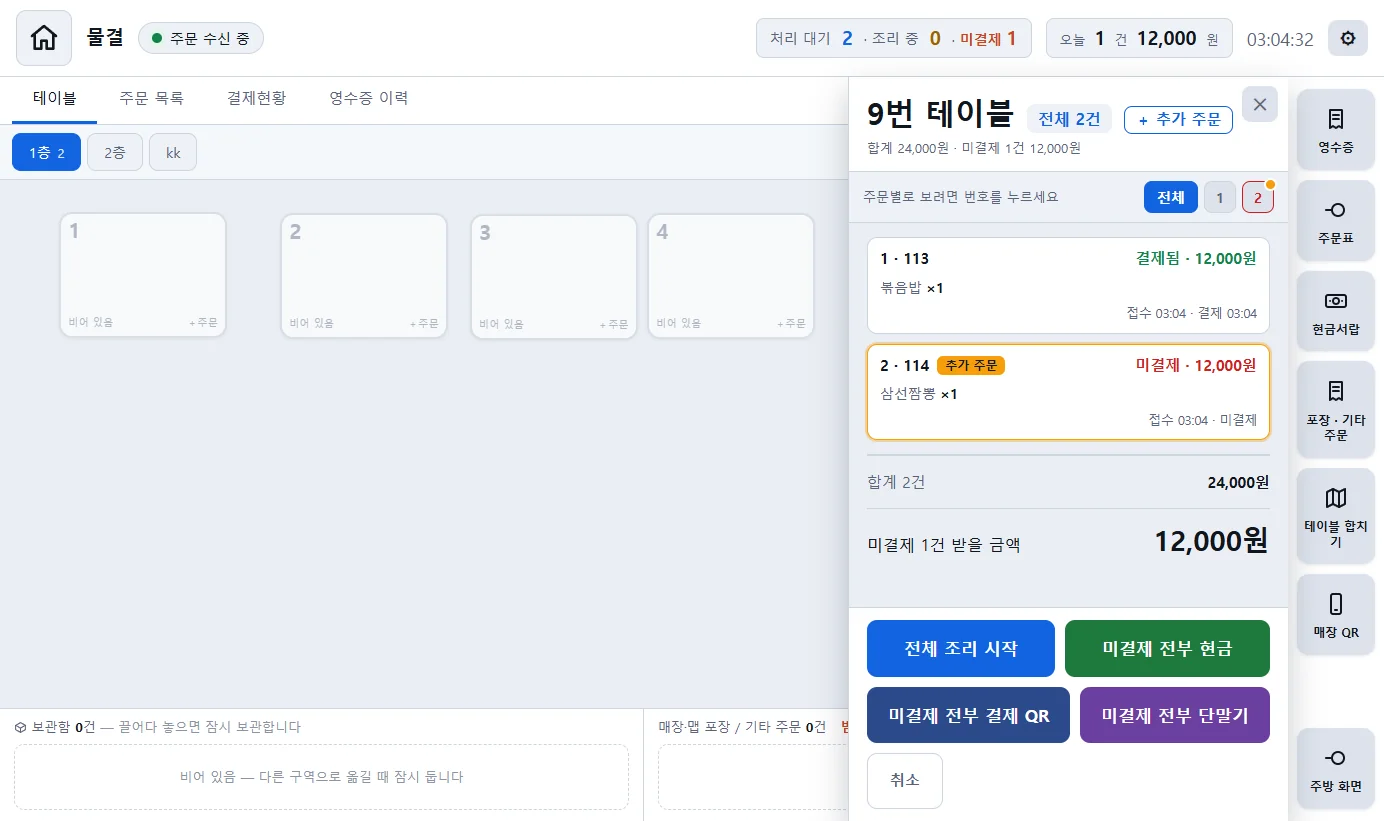
- When you click a table that has several orders, the 전체 All tab opens first. Each order shows its received and payment times (only the payment time in pay-first stores) at the bottom right, and a new order you have not checked shows “Additional order”. An order that another customer paid for shows “Paid on behalf (○○)”.
- Buttons at the bottom: 전체 조리 시작 Start cooking all (all orders before cooking) · 미결제 전부 현금 All unpaid in cash (pays the total in cash; 1 combined receipt) · 미결제 전부 결제 QR All unpaid by payment QR · 미결제 전부 단말기 All unpaid by card terminal (purple; closes all unpaid orders at once as a card terminal payment; see section 4.9) · 취소 Cancel
- 미결제 전부 결제 QR All unpaid by payment QR: Attaches the same payment tag to the unpaid orders so they are collected with 1 QR code. The customer scans only once, and the total amount is shown. The QR window shows “○ orders bundled · they will be merged into one once paid”, and when you display it, the message “N orders bundled into one QR — they will be merged into one once paid” appears briefly. The orders are merged into one only after payment is complete. If payment is not made, only the tag disappears, and the orders and order numbers stay as they are. If the orders of several customers who each ordered separately are mixed in, “Receiving payment for the orders of several people at once · earned mileage goes to the payer” is also shown. Explain this to the customer.
- 취소 Cancel: A window opens where you choose “Cancel unpaid only” or “Cancel everything including paid orders”. If paid orders are included, owner login or the staff PIN is required, depending on the cancellation permission settings. 4.7
- To pay for each order separately, open only that order with its number button (1, 2, 3 …) and pay. Use this for customers who pay individually.
4.5 Customer bill requests (pay-later stores)
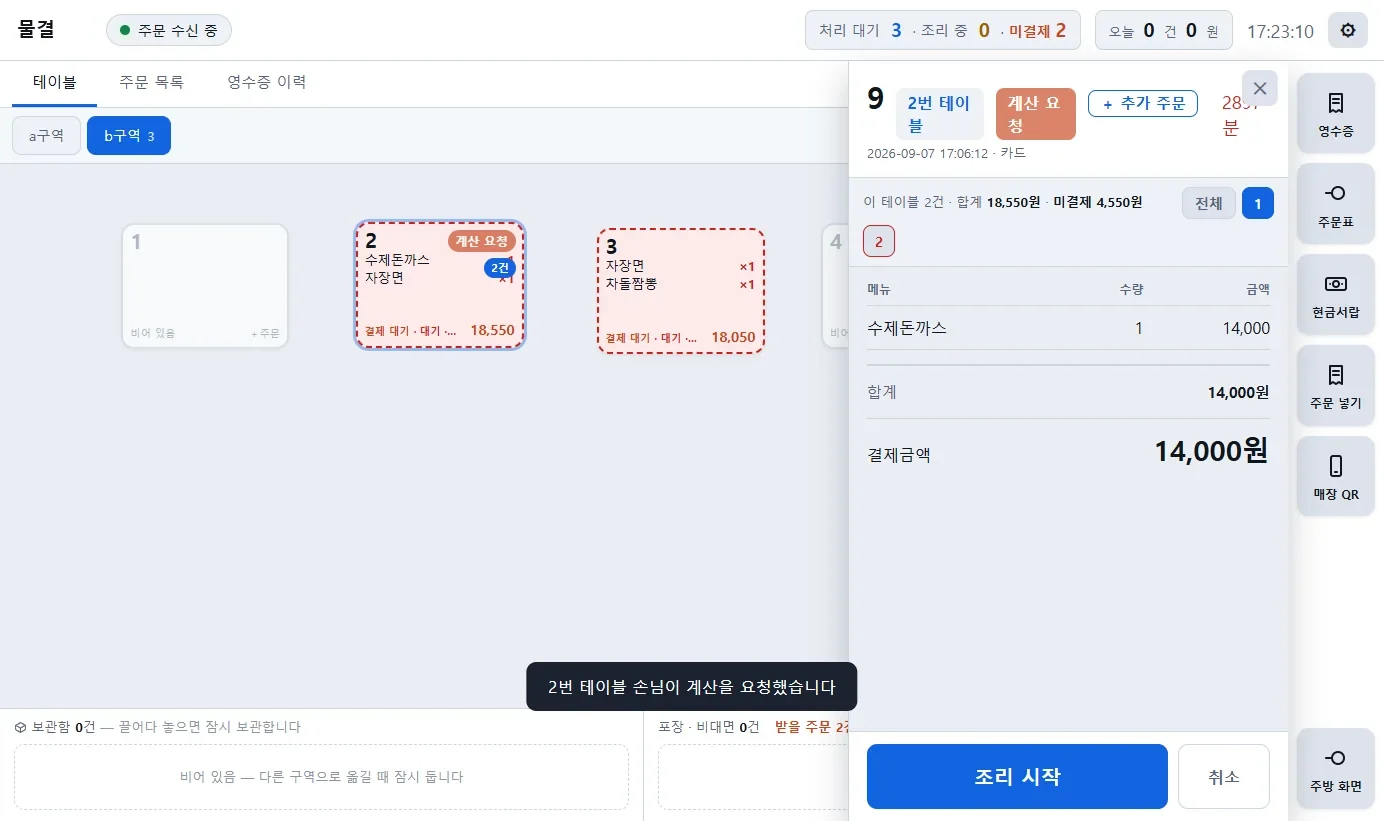
- In a store where customers pay after the meal (pay later), when a customer taps 계산할게요 I'll pay now in the app, “Bill request” appears in POS.
- When you show 결제 QR Payment QR or 미결제 전부 결제 QR All unpaid by payment QR for that table, the badge clears automatically. It also clears when the table pays in cash.
4.6 Additional orders while a QR is displayed
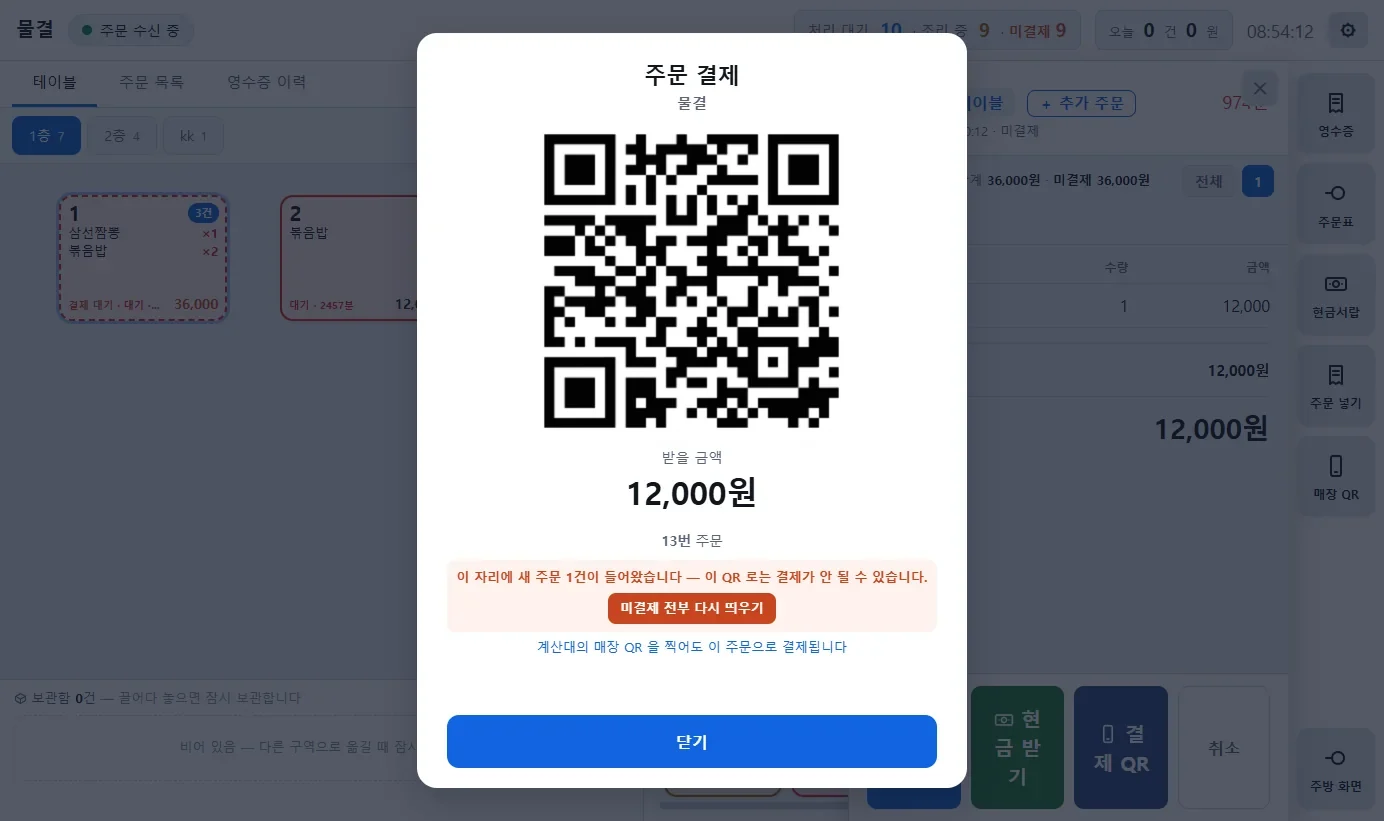
If a new order is received for the same table while the payment QR is displayed (because a customer ordered more in the app or staff entered an additional order), the existing QR may not work for payment. Click 미결제 전부 다시 띄우기 Show all unpaid again in the window to show a new QR that bundles the unpaid orders of that table. If a customer says “the QR does not work”, click this button.
4.7 Canceling orders and payments
- Click 취소 Cancel in the order details, then click 예 Yes at “Are you sure you want to cancel?” An order before payment is deleted immediately.
- When you cancel a paid order, the customer is refunded (app payments are refunded through the app; cash is paid out from the drawer). Because of this, you set cancellation permission in 1.7 Staff permissions. The default is Store owner only. When logged in as staff, depending on the setting, either the message “Store owner login is required” appears or the staff PIN window opens.
- When you cancel, a cancellation receipt (sales cancellation slip) is printed automatically (Settings > Printer connection > Auto print cancellation receipts). Give this slip to customers who paid by card or app.
- If a table has several orders, choose “Unpaid only / Everything including paid” at 취소 Cancel on the 전체 All tab. 4.4
- To remove just one menu item or reduce its quantity instead of canceling the whole order, use 수정 Edit on the menu row in the order details (orders before payment only). 2.2
Canceling an order that has been paid and served
An order that is fully paid disappears from the table screen and the order list, so you cannot find it to cancel with 취소 Cancel in the order details. Cancel it from the Receipt history.
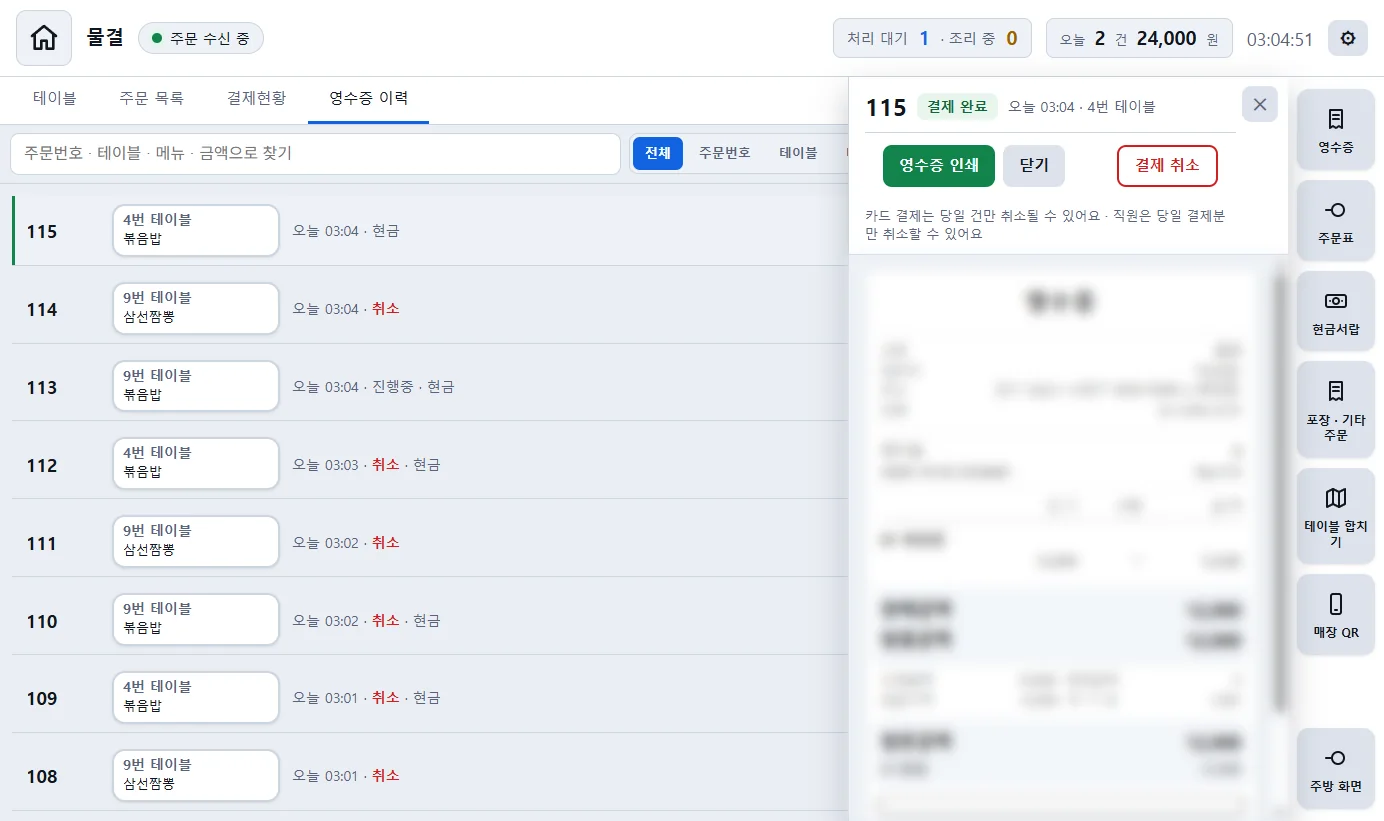
- Click Receipt history in the tabs at the top, then click the row of the order to cancel. If it is not today's order, find it with the period chips (Yesterday · 7 days · 30 days · Period…).
- Click 결제 취소 Cancel payment at the top of the preview that opened on the right. One line below the button shows the current staff permission setting, such as “Card payments can only be canceled on the same day · Staff …”.
- The confirmation window shows the order number, amount, and payment method. Click 결제 취소 Cancel payment to cancel, or 돌아가기 Go back to back out. With the staff PIN method, a PIN entry window opens one more time.
- The button changes to “Canceling…”, and when it finishes, “Canceled” appears on the history row and the preview changes to look like a cancellation receipt (red title, negative amounts). The cancellation receipt is printed.
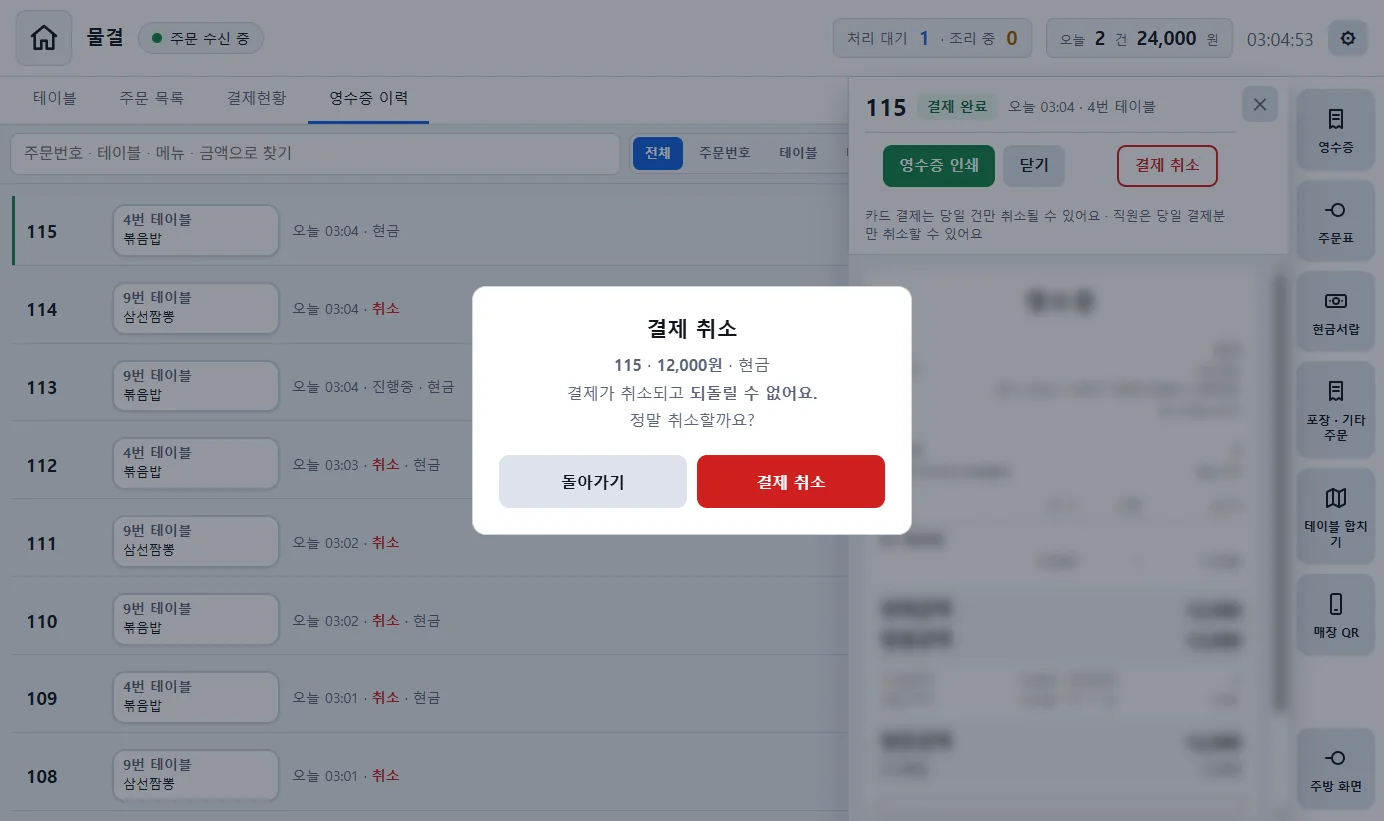
- 결제 취소 Cancel payment is shown only for orders that have been fully paid. It is not shown for orders before payment, orders that are already canceled, or when the history could not be loaded from the server and an “Offline copy” mark appears at the top of the history (check your internet connection and reopen the history).
- Because the order has already been served, no cancellation order slip is printed in the kitchen.
- When you cancel a card payment, a cancellation of the card approval is requested as well. A card payment can be canceled only on the same day. Whether staff can cancel when logged in as staff (Store owner only · PIN · Same day only · Allow staff) follows the settings in section 1.7, and if the cancellation is refused, the reason is shown on the screen.
4.8 Receipt reissue and receipt history
- When payment is complete, the receipt is printed automatically. To print it again, open the order details and click 영수증 Receipt on the right.
- Find earlier receipts on the Receipt history tab. Type in the search field at the top, and use the chips on the right (All · Order number · Table · Menu · Amount) to choose what to search by. You can also view past dates with the period chips (Today · Yesterday · 7 days · 30 days · Period…).
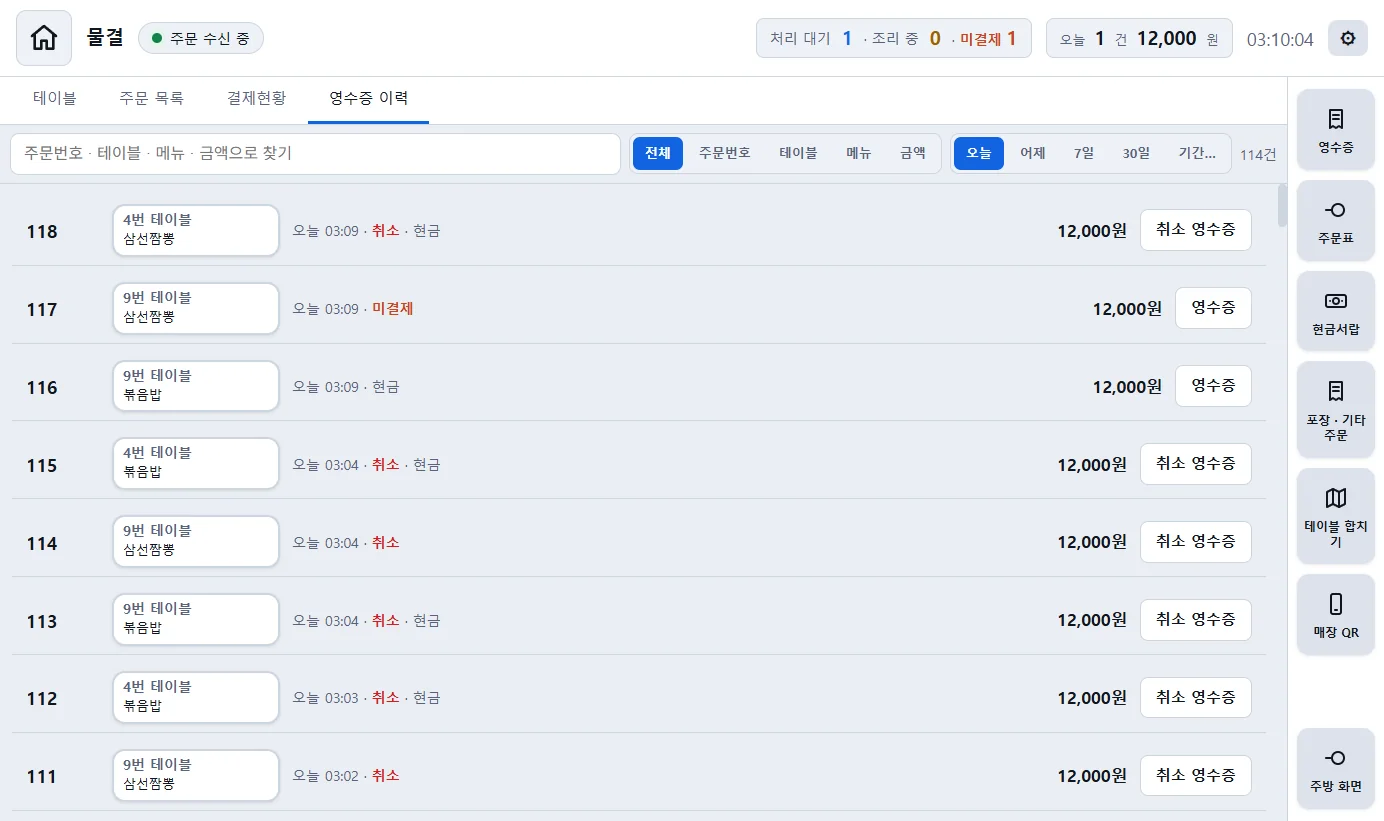
- Click 영수증 Receipt on the right of a row to print it again right away. A canceled order is printed as 취소 영수증 Cancellation receipt (an order closed with “Card terminal payment” is not a cancellation, but a regular 영수증 Receipt. See section 4.9). If you click the row itself, a receipt preview opens on the right, and you can print it with 영수증 인쇄 Print receipt in the preview or cancel it with 결제 취소 Cancel payment. 4.7
- When logged in as staff, you cannot view history from before yesterday. If you need earlier dates, check after logging in as owner.
4.9 When you take payment on a card terminal (terminal payment)
This feature is for stores that use a card terminal (card reader) separately from POS. It records an order the customer paid for on the card terminal as a closing record in POS. The card approval is obtained on the terminal; POS shows the amount and then closes the order. 단말기 결제 Card terminal payment is shown only for orders before payment.
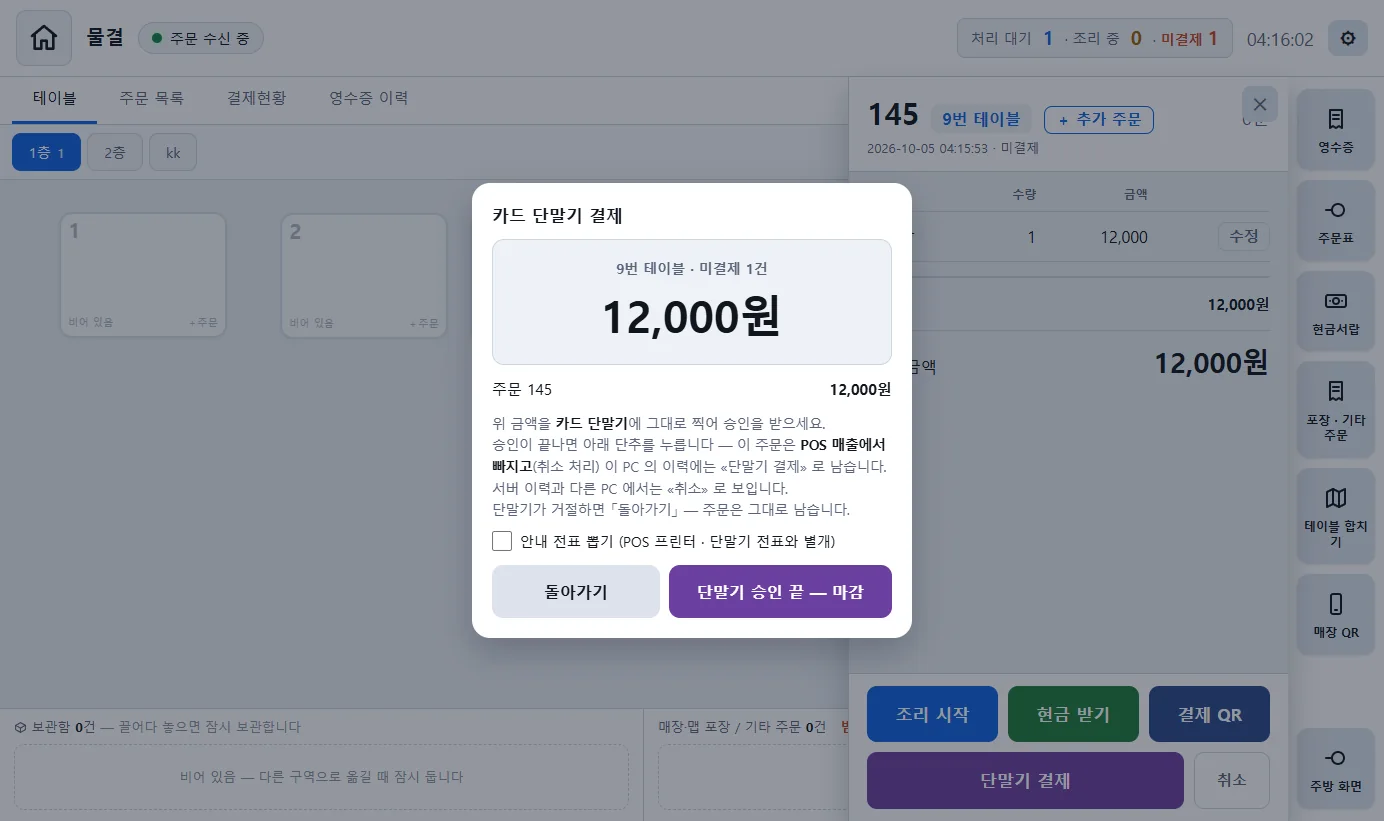
- Click 단말기 결제 Card terminal payment (purple) in the order details. If a table has several unpaid orders, click 미결제 전부 단말기 All unpaid by card terminal on the 전체 All tab.
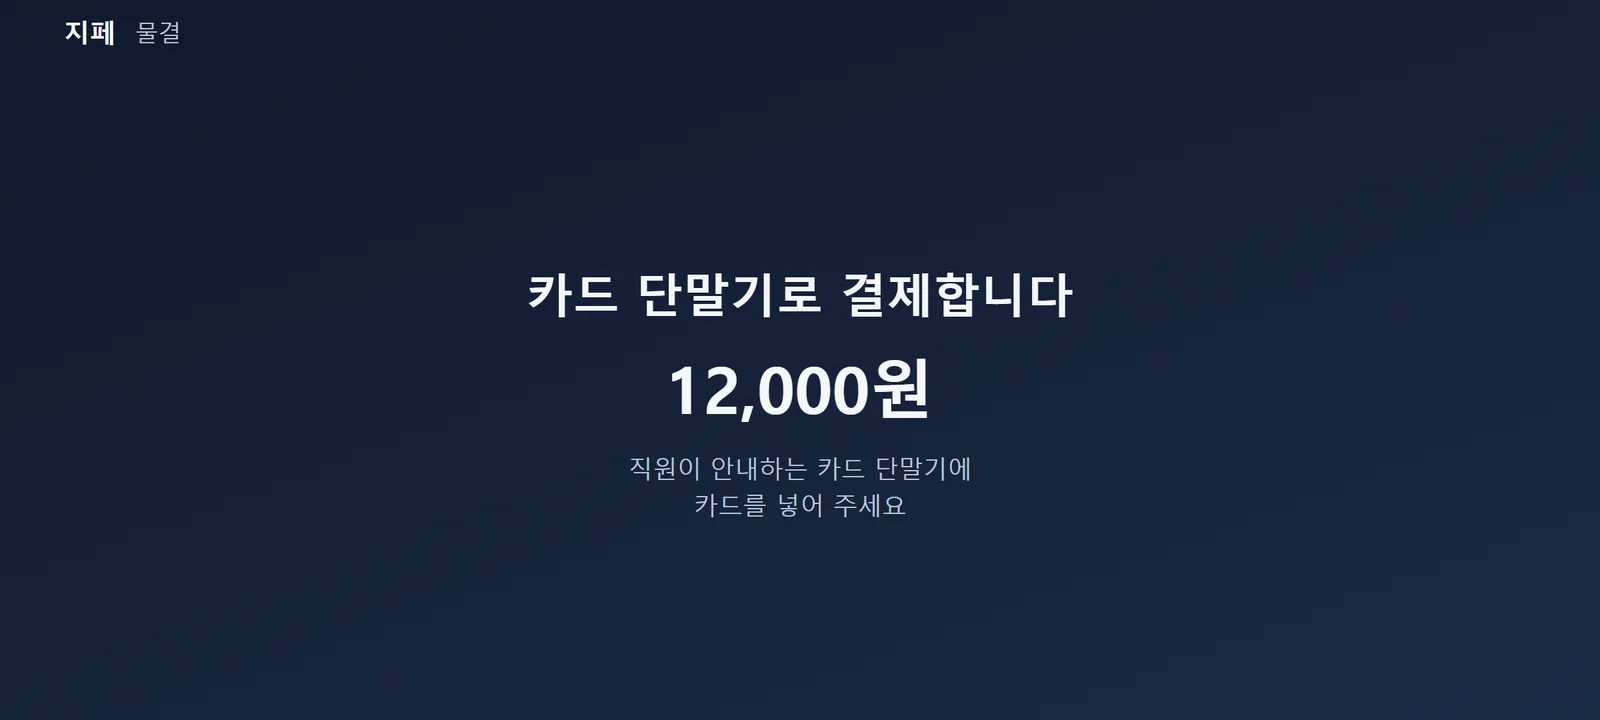
- The “Card terminal payment” window shows the amount due and the order list. At the same time, the customer screen shows “Paying by card terminal” and the amount.
- Enter this amount into the card terminal exactly as shown and get approval with the customer's card. If a separate receipt is needed, check Print guide slip in the window (the POS printer prints 1 slip with the payment method “Card terminal (outside POS)”; this is separate from the card slip printed by the terminal).
- When the approval is done, click 단말기 승인 끝 — 마감 Terminal approved — close out. A message “Closed as a terminal payment — N orders · N KRW (not counted in POS sales)” is shown and the order is closed. If the terminal declined the card, or you want to stop, click 돌아가기 Go back. The order stays as it is.
Click 단말기 승인 끝 — 마감 Terminal approved — close out only after the approval is complete on the card terminal. POS cannot confirm the card approval, so check the amount yourself. A closed order is processed as canceled, is not counted in POS sales, and disappears from the table and kitchen screens (no cancellation order slip is sent to the kitchen). If you close an order before cooking, the kitchen cannot see it, so use this when the customer pays after being served. Manage card terminal payment amounts as sales on the card terminal side.
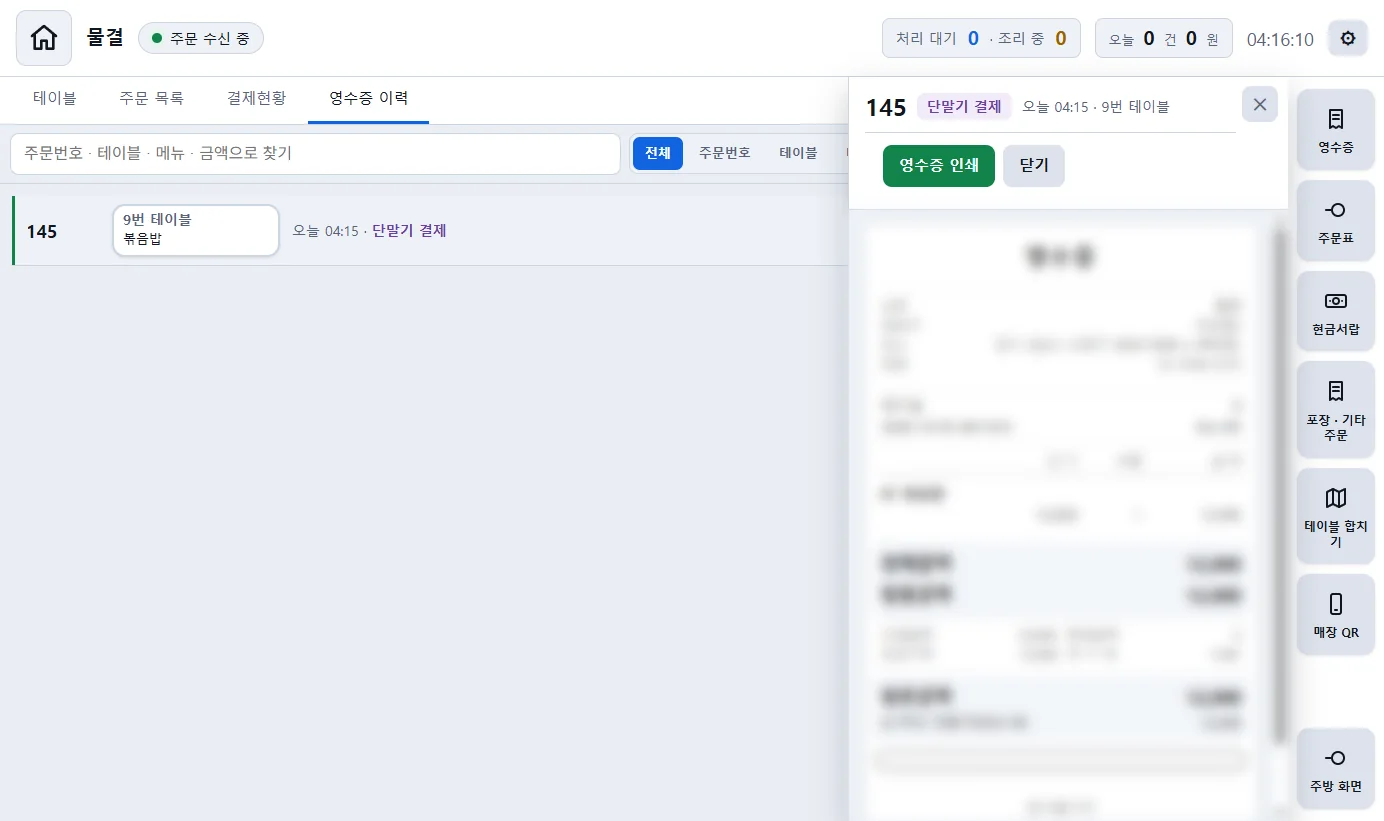
The “Card terminal payment” mark is recorded on the POS (PC) that closed the order. In the history kept on the server, and on other PCs and the phone app, this order looks like a regular cancellation, shown as “Canceled” (the amount and order contents are the same). If you reinstall this POS or move it to another PC, orders closed before that may appear as “Canceled”, so manage terminal payment records together with the records on the card terminal. Terminal payments have already been approved on the card terminal, so do not use 결제 취소 Cancel payment or 취소 영수증 Cancellation receipt in POS for them. Cancel on the card terminal.
5Kitchen
5.1 Start cooking and mark as served
- When you click 조리 시작 Start cooking in the order details, the table turns yellow and shows “Cooking”, and a cooking-started notification is sent to the customer's app. The button changes to 서빙 완료 Served.
- When you click 서빙 완료 Served, the table turns gray and shows “Served” (“Handed over” for takeout orders). An order that is fully paid disappears from the tables, and if an unpaid amount remains, it stays as “Unpaid”.
- To start several orders of one table at once, click 전체 조리 시작 Start cooking all on the 전체 All tab. 4.4
- For a takeout order, when you click 준비완료 알림 Ready notification, a ready notification is sent to the customer's phone and the button changes to “✓ Ready” (1 time only). In pay-later stores, you can click it even before payment.
5.2 Kitchen screen
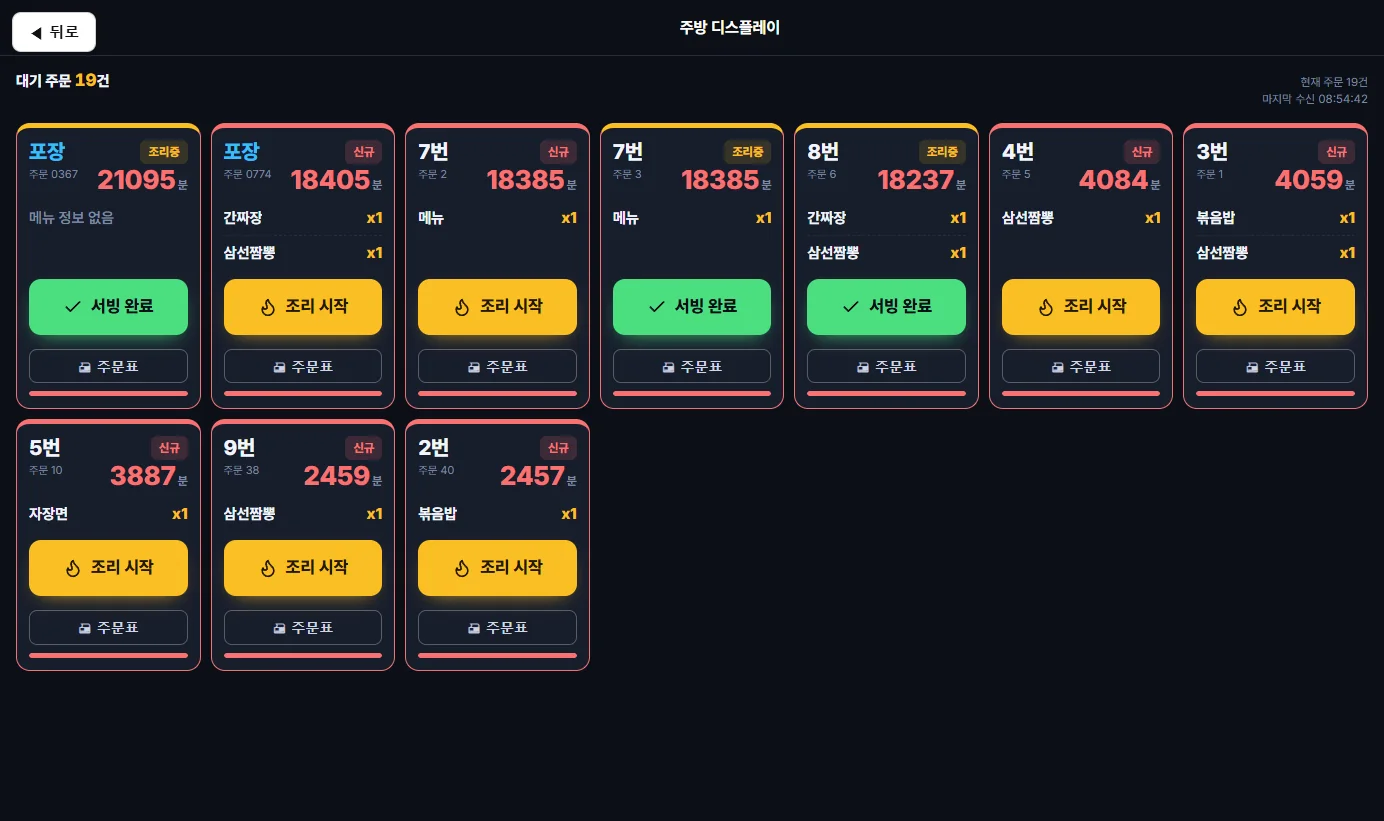
- Each order is shown as one card. The New · Cooking status and the elapsed time are shown in large size, and 조리 시작 Start cooking / 서빙 완료 Served on the card work the same as the buttons on the table screen.
- You can place a tablet in the kitchen and show this screen on it. 6.2
5.3 Kitchen order slip
- When you click 주문표 Order slip on the right, the kitchen order slip for the selected order is printed. Only the menu items and quantities are printed in large type, without prices.
- If you set Settings > Kitchen order sheet > Auto print new orders to 켬 On, an order slip is printed automatically every time an order is received. If there is an additional order for the same table, an “Additional order slip” is printed; if an order is canceled, a “Cancellation order slip” is printed.
- Order slip timing: Sets when the paper order slip is printed. “Immediately on order” prints it as soon as the order is received, and “After payment” prints it after the customer has paid. If you set “After payment”, orders before payment are shown on the table as “Awaiting payment”. Pay-later stores should set “Immediately on order”. For the criteria for the orders shown on the kitchen screen, see section 1.5.
- If you delete a menu item or reduce its quantity (2.2 Edit), a “Revised order slip” is printed.
- Select a dedicated kitchen printer at Settings > Printer connection > Kitchen printer 고르기 Choose (USB, LAN, or COM). The default is “Same as receipt printer”, in which case slips are also printed on the receipt printer. Adjust the text size, margins, and menu order while watching the preview in the Kitchen order sheet settings, then click 저장 Save.
6Customer screen and tablet
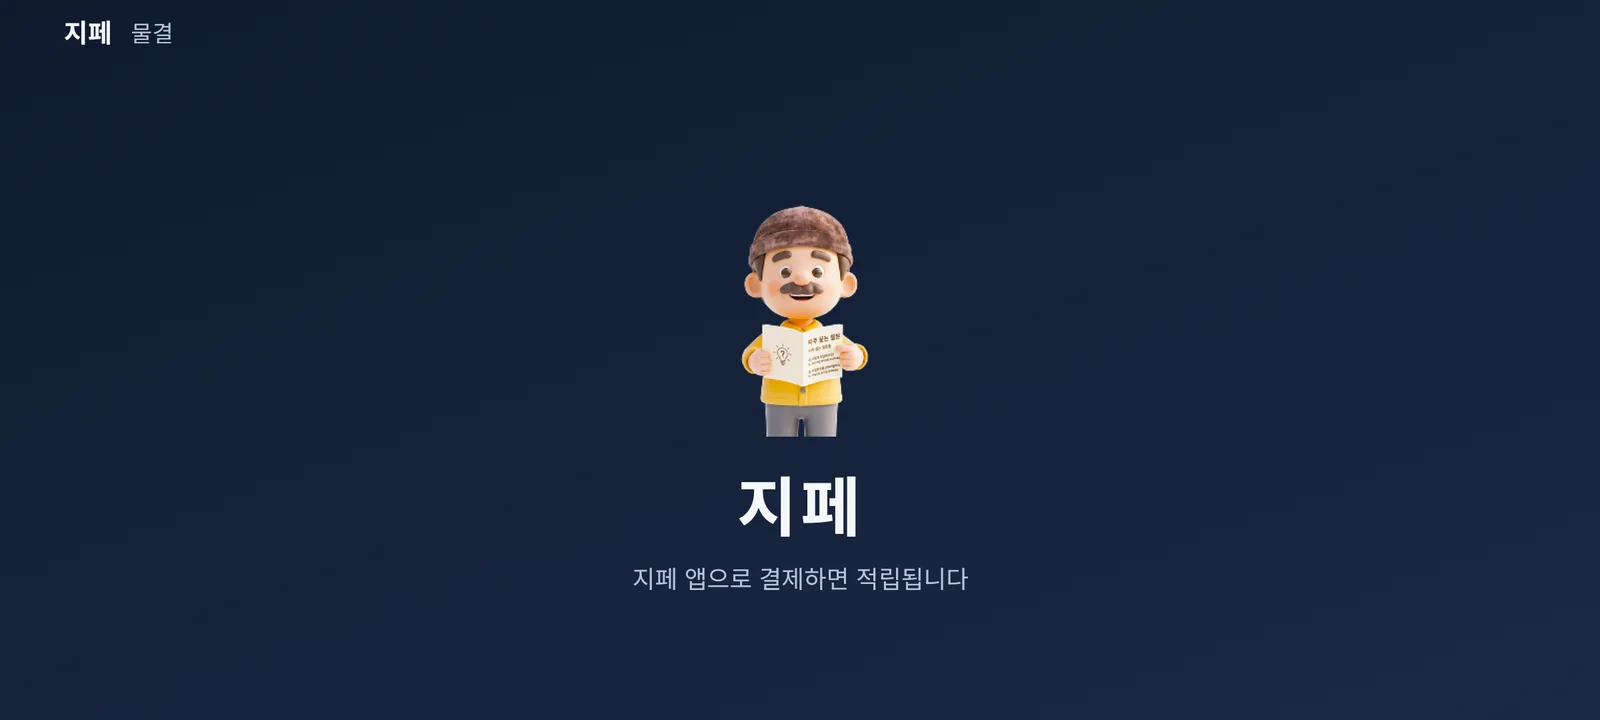
The customer screen shows the payment QR in large size. Normally it shows the store name and the message “Pay with the Gpay app to earn mileage”; while a payment QR is displayed, it shows the QR and the amount; and after payment is complete, it shows “Thank you”. When staff open the 단말기 결제 Card terminal payment window, it shows “Paying by card terminal” and the amount (4.9).
6.1 Customer monitor
- Connect an additional customer monitor to the PC (“Extend” in Windows display settings).
- Set Settings > POS screen > Customer screen (second monitor) to 켬 On.
- The customer screen is shown in full screen on the customer monitor. It also appears automatically if you disconnect the monitor and reconnect it.
6.2 Tablet app “Gpay Customer and Kitchen Screen”
You can show the customer screen or the kitchen screen on an Android tablet. The tablet must be on the same Wi-Fi as POS (or wired to the same router), and it connects directly without going through the internet.
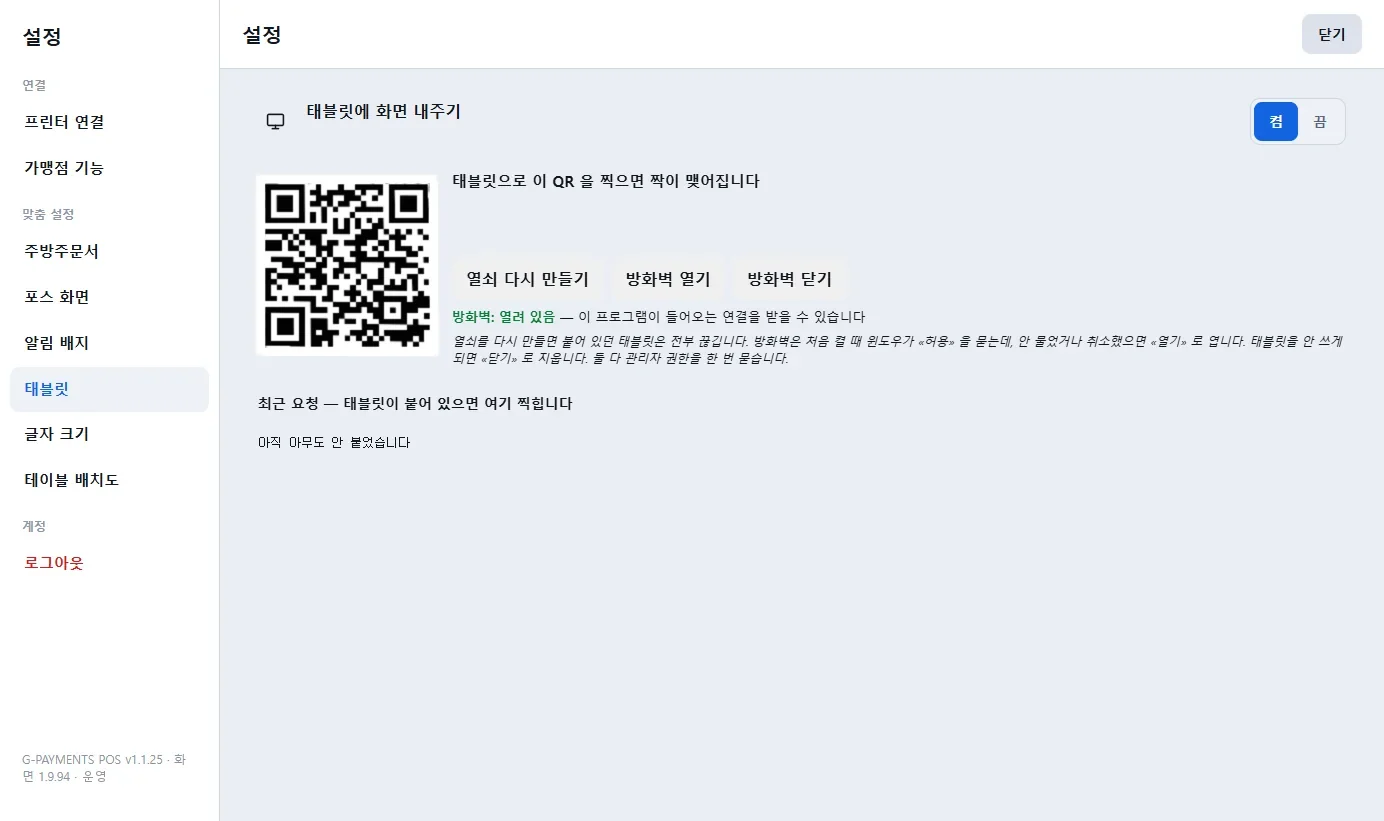
- In POS, set Settings > Tablet > Send screen to tablet to 켬 On. If the Windows firewall permission window appears, allow it. If it does not appear, click 방화벽 열기 Open firewall.
- Install and launch the Gpay Customer and Kitchen Screen app on the tablet. Use QR 찍기 Scan QR to scan the connection QR on the POS screen. If there is no camera, enter the address shown on the screen and the 12-character key in 주소 직접 넣기 Enter address manually.
- Choose one of Customer screen / Kitchen screen, set a settings password (4 digits), and then tap 연결 확인 후 시작 Check connection and start.
- After that, when you turn on the tablet, the screen you chose is shown automatically. On the kitchen screen, you can tap 조리 시작 Start cooking · 서빙 완료 Served on the tablet.
- The tablet settings (switching between customer and kitchen, lock, reconnect) open when you press and hold a corner of the screen for 3 seconds or more and enter the password. Customers cannot access the settings.
- If POS is shut down or the Wi-Fi is disconnected, the tablet shows “Looking for POS…”, and it reconnects automatically when the connection is restored.
- If you click 열쇠 다시 만들기 Regenerate key in POS, all connected tablets are disconnected, so you need to connect them again. If you no longer use a tablet, click 끔 Off and 방화벽 닫기 Close firewall.

7Troubleshooting
“The service is under maintenance” is shown and the program cannot be operated
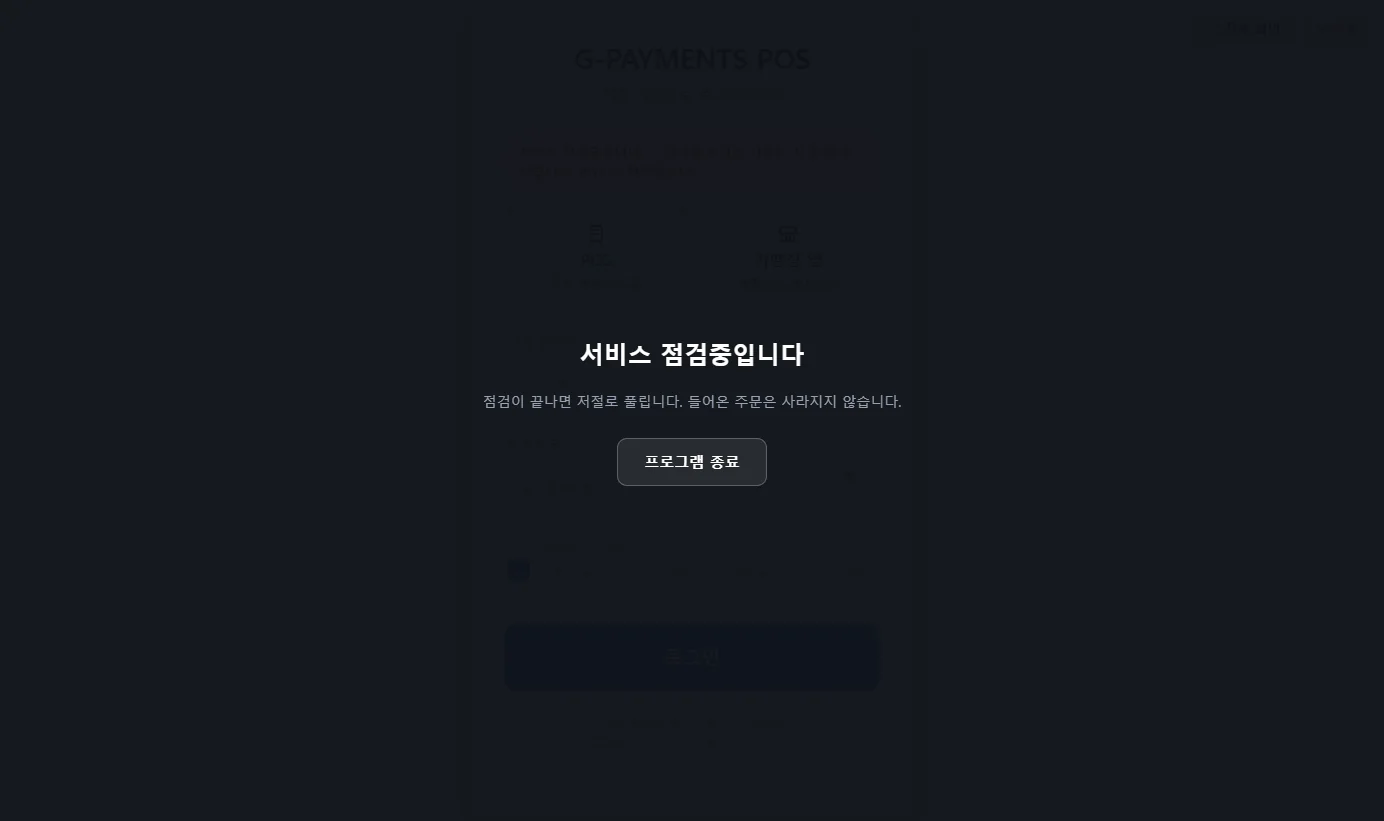
This screen is shown while the Gpay server is under maintenance. It clears automatically when maintenance ends, and orders received during maintenance are not lost. You do not need to quit the program.
It stops at “Downloading new version” or 다시 받기 Download again is shown
The internet connection was temporarily lost. Check the connection and click 다시 받기 Download again. If that does not solve the problem, quit the program and launch it again, and it downloads everything again from the start. To prevent payments from being made while the server and screen versions do not match, you cannot continue doing business with an earlier version.
“The connection between the screen and the program was lost. Please turn POS off and on again” is shown
This message is shown on rare occasions when the connection between the screen and the program is lost. Quit the program with 종료 Quit at the top right and launch it again from the desktop icon. Received orders are kept on the server, so they are not lost.
The receipt does not print (“Receipt printer not found”)
This happens when the printer is turned off, the USB cable has been disconnected, or no printer has been selected yet. Go to Settings > Printer connection > 고르기 Choose, select the printer, and check it with 시험 인쇄 Test print. Gpay POS does not print to the Windows default printer (this prevents receipts from accidentally printing on an office printer). Stores without a printer can set the connection method to “No printer”, and this message will not be shown.
A customer scanned the QR but says the payment does not go through
- Either the order has already been paid, or an order was added to the same table in the meantime. While the payment QR window is open, the QR does not expire as time passes. Close the window and show 결제 QR Payment QR again, or, if 미결제 전부 다시 띄우기 Show all unpaid again is shown in the window, click that button. 4.6
- If a customer scanned the sticker at the checkout counter and an amount entry screen opened, either the customer's app is an earlier version or no payment QR is displayed in POS. Tell the customer to scan the payment QR on the screen. 4.2
Orders are not being received
- Check that the top left shows “Receiving orders” (green). If not, check your internet connection and launch the program again.
- You cannot receive orders while on the login screen. Do not log out during business hours.
- Pay-first orders waiting for payment (orders for which a payment QR is shown but payment has not yet been made) are not shown on the kitchen screen until payment is confirmed; they are only indicated by “N pay-first orders waiting for payment”. If the order slip timing is “After payment”, the paper order slip is also printed after payment. 1.5 · 5.3
The tablet does not get past “Looking for POS…”
- Check that POS is running, that Settings > Tablet is set to 켬 On, and that the tablet is connected to the same Wi-Fi as POS.
- Check that the firewall under Settings > Tablet shows “Open”, and if not, click 방화벽 열기 Open firewall.
- If you clicked 열쇠 다시 만들기 Regenerate key in POS, you need to reconnect on the tablet (corner for 3 seconds → password → reconnect).
Canceling payments and opening the cash drawer do not work when logged in as staff
The owner has restricted staff permissions. If a PIN entry window opens, enter the staff PIN; if “Store owner login is required” is shown, log in as owner (Settings > Merchant features > 로그인 Log in) and then continue. To let staff do it themselves, while logged in as owner change Staff permissions to “PIN”, “Same day only”, or “Allow staff” (canceling payments) and to “Allow all” (cash drawer), and give the staff PIN to your staff. Paid orders are canceled with 결제 취소 Cancel payment in the receipt history, and card payments can be canceled only on the same day. 4.7 · 1.7
“You do not have permission to view this order” is shown
You opened an order that is still in the list on screen but has already been deleted on the server (a canceled or cleaned-up order), or an item that is not an order of this store. The list is cleaned up at the next refresh (within 15 seconds). If the message keeps appearing, launch the program again.
“N orders could not be moved” is shown when merging tables
These orders could not be moved because they were already canceled or already merged into another order. The remaining orders were moved, so check the table screen. 2.3
Something other than “운영” (live) is shown at the bottom of the screen
This is not the store (live) installation. In stores, “운영” (live) should be shown at the very bottom of the login screen. If not, download the store (live) installer from the installation guide and install again.
This manual is the October 12, 2026 revision (based on Gpay POS program version 1.3.191 and screen version 1.11.256). For installation, see the installation guide. Screens may differ slightly because of automatic updates. For inquiries, contact your Gpay merchant representative.