
User guide · October 19, 2026
Gpay Store app user guide
This guide shows, screen by screen, how to run your business with the Gpay Store app, from opening for business to menu items, products, sales and store settings. For order intake and payment, read it together with the Gpay POS user guide.
1Getting started
Gpay Store is the app used by merchant store owners and managers. After you finish the merchant onboarding process, log in on your phone to open for business, and manage orders, menu and sales at a glance on the Home screen.
From joining to your first login
Store owners don't sign up directly in the app. Joining goes through the contact center, and you log in to the app after approval is complete.
- Ask about joining by calling the contact center at 1566-4250 (weekdays 09:00–18:00 KST, lunch 11:30–12:30).
- A representative explains the store registration and contract process. Follow the instructions to complete registration and the contract.
- After approval, download the Gpay Store (지페가맹점) app from Google Play or the App Store. Inside the installed app, the screen header shows its in-app name, Gpay Store (지페스토어).
- Log in to the app by following the “Logging in” steps below.
- Register your menu (Chapter 4), then turn on the open/closed switch at the top of 더보기 More (Chapter 2).
Before approval is complete, a red band saying “You are not an official merchant yet” appears at the top of Home, together with a “Merchant approval pending” notice. In this state, your store's menu and products don't appear in the Gpay app that customers use. Ask the contact center about the approval progress.
Logging in
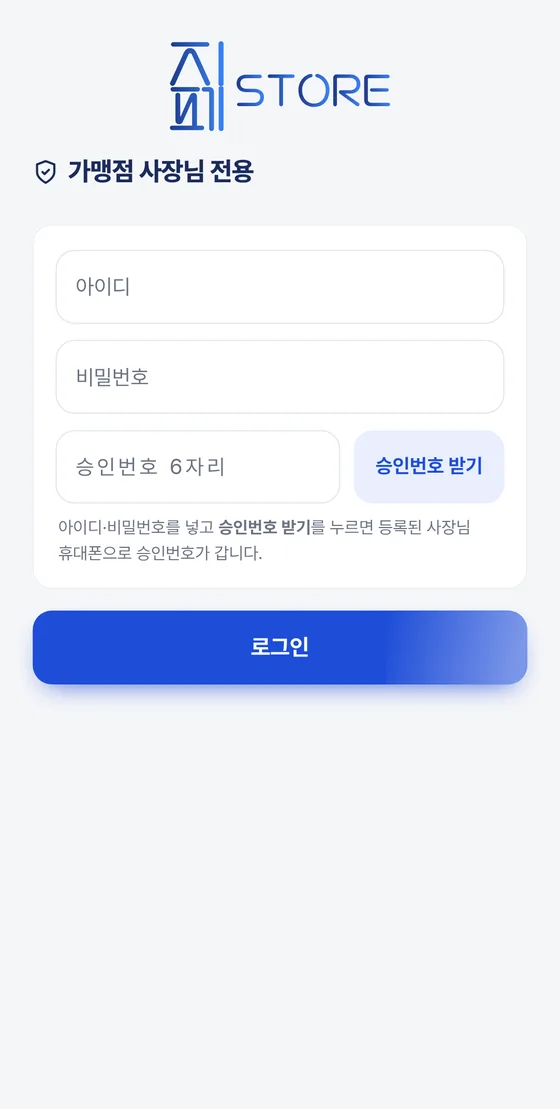
- When you open the app, the “For merchant store owners only” login screen appears.
- Enter your ID and password.
- Tap 승인번호 받기 Get approval code. The button text briefly changes to “Requesting...” and an “Approval code requested” notice appears. The approval code arrives by text message on the store owner's registered phone.
- Enter the 6-digit number you received by text in the 6-digit approval code field. In some cases the number is filled in automatically.
- Tap 로그인 Log in. While you are logging in, the button text changes to “Logging in...”.
If a field is empty, a message appears as shown below.
| Situation | Message shown |
|---|---|
| 로그인 Log in with the ID left empty | Enter your ID |
| 로그인 Log in with the password left empty | Enter your password |
| 로그인 Log in with the approval code left empty | Enter your approval code |
| 승인번호 받기 Get approval code with the ID left empty | Enter your ID first |
| 승인번호 받기 Get approval code with the password left empty | Enter your password first |
The approval code is sent only to the store owner's registered phone. If no text arrives, ask the contact center (1566-4250) to check that the registered phone number is correct.
Log out with 로그아웃 Log out at the very bottom of 더보기 More (Chapter 8).
The Home screen at a glance
Home opens when you log in. Home is a screen that gathers only “things to do now”. The open/closed switch and settings are in 더보기 More.
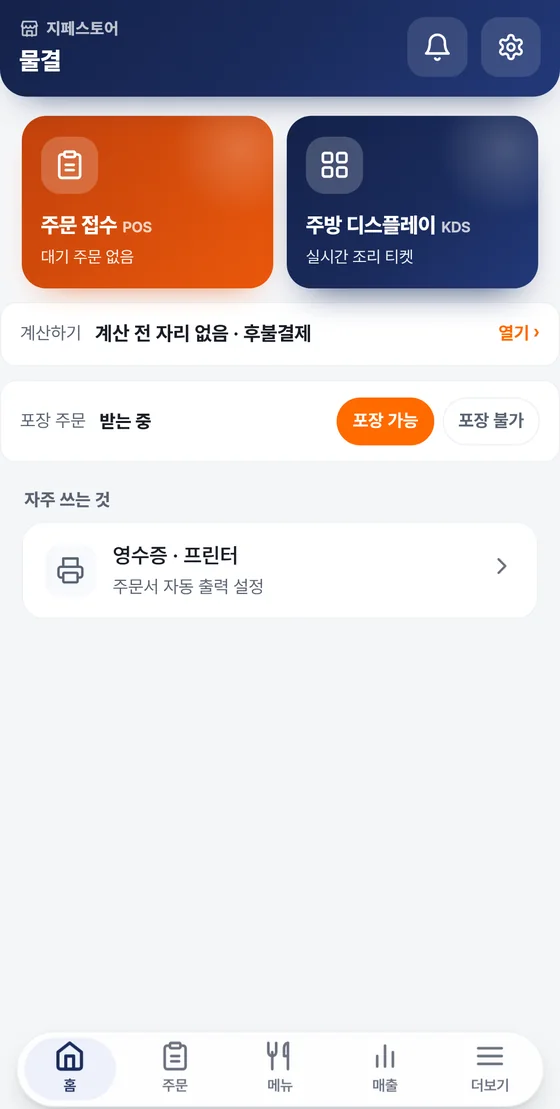
| Location | Text shown | What you do |
|---|---|---|
| Top row | “Gpay Store”, store name, bell icon, gear icon | The bell icon opens HQ messages. If there are unread messages, a number appears on it, and a “New message” card also appears at the top of Home. The gear icon goes to the 더보기 More (settings) screen. |
| Order intake POS tile | “Order intake POS”, “No pending orders” | Tap it to open the order intake screen. If there are orders waiting to be handled, it changes to “N pending” (Chapter 3). |
| Kitchen display (KDS) tile | “Kitchen display (KDS)”, “Real-time cooking tickets” | Tap it to open the kitchen cooking ticket screen (Chapter 3). |
| Settle bill row | “Settle bill”, “No unpaid tables”, “Open ›” | The tables waiting to be paid and the store's payment method appear on one line. Tap it to open the Settle bill screen (Chapter 3). |
| Takeout order row | “Takeout order”, “Accepting”, 포장 가능 Takeout available, 포장 불가 No takeout | Decide whether to accept customers' takeout orders (Chapter 2). |
| Frequently used | “Receipt · printer”, “Order sheet auto-print settings” | Receipt printing, printer connection and automatic order sheet printing are set in the Gpay POS settings on your PC. |
| Bottom tabs | Home · Orders · Menu · Sales · More | These are five tabs for moving between screens. They are explained in detail below. |
Text shown on the rows
| Skip | Text shown | Meaning |
|---|---|---|
| Settle bill | Pay-first store | A store where customers pay right away when they order. There are no tables waiting to be paid. |
| Settle bill | No unpaid tables · pay later | In a pay-later store, there are no tables that haven't been paid yet. |
| Settle bill | N unpaid tables · N bill requests · pay later | The number of tables waiting to be paid at a pay-later store. “N bill requests” is added only when a customer has requested the bill from the app for a table. |
| Takeout | Downloading | 포장 가능 Takeout available is turned on. Customers can place takeout orders. |
| Takeout | Not accepting | 포장 불가 No takeout is turned on. |
| Takeout | Not set | You haven't decided yet whether to offer takeout. |
Pay later is not available at every store. Unpaid tables build up only at stores set as pay-later stores (Chapter 3).
The five bottom tabs
| Tab | What you do here | Details |
|---|---|---|
| 홈 Home | This is the first screen, where today's tasks are gathered. | Chapter 1 |
| 주문 Orders | Opens the order intake screen. The number of orders waiting to be handled appears as a number badge. Depending on the app version, you may see only a shipping management notice instead of an order list; in that case, go in through the 주문 접수 POS Order intake POS tile on Home. | 3 cards |
| 메뉴 Menu | Register and edit menu items and change sold-out status. | Chapter 4 |
| 매출 Sales | View sales by period. | Chapter 6 |
| 더보기 More | The open/closed switch, store mode, settings and support menus are gathered here. | Chapters 2, 7 and 8 |
In online mall mode, Home shows Shipping management and Product management tiles, and the 주문 Orders and 메뉴 Menu bottom tabs change to 배송 Shipping and 상품 Products. 매출 Sales shows product sales. If your store runs both a restaurant and a shopping mall, “What kind of work do you do?” appears first when you open the app (Chapter 2).
2Opening for business · takeout settings
You open and close for business with a single switch at the top of 더보기 More, and switch takeout orders on or off with two buttons on Home. This chapter also covers store mode, where you choose whether to use the restaurant or the shopping mall side, and how the 더보기 More menu is organized.
Opening and closing for business
The open/closed switch is at the top of 더보기 More, not on Home. Turn it on when you open for business and off when you close. Customers can order in the Gpay app only while the switch is on.
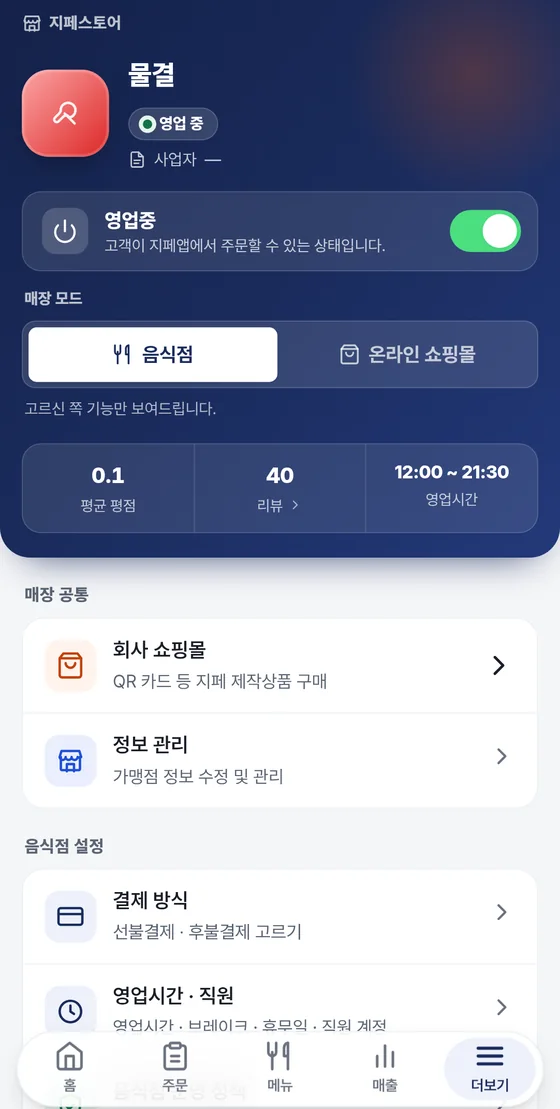
Opening for business
- Tap 더보기 More in the bottom tabs.
- Turn on the Open switch at the top.
- Customers can order when the switch is green and shows “Open · Customers can order in the Gpay app.” When you turn it on again, it turns on right away without a confirmation window.
Closing for business
- Tap the switch at the top of 더보기 More.
- A “Close for business?” confirmation window appears. It says “Customers will no longer be able to order in the Gpay app. Orders in progress will still be processed.”
- Tap 영업 종료 Close store. If you cancel, the business status stays the same.
- When it changes to “Closed”, the customer's Gpay app also shows “Closed” and new orders are blocked.
| Switch | Text on screen | In the customer app |
|---|---|---|
| On (green) | Open · Customers can order in the Gpay app. | Customers can place orders. |
| Off (gray) | Closed · The Gpay app shows “Closed” and orders are blocked. | Customers can't place new orders. Orders that have already come in are processed as usual. |
| When the status is unknown | Couldn't load the business status — tap here to try again | The switch can't be tapped. Tap the card with the message to reload. |
When you open for business, first check that the switch is on. Even if hours are listed in the business hours box, customers can't order while the switch is off.
Information shown at the top
- Open / Closed indicator: The current status appears below the store name.
- Business operator: The business registration number appears. If there is no value, “—” is shown.
- Average rating · Reviews: Gathers the reviews customers have left. If there are no reviews, the rating shows “—”. Tap Reviews › to open review management, which has store reviews and product reviews (Chapter 8).
- Business hours: The hours you saved on the Hours · Staff screen appear. If you have never opened that screen, “—” is shown. In that case, open the Hours · Staff screen (Chapter 7) once and it fills in.
Accepting takeout orders
You decide whether to accept takeout orders right on the Takeout order row on Home.
- Find the Takeout order row on Home.
- To accept takeout orders, tap 포장 가능 Takeout available. To stop accepting them, tap 포장 불가 No takeout. The side that is on now is orange.
- When it is saved, a message like “Saved.” appears, and the row text changes to “Accepting” (takeout available) or “Not accepting” (no takeout).
- If you see “Couldn't save. Please tap again.” or “Couldn't connect. Please tap again.”, the previous state is unchanged. Check your connection and tap again.
- Customers can choose takeout in the Gpay app only when 포장 가능 Takeout available is on. When 포장 불가 No takeout is on, customers see only dine-in.
- A change shows up right away on the customer map and the store introduction.
- The row doesn't change until the server confirms the save. If you tap and nothing changes, check the message text and tap again.
When a takeout order comes in, it is marked “Takeout” on the kitchen display and the order intake screen. When the food is ready, notify the customer with the 준비완료 · 손님 알림 Ready · notify customer button on the order intake screen (Chapter 3).
Store mode: Restaurant · Online shopping mall
A store that runs both a restaurant and an online mall sees only the features of the side chosen under Store mode (“Only the features of the side you chose are shown.”). A store that runs only one may not see the selection box, depending on the app version.
- Under Store mode at the top of 더보기 More, tap 음식점 Restaurant or 온라인 쇼핑몰 Online mall. The one you chose looks turned on.
- A notice appears: “Switched to restaurant mode” or “Switched to online mall mode”.
- The Home tiles, the bottom tabs and the settings groups in 더보기 More change to match the mode you chose.
| Type | Restaurant | Online mall |
|---|---|---|
| Home tiles | Order intake POS · Kitchen display (KDS) | Shipping management · Product management |
| Bottom tabs | Home · Orders · Menu · Sales · More | Home · Shipping · Products · Sales · More |
| 더보기 More settings groups | Restaurant settings | Online mall settings |
| 매출 Sales tab | Food order sales | Product sales |
If your store runs both a restaurant and a shopping mall, “What kind of work do you do?” appears first when you launch the app fresh. Choose the one you will use today: Restaurant (order intake · cooking · menu · store sales) or Online mall (products · shipping · cancellations and returns · product sales). You can change it at any time later in 더보기 More.
How the More menu is organized
더보기 More is the screen that gathers settings. Below the top part (open/closed switch and store mode) come groups, and tapping a row inside a group opens that settings screen.
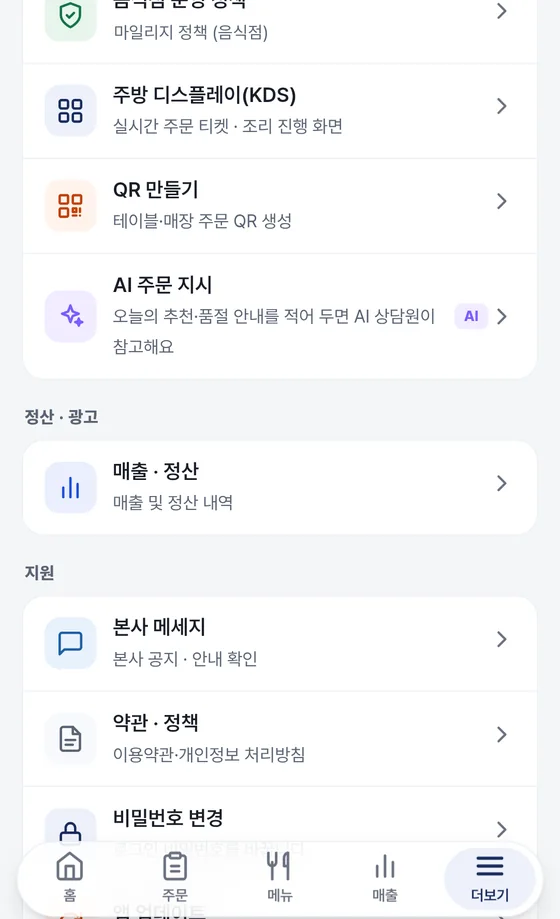
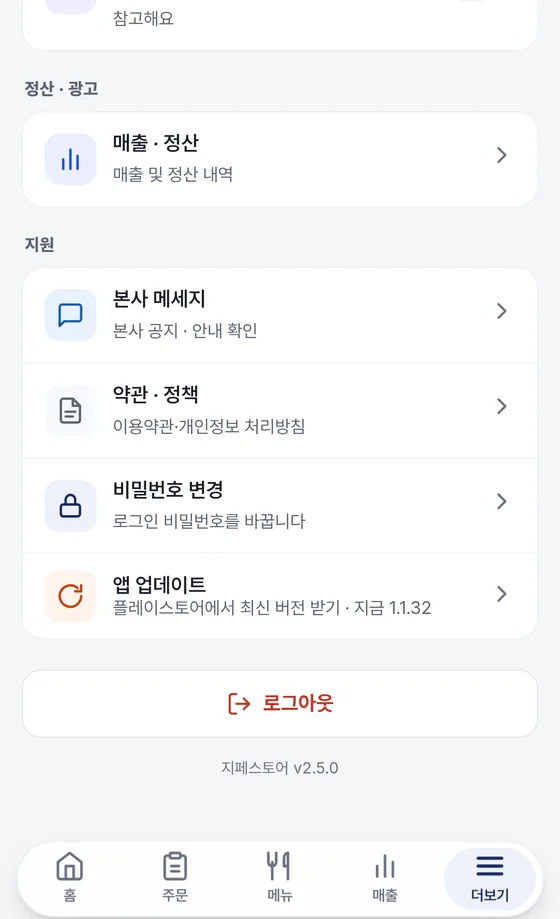
Rows shown in restaurant mode
| Group | Skip | What you do | Details |
|---|---|---|---|
| Store-wide | Company mall | Buy products made by Gpay, such as QR cards. | Chapter 7 |
| Store-wide | Manage info | Edit and manage your merchant information. | Chapter 7 |
| Restaurant settings | Payment method | Choose the store's payment method. | Chapter 7 |
| Restaurant settings | Hours · Staff | Manage business hours, break time, days off and staff accounts. | Chapter 7 |
| Restaurant settings | Restaurant policy | Set the mileage earning policy. Mileage is a full-member benefit. | Chapter 7 |
| Restaurant settings | Kitchen display (KDS) | This is the screen for real-time order tickets and cooking progress. | 3 cards |
| Restaurant settings | Create QR | Create QR codes for table and store orders. | Chapter 7 |
| Restaurant settings | AI ordering instructions | A box for writing today's recommendations and sold-out notices. How much of it is reflected in AI ordering may vary by app version. AI ordering is a full-member benefit and uses an external AI service (OpenAI). | Chapter 7 |
| Settlement · Ads | Sales · Settlement | View sales and settlement details. It opens the same sales screen as the 매출 Sales tab below. | Chapter 6 |
| Support | HQ messages | Check HQ announcements and notices. | Chapter 8 |
| Support | Terms · policies | Read the terms of service and the privacy policy. | Chapter 8 |
| Support | Change password | Change your login password. | Chapter 8 |
| Support | App update | Get the latest version from the Gpay Store app page in the app store. This row may not appear, depending on your app version. | Chapter 8 |
| Bottom | 로그아웃 Log out | Log out of your merchant account. | Chapter 8 |
Rows that change in online mall mode
When you choose 온라인 쇼핑몰 Online mall, the Online mall settings group appears instead of the “Restaurant settings” group. The Store-wide, Settlement · Ads and Support groups stay the same.
| Skip | What you do | Details |
|---|---|---|
| Product management | Manage products and options. | Chapter 5 |
| Shipping management | Process the shipping status of orders step by step. | Chapter 5 |
| Product reviews | Check product reviews and post replies. | Chapter 8 |
| Create QR | Create QR codes for table and store orders. | Chapter 7 |
| Shopping mall policy | Set the earning rate, mileage for reviews, mileage use and customer center hours. Mileage is a full-member benefit. | Chapter 7 |
| Seller info | Enter the items the E-Commerce Act requires you to display, and return information. | Chapter 7 |
| Cancel purchase | The merchant cancels a product order directly. | Chapter 5 |
Check news from HQ in HQ messages, and direct inquiries to the contact center at 1566-4250 (weekdays 09:00–18:00 KST, lunch 11:30–12:30).
Mileage builds up separately for each store, and only customers who are full members can receive it. It can be used only at that store and is not paid back in cash.
3Taking orders
Customer orders are mainly taken in Gpay POS on the checkout PC. In the phone app, you check orders on the order intake screen and the kitchen display (KDS), and pay-later stores collect payment on the Settle bill screen. Shopping mall product orders are handled in Shipping management.
Where you take orders
The table screen, order entry, payment QR, cash payment, receipts and kitchen order slip printing are handled mainly in Gpay POS on your PC. How to operate it is covered in the Gpay POS user guide, and how to install it on your PC is covered separately in the Gpay POS installation guide.
| What you want to do | Where to do it | Where it is explained |
|---|---|---|
| Table screen · order entry · payment QR · cash · receipts | Gpay POS on your PC | Gpay POS guide |
| Check new orders · start cooking · mark as served | Gpay POS, or the order intake screen on your phone | This chapter, “The order intake screen on your phone” |
| View kitchen cooking tickets | The kitchen display (KDS) in the app | This chapter, “Kitchen display (KDS)” |
| Paying at a pay-later store | The Settle bill screen in the app, or Gpay POS | This chapter, “Settling the bill at a pay-later store” |
| Shopping mall product orders | Shipping management in the app | This chapter, “Shopping mall orders”, and Chapter 5 |
Depending on your app version, the 주문 Orders tab below may show only the notice “Please check incoming orders on the Shipping management screen.” instead of an order list. In that case, check restaurant orders through the 주문 접수 POS Order intake POS tile on Home (this chapter, “The order intake screen on your phone”) or in Gpay POS, and check shopping mall product orders in Shipping management.
The order intake screen on your phone
Even when you're away from the checkout counter, you can check orders and start cooking from your phone. Open this screen with the 주문 접수 POS Order intake POS tile on Home. Depending on your app version, the 주문 Orders tab below also opens the same screen.
- Tap the 주문 접수 POS Order intake POS tile on Home.
- The “Order intake” screen opens. At the top are the 메인 Main and 계산 Checkout buttons and a refresh icon. When the connection row below shows “POS connected · Waiting for orders”, you are ready to receive new orders. If the connection drops, “Disconnected” and the reason appear.
- You see “N pending orders” and the table tiles. Use the legend at the top (empty table · paid · unpaid · takeout) to tell the tile states apart. Each tile shows the table number, waiting time, status badge, amount and number of food items.
- Tap a table tile that has an order, and the order details slide up from the bottom.
- Tap 조리 시작 Start cooking and “How many minutes will it take?” appears. Choose one of 10, 15, 20 or 30 minutes, or tap 바로 시작 Start now.
- When the food goes out, tap 서빙 완료 Served. In the “Mark as served?” confirmation window, tap 완료 Done.
- Takeout orders where the customer chose a pickup time have a 준비완료 · 손님 알림 Ready · notify customer button. When the food is ready, tap it to notify the customer's phone. Because this notification can't be undone, a “Notify the customer that the order is ready?” confirmation window appears one more time.
| Badge | Meaning |
|---|---|
| Received | An order that just came in and hasn't started cooking yet. |
| Cooking | Being cooked. If you chose an estimated time, “About N min” appears too. |
| Cooking done | An order that is done cooking. At a pay-later store, it stays on the list with “Unpaid” until it is paid. |
| ✓ Paid | An order that has been paid. |
| Unpaid | An order that hasn't been paid yet. At a pay-later store, it stays “Unpaid” even after it is served, and you collect payment with 계산하기 Settle bill. |
| Takeout (time) · N min left | The takeout pickup time the customer chose. After that time passes, it changes to “N min past”. |
- At a pay-later store, you can tap 조리 시작 Start cooking even before payment. At a pay-first store, you can start cooking only for orders that have been paid.
- If a table has two or more orders that haven't been served yet, a 이 자리 전부 서빙 완료 Mark whole table served button appears at the top of the order details. Tap it to mark all of that table's orders as served at once.
- To cancel an order, tap 결제취소 Cancel payment (for a paid order) or 주문취소 Cancel order (for an order not yet paid) at the very bottom of the order details. When the button text changes to “Tap again to …”, you must tap once more within 3 seconds for the cancellation to go through.
A card payment can be canceled only on the day it was paid. If that day has passed, follow the on-screen instructions to refund the customer directly, or ask the contact center (1566-4250).
New order alerts
New orders are announced in several places. While you are open, check at least one of them often.
| Where | How it alerts you |
|---|---|
| The 주문 접수 POS Order intake POS tile on Home | “No pending orders” changes to “N pending”. |
| The 주문 Orders tab below | The number of orders waiting to be handled appears as a number badge. In online mall mode, this badge doesn't appear. |
| Order intake screen | A “N new orders!” notice briefly pops up at the top of the screen, and a sound and vibration play. Orders you haven't opened yet remain as the “N unseen orders” row and the NEW mark on tiles. |
| Kitchen display | A “N new orders” notice appears and a sound plays. |
| Phone push notification | Orders that customers paid for by card are also announced by push notification. Not every order sends a push. |
| Gpay POS on your PC | A new order card pops up at the bottom right of the screen and an alert sound plays. Table orders sound like a “ding-dong”, and takeout and contactless orders sound like a “marimba”. |
The reminder status appears as 재알림 켬 Reminders on on the “Unseen orders” row. This feature reminds you again while unseen orders remain. Tap the button and it changes to 재알림 끔 Reminders off, so you are no longer reminded; tap it once more and it turns back on.
You can miss a push notification. Even if no notification arrives, you can check new orders under “N pending” on Home and on the order intake screen. If you can't hear the sound, check your phone's volume and silent mode settings.
Kitchen display (KDS)
The kitchen display is a screen that shows each cooking ticket separately. Place the device with the app open in the kitchen and use it there. Open it with the 주방 디스플레이 KDS Kitchen display (KDS) tile on Home or the Kitchen display (KDS) row in 더보기 More.
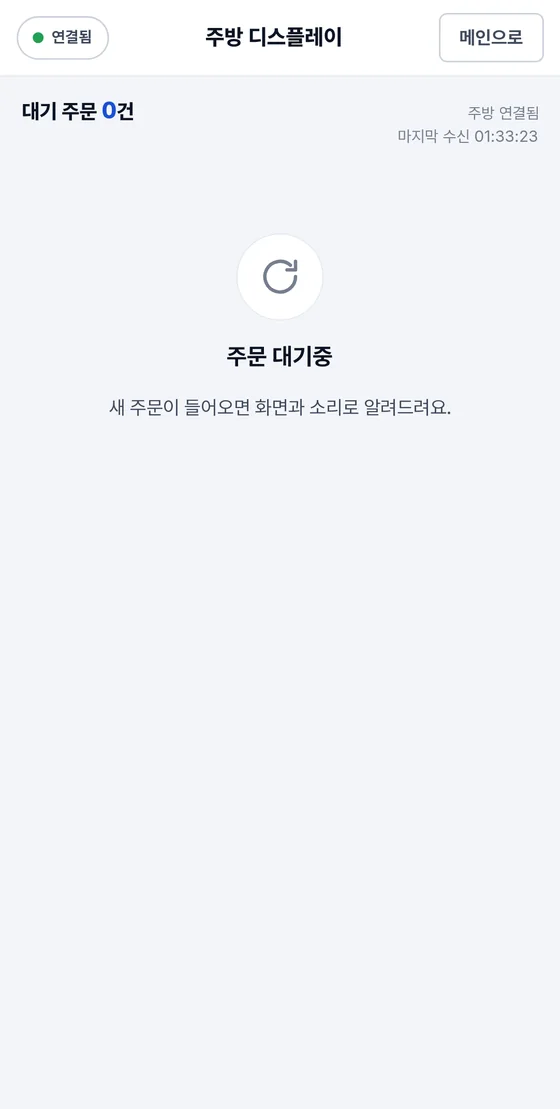
Connection status text
| Top-left chip | Text on the right | Meaning |
|---|---|---|
| Connected | Kitchen connected | Ready to receive orders. |
| Receiving | New order received | A new order just came in. |
| Disconnected | Disconnection or error message | The connection was lost. Check your internet connection. |
| (After orders are loaded) | N current orders / Waiting for orders | The number of orders currently on the screen. If there are no orders, “Waiting for orders — we'll alert you with the screen and a sound when a new order comes in.” appears. |
“Last received” is the time the kitchen screen last received orders from the server. While the screen is showing, it reloads periodically.
Tickets are divided into four groups
| Group | Message | Meaning |
|---|---|---|
| New | Start cooking · longest-waiting tables first | Orders that haven't started cooking yet. Tables that have waited longest appear at the top. |
| Cooking | Orders running behind the estimate first | Orders being cooked. Orders running later than the estimated time appear at the top. |
| Cooking done · waiting to be served | (No message) | Orders that are done cooking appear as small cards, and each card has one 서빙 완료 Served button. This is mainly seen at pay-later stores. |
| Old orders | Over 6 hours — clear them by marking them as served | Orders that have been left for a long time. Expand them with 펼치기 Expand and collapse them with 접기 Collapse. |
What appears on a ticket
- Table number: Shown as “No. N” or “Takeout”. If one table places several orders, the ticket also shows which order it is, such as “1/3”.
- Large number: The minutes waited since the order. After cooking starts, it may show as “Cooking for N min”.
- The menu items and quantities, requests for each menu item, and the requests for the whole order appear.
- A takeout order also shows the pickup time and the time left (or time past).
- Badges: There are “New” (blue), “Cooking” (amber), “Cooking done” and “Processing” (gray). Orders that have not been paid yet at a pay-first store get a red “Awaiting payment” badge. These orders are made after payment is confirmed. At a pay-later store, no payment badge is attached and every order is cooked right away.
From starting cooking to serving
- On a ticket in the “New” group, tap 조리 시작 Start cooking.
- When “How many minutes will it take?” appears, choose one of 10, 15, 20 or 30 minutes, or tap 바로 시작 Start now. A notification that cooking has started goes to the customer's phone. If you chose a time, the estimated time is sent along with it.
- The ticket moves to the “Cooking” group. The badge goes through “Processing” and changes to “Cooking”.
- When the food goes out, tap 서빙 완료 Served. In the confirmation window “Mark as served? This order will disappear from the list.”, tap 서빙 완료 Served once more.
An order marked as served disappears from the list and can't be undone. Mark an order as served only after the food has actually gone out. The estimated time is only guidance for the customer, not a promised completion time.
In the kitchen, you can tap 서빙 완료 Served whether or not the order has been paid. The kitchen screen in Gpay POS on the PC is explained separately in the Gpay POS user guide.
Settling the bill at a pay-later store
At a pay-later store, customers sit down, order several times and pay once when they leave. Tables waiting to be paid gather on the Settle bill screen. Pay later is not available at every store, and pay-first stores take payment right when the customer orders, so this screen is mostly empty. How to change the store's payment method is explained in Chapter 7.
Opening the Settle bill screen
- On the Settle bill row on Home, tap 열기 › Open ›.
- Tap the 계산 Checkout button at the top of the order intake screen.
- In the order details on the order intake screen, tap 계산하기 Settle bill for an unpaid order that has finished cooking.
Reading the table list
- At the very top are ‹ 뒤로 ‹ Back and 새로고침 Refresh. If no table is waiting for checkout, the list is empty.
- Each table waiting for checkout gets one card. A card shows the table number (“No. N”), “N orders”, and, for a table where several people ordered, a one-line summary such as “3 people · #order number”.
- When a customer requests checkout in the app, that table's card gets a yellow Checkout request mark and the card border turns orange. It appears within a few seconds.
- Tap 새로고침 Refresh to reload the list right away.
Check out one table and close it
- Tap the card of the table you want to check out. A “Table N” window slides up from the bottom and shows the order and the Amount due.
- Check the amount and choose how to receive payment. To let the customer pay with the Gpay app, tap 결제 QR 띄우기 Show payment QR. To take cash, tap 현금으로 받기 Take cash.
- If the table has several orders, the prompt “Receive N orders from Table N all at once?” appears and explains: “Orders are not merged - the order numbers and who placed each order stay as they are.” Tap 한 번에 받기 Take all at once and the QR appears.
- When the QR appears, the customer scans it with the Gpay app and pays. The screen shows “Checking approval… It will appear here as soon as the customer pays.”
- When the payment is confirmed, the notices “Table N · Checkout done” and “Received” appear. That table is cleared from the list. To check out the next table, tap 다른 자리 계산 Pay for another table.
- When you take cash, the confirmation window “Table N … Did you receive … in cash? A cash checkout is hard to undo.” appears. Tap 받았어요 Received.
- To close the window without checking out, tap 닫기 Close. The table stays in the list.
A cash checkout is hard to undo. Tap 받았어요 Received only after you have received the money from the customer. Check the amount first on the “Amount due” line.
You cannot change the payment method while tables are still waiting for checkout. Check out or clear all the tables first, then change it (Chapter 7).
Shopping mall orders
Shopping mall product orders that ship by courier are handled separately from restaurant orders. When you switch to 온라인 쇼핑몰 Online mall mode in 더보기 More, a Shipping management tile appears on Home.
- On the Home screen in mall mode, tap the 배송 관리 Shipping management tile. The tile shows “N new orders” or “No new orders”. You can also open it from the 배송 Shipping tab at the bottom.
- On the Shipping management screen, process an order in this sequence: “Order received” → “Preparing · Shipping” → “Delivered”.
- For an order where the customer has requested a cancellation or return, handle the request first.
Entering tracking numbers and approving or rejecting cancellations and returns are explained in detail in Chapter 5.
4Menu management
Here you create menu items and categories and change sold-out status and menu order. Photos, prices and sold-out changes you make on your phone show up in the customer app right away.
Tap the 메뉴 Menu tab at the bottom to open the Menu management screen. This tab appears in Restaurant mode. In online mall mode, the same spot becomes the Products tab (Chapter 5). On a PC, you can manage the same menu in Gpay POS as well.
View the menu list
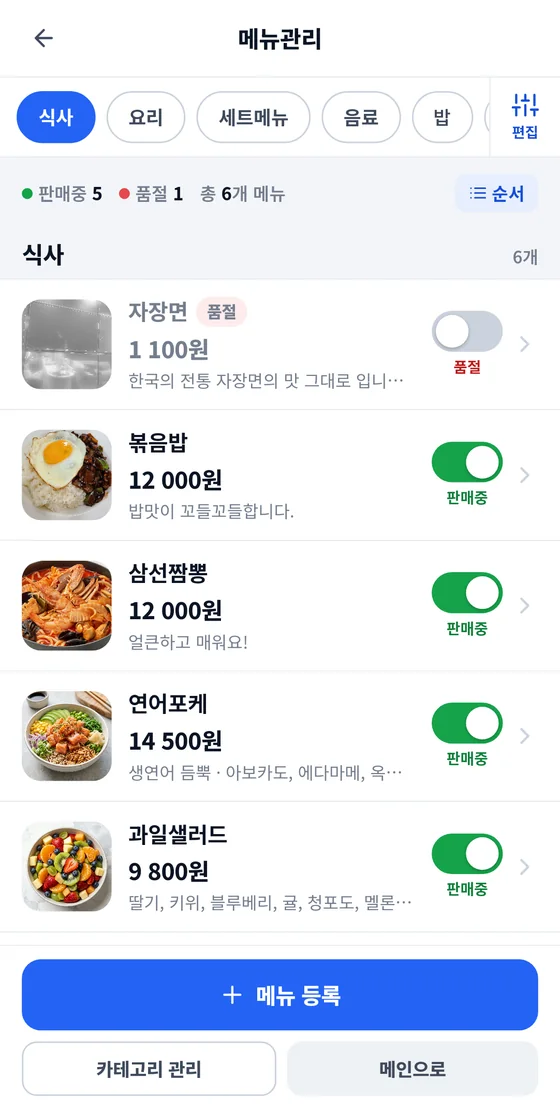
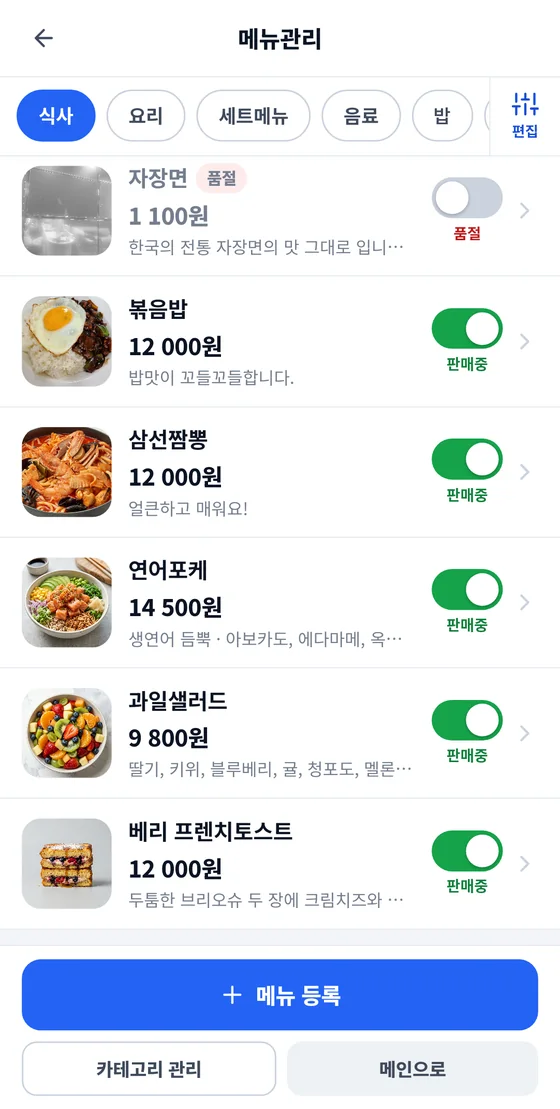
| Location | What you see | Description |
|---|---|---|
| Category tabs | Meals · Dishes · Set menus · Drinks … | Only the menu items in the category you tap appear below. If there are many categories, swipe sideways to see them. |
| 편집 Edit | Far right of the category tabs | Opens the screen where you add, edit, reorder and delete categories. 카테고리 관리 Manage categories at the very bottom opens the same screen. |
| Summary line | On sale · Sold out · Total N menu items | The number of menu items in the category you have selected. On sale plus sold out adds up to the total. |
| 순서 Reorder | Right side of the summary line | Changes the order of the menu items within the same category. It appears only when there are two or more menu items. |
| Menu row | Photo · name · price · description | Tap a row to open the Edit menu item screen. If there is no photo, a default tableware image is shown. |
| Switch | On sale / Sold out | Tap to change it right away. It is explained below in “Change sold-out status”. |
| Discount marker | “N% discount” badge | If you enter a discount rate in Edit menu item, a badge appears next to the name, the discounted price is shown large, and the original price is shown with a strikethrough. A sold-out menu item gets a “Sold out” badge instead. |
| 메인으로 Back to main | At the very bottom, and the arrow at the top left | Returns to Home. |
Change sold-out status
- On the 메뉴 Menu tab, tap the category tab you want.
- Tap the toggle on the right of the menu row. It briefly shows “Processing” and then changes to Sold out. When processing is done, a prompt appears.
- To sell the item again, tap the same toggle once more. It goes back to On sale.
The toggle is saved the moment you tap it. There is no separate save button. When an ingredient runs out, tap it right away on your phone.
If an error message appears, the change may not have been saved. Check your internet connection, reopen the Menu management screen, check which way the toggle is set, and tap it once more.
Change menu order
- First choose the category tab whose order you want to change.
- Tap 순서 Reorder on the right of the summary line. A number and up/down arrow (▲▼) buttons appear for each menu item.
- Each time you tap an arrow, the menu item moves up or down by one place. Keep tapping until it is where you want it.
- Tap 순서 저장 Save order at the bottom of the screen. This button is disabled until you change the order. When “The order has been saved.” appears, you are done.
- To finish reordering, tap 끝내기 Finish.
While you are reordering, tapping a menu row does not open Edit menu item. This keeps you from tapping a row by mistake and changing its contents. The group of buttons at the bottom, including 메뉴 등록 Add menu item, also disappears for a while, and a 순서 저장 Save order row appears at the very bottom. Tap 끝내기 Finish to return to normal.
The order changes only within a category. Change the order of the category tabs themselves in 카테고리 관리 Manage categories. If you tap another category tab while reordering, reordering turns off and any order you have not saved is lost. If you tap 끝내기 Finish while there is an unsaved order, a “Leave anyway?” confirmation appears.
If “No response. Please check your network connection and app version.” appears after 순서 저장 Save order, check your internet connection and make sure the app is the latest version. If a failure message such as “Failed to save the order.” appears, tap 순서 저장 Save order again.
Add a menu item
You add new menu items one at a time. Three fields are required: Menu name · Price · Category.
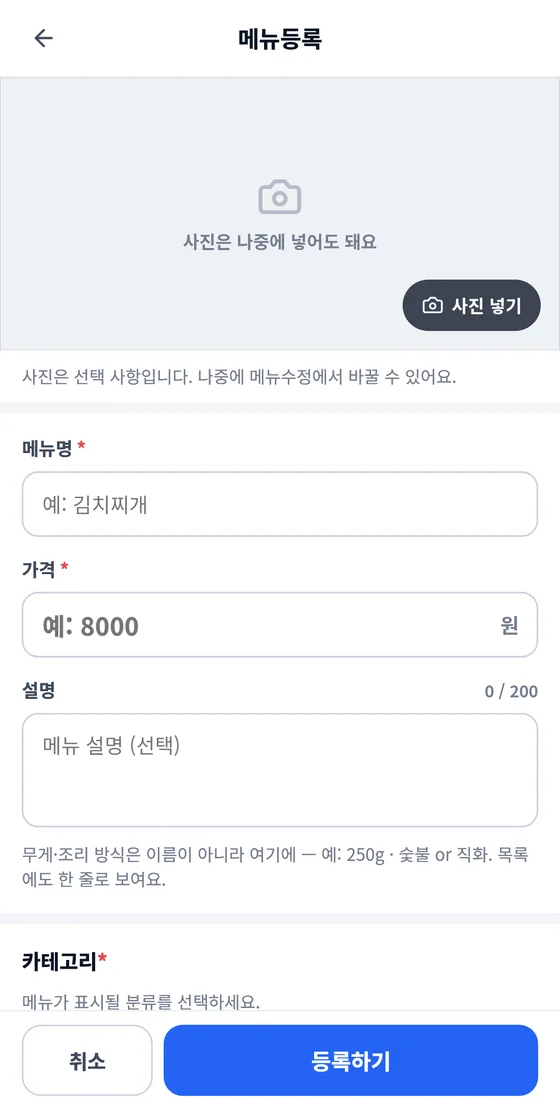
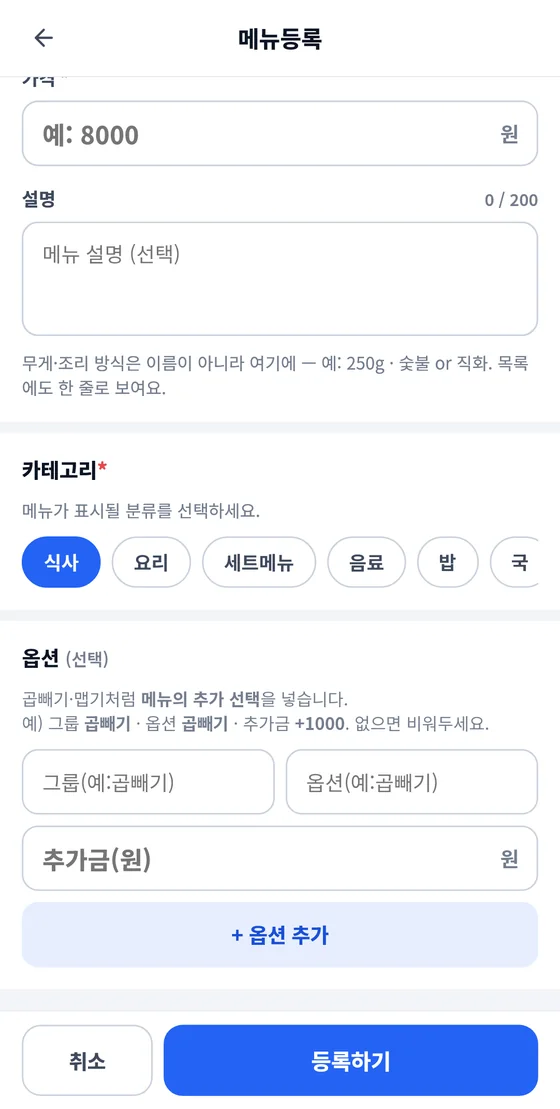
- Tap + 메뉴 등록 + Add menu item at the bottom of the Menu management screen. The category you were viewing is already selected under Category.
- To add a photo, tap 사진 넣기 Add photo and take a photo or choose one from your album. After you add a photo, the button changes to 사진 변경 Change photo. You can add a photo later.
- Enter the menu name.
- Enter the price in numbers. Thousands separators (commas) are added automatically.
- The description is optional. You can enter up to 200 characters, and the character count appears as “0 / 200”.
- Under Category, choose one category where this menu item will appear. If there is no suitable category, tap 추가 Add at the end of the chips, enter a name, and create it first.
- If customers can choose between alternatives, such as a double portion or spice level, add options. If there are none, leave this empty.
- Tap 등록하기 Register at the very bottom. To cancel, tap 취소 Cancel.
| Option field | What to enter |
|---|---|
| Group | The name that groups the options. Example: Double portion |
| Option | The item customers choose. Example: Double portion |
| Extra charge | The amount added when this option is chosen. If left empty, there is no extra charge. |
Enter the group and the option (the extra charge can be left empty) and tap + 옵션 추가 + Add option. The option is added to the list above the input fields, in the order group · option · extra charge. Remove a wrong option with 삭제 Delete next to its row. You can add up to 30 options to one menu item.
If you only type in the option fields without tapping + 옵션 추가 + Add option, that option is not registered. Only the options added to the list are saved together with 등록하기 Register.
Write weight and cooking style in the description, not in the menu name. For example, if you write “250g · charcoal-grilled”, it also appears on one line in the menu list.
You can register a menu item without a photo. A photo you upload on the add screen is saved only when you tap 등록하기 Register. You can change the photo at any time in Edit menu item.
You cannot register a menu item if there are no categories at all. In that case the button changes to “Please create a category first”, so first create a category with 추가 Add where the category chips would be. If the menu name or price is empty, a message appears and the item is not registered.
Edit a menu item
On the Menu management list, tap the row of the menu item you want to change and the Edit menu item screen opens.
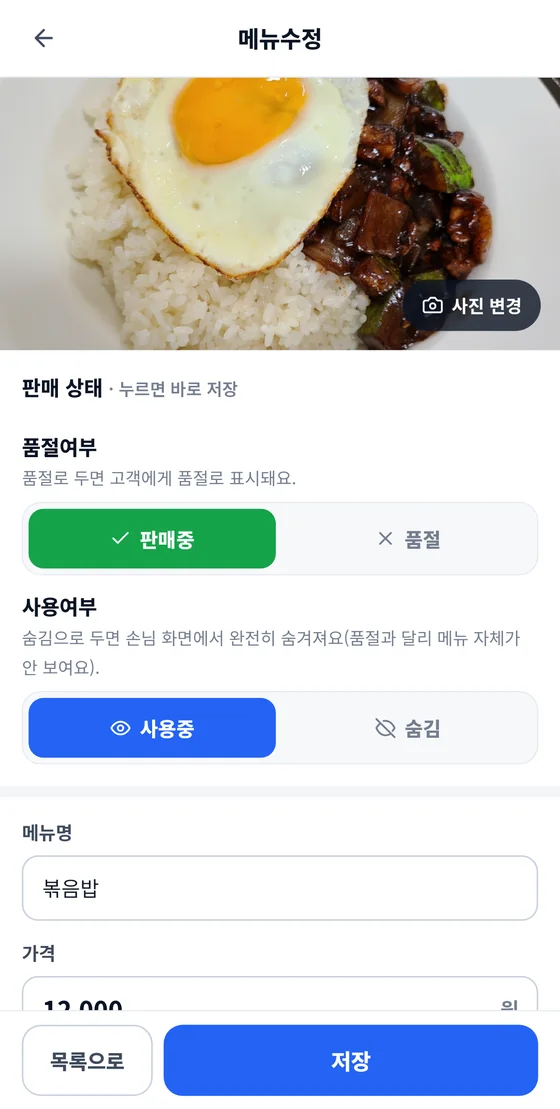
| Item | What you do |
|---|---|
| Change photo | Tap 사진 변경 Change photo above the photo to upload a new photo. |
| Sold-out status | Tap 판매중 On sale or 품절 Sold out. It is saved as soon as you tap. |
| In-use status | Tap 사용중 In use or 숨김 Hidden. It is saved as soon as you tap. |
| Menu name · Price | After editing, tap 저장 Save at the very bottom. |
| Discount rate | This is the value customers see. 0 means no discount; enter a number from 0 to 99. When you enter one, a “before discount → after discount” preview appears right below. Leaving the field empty also means no discount. |
| Mileage earning | Scroll down and you will find 적립 포함 Earns mileage and 적립 제외 No mileage. Mileage is a full-member benefit. If you exclude this item from earning, customers do not earn mileage when they order it. A confirmation window appears when you tap, and once you confirm, it is saved right away without tapping 저장 Save separately. |
| Description | You can enter up to 200 characters. After editing, tap 저장 Save at the very bottom. |
| Saved options · Add option | Options that are already registered have 수정 Edit and 삭제 Delete for each group, and 품절 Sold out, 수정 Edit and 삭제 Delete for each option. You can edit the name and the extra charge. To add a new option, enter it in the “Add option” field, tap + 옵션 추가 + Add option, and then tap 옵션 저장 Save option. This is saved separately from 저장 Save at the very bottom. |
| 이 메뉴 삭제 Delete this item | It is at the very bottom. When you tap it, a “Delete this menu item? (This cannot be undone)” confirmation appears. |
- Change the fields you want to edit (menu name, price, discount rate, description).
- Tap 저장 Save. Only the fields you changed are saved, one after another, and “Saved” appears when it is done.
- To go back to the list, tap 목록으로 Back to list.
If no field has changed, “Nothing has changed” appears. If “Saving may have failed” appears, refresh the screen and check the saved values. Mileage (a full-member benefit) is earned per store, can be used only at the store where it was earned, and is not paid back in cash. The earning rate is set in Store settings (Chapter 7).
What is the difference between sold out and hidden?
| Status | Customer screen | Use it when |
|---|---|---|
| On sale · In use | The menu item is visible. | This is the normal state. |
| Sold out | The menu item stays visible and is marked “Sold out”. | An ingredient has run out, or you cannot sell it just for today |
| Hidden | The menu item itself is not shown. | You want to take a menu item off for a while because you will not sell it |
Manage categories
A category is a group of menu items. The category tabs on the Menu management screen are the categories.
- On the Menu management screen, tap 편집 Edit to the right of the category tabs or 카테고리 관리 Manage categories at the very bottom.
- Enter a new category in the “New category name” field and tap 추가 Add. A name can be up to 30 characters.
- Move a category with the ▲▼ buttons on each row, then tap 순서 저장 Save order. This button is disabled until you change the order, and once you do, “N order changes” is shown with it.
- Edit a name with the pencil button on the right of the row. After typing, tap the check (✓) button to save, or the ✕ button to cancel.
- To delete a category, tap the trash can button and confirm in the “Delete this category?” window.
- When you are done, tap 메뉴관리로 To menu management to go back.
You cannot delete a category that contains menu items. Delete the menu items in that category first, then delete the category.
If there are no categories at all, the Menu management screen shows “Please create a category first”. Tap 카테고리 만들기 Create category to create your first category.
How it looks on the customer screen
What you change on your phone shows up in the customer app right away. Here is a summary by status.
| What you changed | What the customer app shows |
|---|---|
| Sold out | The menu item is marked “Sold out”. |
| Hidden | The menu item is not shown. |
| Discount rate | The discounted price is shown large, with the original price struck through next to it. A store that has discounted menu items may also appear in the “Discounted now” section of the customer app. |
| Photo · Price | The edited photo and price are shown right away. |
AI introduces your menu
Customers can ask questions such as “What's nearby?” in the app's AI ordering (a full-member benefit). If you have registered your menu items and prices, they are included in the answer when customers ask the AI. AI ordering uses an external AI service (OpenAI).
If the menu items and prices are empty, the AI has nothing to tell customers. Always keep menu names, prices and sold-out status up to date. This does not mean the AI will definitely recommend a particular menu item.
If it is hard for you to register categories, menu items and photos yourself, you can ask about the registration service (paid). Please get in touch with the contact center at 1566-4250.
Can I register a menu item without a photo?
Yes, the photo is optional. You can add it later with 사진 변경 Change photo in Edit menu item.
I can't see the 순서 Reorder button.
It does not appear when a category has only one menu item. It appears once you have registered two or more menu items.
Does changing a menu item to hidden delete it?
No. It is just not shown on the customer screen. Change it back to 사용중 In use and it is shown again.
How do I remove a discount?
In Edit menu item, change the discount rate to 0 or empty the field, and tap 저장 Save.
Can I move a menu item to another category?
The Edit menu item screen in the app has no field for changing the category. To move an item to another category, register the menu item again in that category.
I can't delete a category.
A category that still has menu items cannot be deleted. Delete all the menu items in the category first, then delete it again.
I changed an item to sold out, but it looks the same in the customer app.
If an error message appeared, the change may not have been saved. Check your internet connection, reopen the Menu management screen, and check that the toggle says “Sold out”. If it does not, tap the toggle once more.
5Products · shipping · cancellations and returns
How to list products in online mall mode, ship the orders you receive, and handle cancellation and return requests.
This chapter is for store owners who also run an online mall. You handle mall orders in Shipping management in the phone app. In Restaurant mode, depending on the app version, the 주문 Orders tab shows a Shipping management notice instead of an order list. Receiving orders, tables, kitchen and payment QR for store (restaurant) orders are handled in the Gpay POS PC program, so please also see the Gpay POS user guide.
Start in online mall mode
- A store that runs both a restaurant and an online mall chooses 온라인 쇼핑몰 Online mall under “Store mode” on the 더보기 More tab. Only the features for the mode you choose are shown.
- Two buttons, 배송 관리 Shipping management and 상품 관리 Manage products, appear on Home. The 배송 관리 Shipping management button also shows “N new orders” or “No new orders”. Below them, the “Order handling” row also has 구매 취소 Cancel purchase and 취소·반품 요청 관리 Manage cancel/return requests.
- The bottom tabs change to Home · Shipping · Products · Sales · More.
For customers to buy mall products, the seller information must be completely filled in. The representative name, business registration number, mail-order business report number and inquiry phone number are required. Before you list a product, first check the seller information under 더보기 More (Chapter 7).
View the product list
Tap 상품 관리 Manage products on Home or the 상품 Products tab at the bottom to open the Product management screen. The products you have registered are stacked as cards.
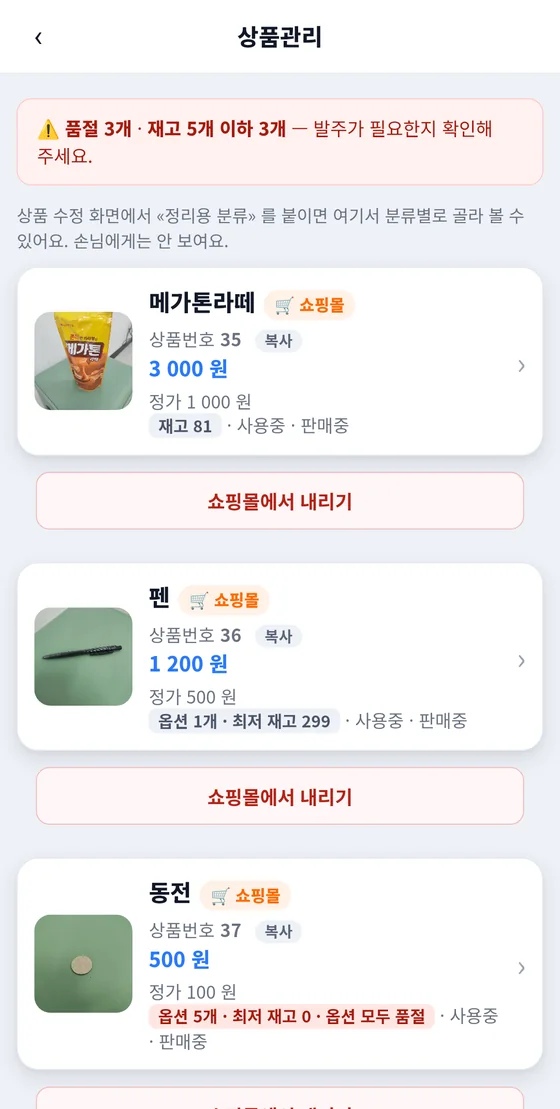
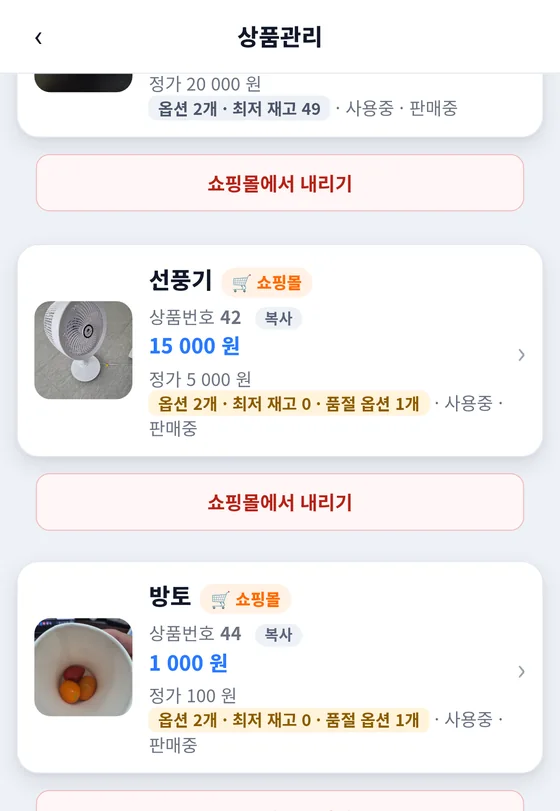
| Where on the card | What you see | Description |
|---|---|---|
| Mall badge | “Mall” next to the product name | This product is posted on the customer mall. A product waiting for review shows “Under review”. |
| Product number | Product number + 복사 Copy | Tap to copy the number. It is the same number as in the admin, so when you contact HQ, tell them the number and they can find the product right away. |
| Price | Large number and “List price” | The large number is the selling price (the amount the customer actually pays), and “List price” is the price before discount. |
| Stock chip | “Stock N” or “N options · Minimum stock N” | For a product without options, it shows the product's stock; for a product with options, it shows the smallest stock among the options. If the stock is 5 or fewer, it is orange (a product without options also gets “Almost sold out”). If the stock is 0 or you set the product to sold out, it is red. A product with options is red and gets “All options sold out” when every option is sold out. If only some options are sold out, “N sold-out options” is added. |
| Status | In use · On sale | The status is “In use” or “Hidden”, and “On sale” or “Sold out”. |
| 쇼핑몰에서 내리기 Take off the mall | Button below the card | It appears only on products that are posted on the mall or under review. A confirmation window appears when you tap it. Taking a product off the mall does not delete it. |
| Whole card | › on the right | Tap to open the Edit product screen. |
At the bottom of the list are the + 상품 등록 + Add product and 메인으로 Back to main buttons.
Sold-out and low-stock warning banner
A banner appears at the top of the list: “N sold out · N with 5 or fewer in stock — please check whether you need to reorder.” It helps you notice before stock runs out.
- “Hidden” products are not counted.
- Products with options are counted by option stock. If all options are sold out, it reports “Sold out”; if even one option has 5 or fewer in stock, it reports “5 or fewer in stock”.
- If there are no products to warn about, the banner is not shown.
- The “category for organizing” notice below the banner may not be shown, depending on the app version.
For products with options, the base stock is not used. When a customer buys, only the option stock goes down.
Add a product
Product registration has four steps, which you fill in from top to bottom on one screen: Basic info → Photos → Options → Review entries. Tap the 기본정보 Basic info 사진 Photos 옵션 Options 입력 확인 Review entry buttons at the top of the screen to jump straight to that section. If you get confused, tap 상품 등록 안내 › Product listing guide › at the top right to open the guide window.
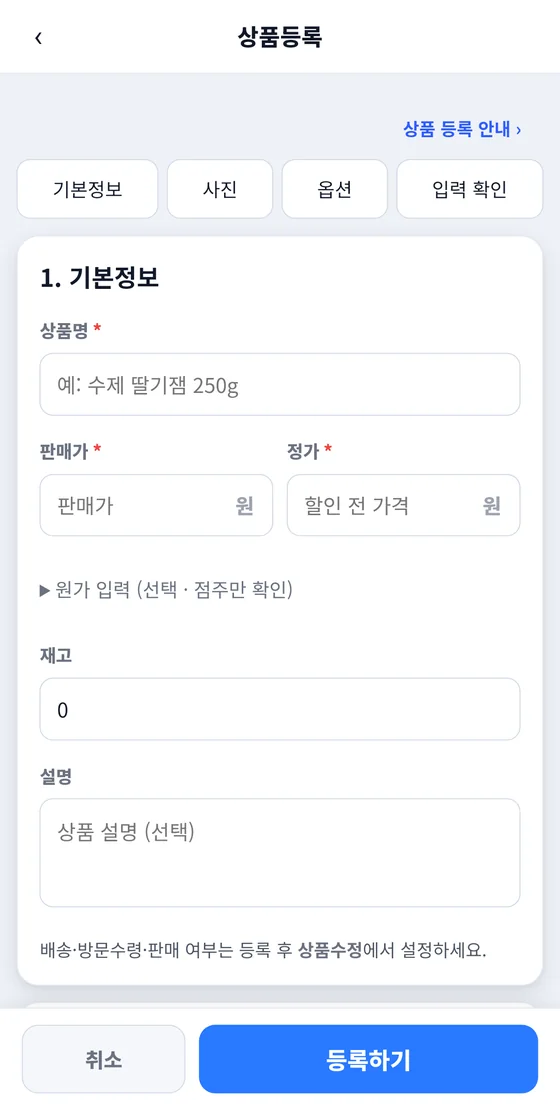
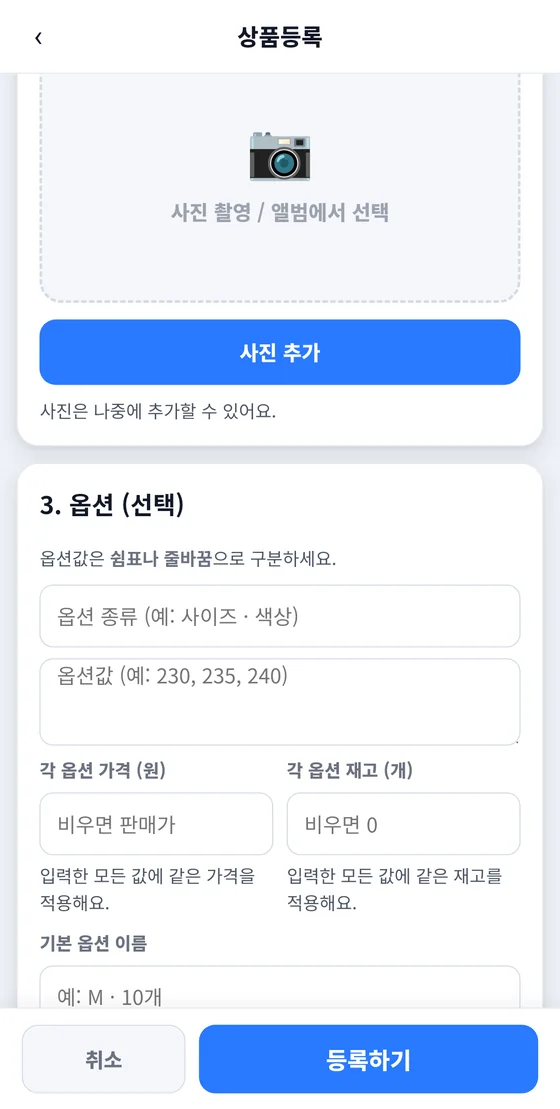
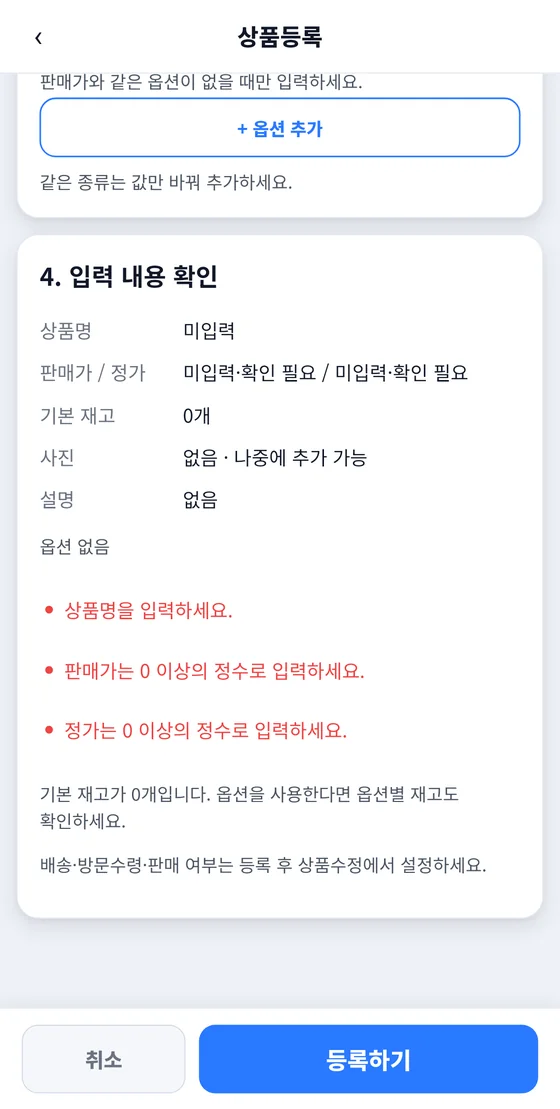
- Open 상품 관리 Manage products on Home and tap + 상품 등록 + Add product at the bottom of the list.
- In 1. Basic info, enter the product name, selling price and list price, and, if needed, the cost, stock and description.
- In 2. Product photos, tap 사진 추가 Add photos and take a photo or choose one from your album. You can add photos later.
- If the product has options, fill in 3. Options (optional) and tap + 옵션 추가 + Add option. If it has no options, skip this step.
- In 4. Review entries, check that nothing is missing. Tap a red notice to jump to that field.
- Tap 등록하기 Register. Once registered, the product appears right away on the My store screen in the customer app. To appear in the Gpay mall, you must apply for review after registering (see “Post to the Gpay mall” below).
| Field | What to enter | Note |
|---|---|---|
| Product name * | This is the name customers see. Enter up to 80 characters. | It helps to include the quantity and unit. Example: Homemade strawberry jam 250g |
| Selling price * | The amount the customer actually pays. | It is the base for option prices. |
| List price * | The price before discount. | If the list price is higher than the selling price, the customer screen shows it as a discount. |
| Cost (optional) | Tap “Enter cost” to expand it and enter the amount. | Only the store owner can see it. It is not shown to customers. |
| Stock | The quantity you can sell. The initial value is 0. | If you use options, enter the stock for each option. |
| Description (optional) | The product description. Enter up to 200 characters. | Whether to offer shipping and in-store pickup, and whether to sell, are set in Edit product after you register. |
If the selling price is higher than the list price, a “Save it as it is?” confirmation appears. The list price is the price before discount, so if you leave it like this, no discount is shown on the customer screen.
How to use the option fields
| Field | What to enter |
|---|---|
| Option type | The name that groups the choices, such as size or color. You can also pick from a list of suggested names such as capacity, weight, quantity and flavor. |
| Option values | Enter several at once, separated by commas or line breaks, like 230, 235, 240. |
| Price of each option | This is the final amount the customer sees. If left empty, it is the same as the selling price. You cannot enter less than the selling price. The same price applies to all the values you entered. |
| Stock of each option | If left empty, it is 0. The same stock applies to all the values you entered. |
| Default option name | Enter it only when none of the options has the same price as the selling price. Example: M, 10 pcs. This value becomes the first option and is preselected on the customer screen. |
You can add up to 3 option types, and up to 30 option values in total for one product, including the default option. To add a value to an existing type, keep the name as it is, change only the value, and tap + 옵션 추가 + Add option again.
Even if the screen closes while you are typing, what you entered is kept temporarily for one day. When you reopen it, a message says “Restored what you were typing”. If registration fails, your input is also kept, so tap 등록하기 Register again after a moment.
Depending on the app version, an “If this is a tax-free item” notice card may appear on the registration screen, but please check tax handling with your tax accountant.
Edit a product
On the Product management list, tap the card of the product you want to change and the Edit product screen opens. Each field is saved separately.
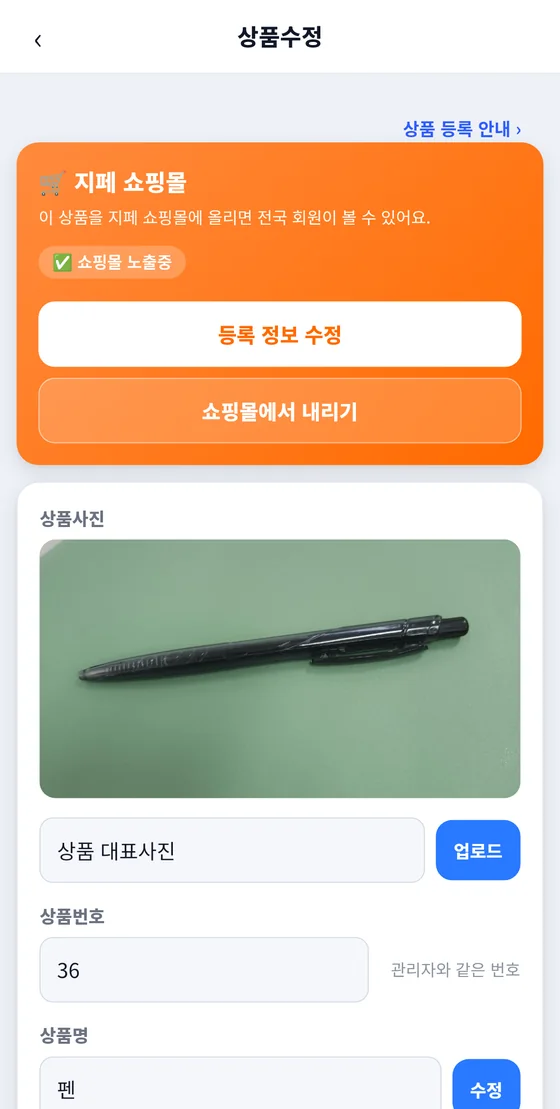
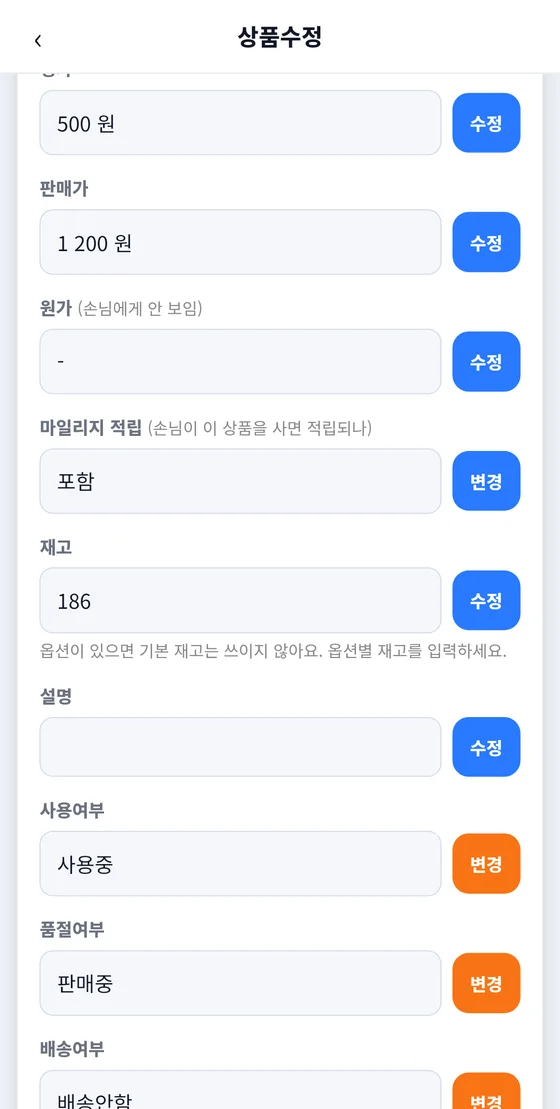
| Field | How to change it |
|---|---|
| Main product photo | Tap 업로드 Upload to upload a new photo. |
| Product number | Tap to copy it. It is “the same number as in the admin”, so use it when you contact HQ. |
| Product name · List price · Selling price · Cost · Stock · Description | Tap 수정 Edit next to the field, edit it, and save. The cost is not shown to customers. |
| Product code | It is “a value you assign yourself”. It can overlap between stores, so use the product number to refer to a product. |
| Mileage earning | Tap 변경 Change and a confirmation window appears. “Included” and “Excluded” switch with each other. Mileage is a full-member benefit. If you exclude it, customers do not earn mileage when they buy this product. |
| In-use status | Use 변경 Change to switch between “In use” and “Hidden”. |
| Sold-out status | Use 변경 Change to switch between “On sale” and “Sold out”. |
| Shipping status · Pickup status | Use 변경 Change to switch between “Shipping available / No shipping” and “Pickup available / No pickup”. If you will sell a product by courier, be sure to check the shipping status. |
| Product photos (several) | With + 사진 추가 + Add photos, upload up to 10 more photos besides the main photo. Customers swipe sideways to view them in the product details. |
| Product options | Under “Create several at once”, enter the option type, values, price and stock and tap 한 번에 추가 Add all at once. For options you have already created, edit the name, price and stock in the table; checking “Sold out”, selecting “Default”, reordering and deleting are also done in the same table. Tap 이 옵션 저장 Save this option below the table to save the whole table at once. |
| 이 상품 삭제 Delete this product | It is at the very bottom. Two confirmation windows appear. Once deleted, the product disappears from the mall and the list and cannot be restored. |
For a product with options, a notice under the stock field says “If there are options, the base stock is not used. Enter the stock for each option.” Manage stock in the option table.
Post to the Gpay mall
After you register a product, it shows right away on your My store screen, but it appears in the Gpay mall, which customers nationwide see, only after you apply and it passes review. The steps and messages below may differ a little depending on the app version.
- At the top of Edit product, tap 지페쇼핑몰 등록하기 List on the Gpay mall on the “Gpay mall” card.
- Which corner should it go in? Choose a category. You can search by typing a name in the search field, and when you pick one, 다음 Next becomes active.
- Check what customers will see: the product photo, selling price and stock appear in turn. You can fill in what is missing right away with the 사진 등록 Add photos, 가격 입력 Enter price and 재고 입력 Enter stock buttons next to the missing items. You cannot go to the next step without a product photo, and you cannot post a product whose selling price is 0.
- This is how it looks: check how it will appear on the member screen, plus the category, selling price and stock, and tap 지페쇼핑몰에 올리기 Post to the Gpay mall.
- “Waiting for review” appears on the card. Once approved, it changes to “Showing on the mall” and is displayed in the customer mall.
For a product that is already approved, tap 등록 정보 수정 Edit listing info, go through the same steps, and tap 수정 반영하기 Apply changes at the end; the changes are applied right away without another review. You do not have to wait for a new review every time you edit a product.
To take a product off the mall for a while, tap 쇼핑몰에서 내리기 Take off the mall. The product is not deleted, and when you post it again, the previous settings are restored as they were. To delete a product, use 이 상품 삭제 Delete this product separately.
Shipping management
When a mall order comes in, handle it from 배송 관리 Shipping management on Home, the 배송 Shipping tab at the bottom, or 배송 관리 Shipping management under 더보기 More. The screen is called Product shipping management.
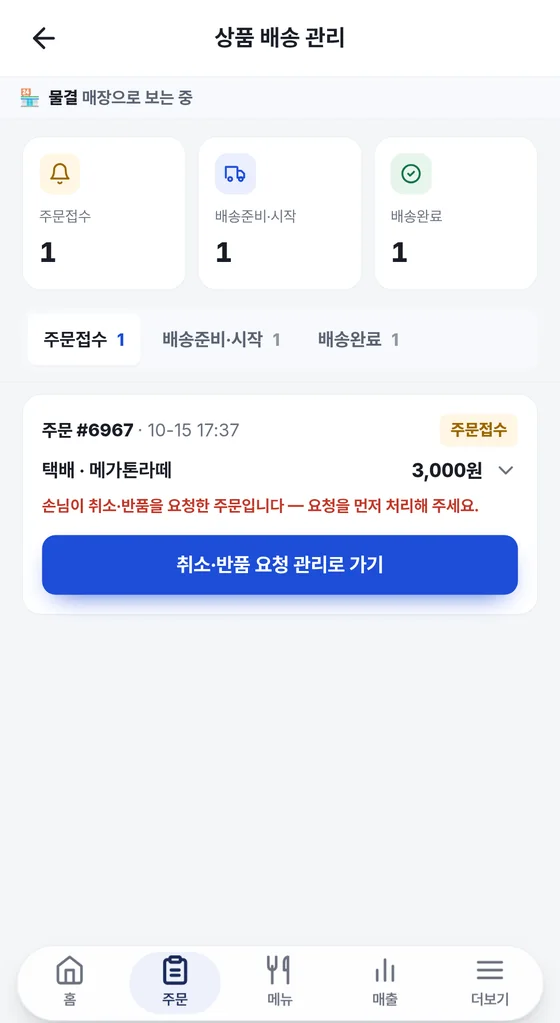
| Step | Meaning | What you do |
|---|---|---|
| Order received | An order that the customer has paid for. | Check the details and tap 다음 단계로 (상품·배송준비) Next step (preparing). |
| Preparing for shipment | The stage where you get the product ready. | For a courier order, enter the courier and tracking number, and tap 다음 단계로 (배송시작) Next step (start shipping). |
| Shipping started | The package has been sent by courier. | When you confirm that delivery is finished, tap 다음 단계로 (배송완료) Next step (delivered). |
| Delivered | Delivery is finished. | There is nothing more to do. |
“Preparing product and shipping” and “Shipping started” appear together in the single 배송준비·시작 Preparing · Shipping tab. When the count is large, the box shortens it, like “10+”.
How to read an order card
- At the top you see Order #number and the order time, and a stage badge on the right.
- The summary line shows “Courier · Product name (+ N more)” and the payment amount. Tap the line to expand the card and see the products (options, quantity), amounts, recipient, address and requests.
- An in-store pickup order is marked “In-store pickup (collected in person)” and has no tracking number field.
- From the preparing stage on, a courier order shows one line with the tracking status even when the card is collapsed. If you have entered it, it shows the courier and tracking number; if not yet, it shows “Tracking number not entered”.
Enter a tracking number and start shipping
- On the 주문접수 Order received tab, tap the summary line of an order card and check the products, recipient, address and requests.
- Tap 다음 단계로 (상품·배송준비) Next step (preparing) at the bottom of the card. The order moves to the 배송준비·시작 Preparing · Shipping tab.
- For a courier order, a “Courier tracking number” field appears. Choose the courier, enter the tracking number, and tap 저장 Save. If your courier is not on the list, choose “Other (enter manually)” and type its name.
- In the “Tracking number saved. Start shipping?” window, tap 배송시작 Shipping started. If you do not want to do it now, tap 나중에 Later.
- When you confirm that delivery is finished, tap 다음 단계로 (배송완료) Next step (delivered). The order moves to the 배송완료 Delivered tab.
When you save the tracking number, the courier and tracking number are shown to the customer. If you keep using the same courier, that courier is preselected the next time you enter one.
For an order for which the customer requested a cancellation or return, the “Next step” button and the tracking number field are hidden, and 취소·반품 요청 관리로 가기 Go to cancel/return requests is shown instead. You have to handle the request before you can continue shipping.
The 송장 한꺼번에 입력 Enter tracking numbers in bulk button at the top of the screen may not be shown depending on the app version, so this chapter explains how to enter the tracking number order by order.
If “Couldn't load the orders” appears, tap 다시 불러오기 Reload. If there are orders that were loaded last time, that list is shown as well.
Handle cancellation and return requests
When a customer applies for a cancellation or return in the app, the request piles up on the Cancel/return request management screen. Open it by tapping 취소·반품 요청 관리로 가기 Go to cancel/return requests on the order's card in Shipping management, or 취소·반품 요청 관리 Manage cancel/return requests in the “Order handling” row on Home. You can also get in through the link “To handle cancellations and returns requested by members → Cancel/return request management” at the top of the Cancel purchase screen.
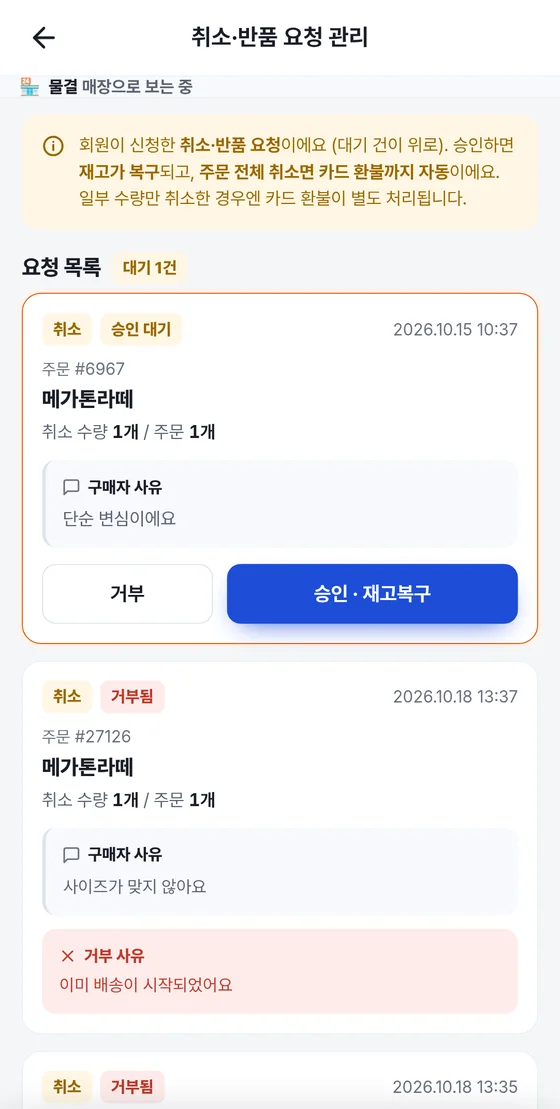
| Badge | Meaning |
|---|---|
| Cancellation / Return | The type of request the customer applied for. |
| Pending approval | Requests you have not handled yet. They are collected next to the title as “N pending”. |
| Approved | A request you approved. Check the result of the card refund in the payment history. |
| Rejected | A request you rejected. The rejection reason is shown to the customer exactly as written. |
- In the “Request list”, check the product, quantity and buyer's reason on a 승인 대기 Pending approval card.
- To accept, tap 승인 · 재고복구 Approve · restore stock. When the “Approve this request?” window appears, tap 승인 · 재고복구 Approve · restore stock again. “Approved · Stock restored” appears.
- To decline, tap 거부 Reject. Enter the reason in the “Rejection reason” field and tap 거부하기 Reject. If you leave the reason empty, the request is not rejected.
The rejection reason is shown to the customer exactly as you write it. Please give a specific reason, such as “The item has already been shipped, so it is hard to cancel”.
When you approve, stock is restored immediately. If the whole order is canceled, the card refund is also issued automatically. If only some of the quantity in the order is canceled, the card refund is handled separately from the approval.
Cancel a purchase yourself as a merchant
This screen is for when you need to cancel an order for a reason on your side, such as running out of stock or being sold out. Handle cancellations and returns that customers request in the request management described in the previous section.
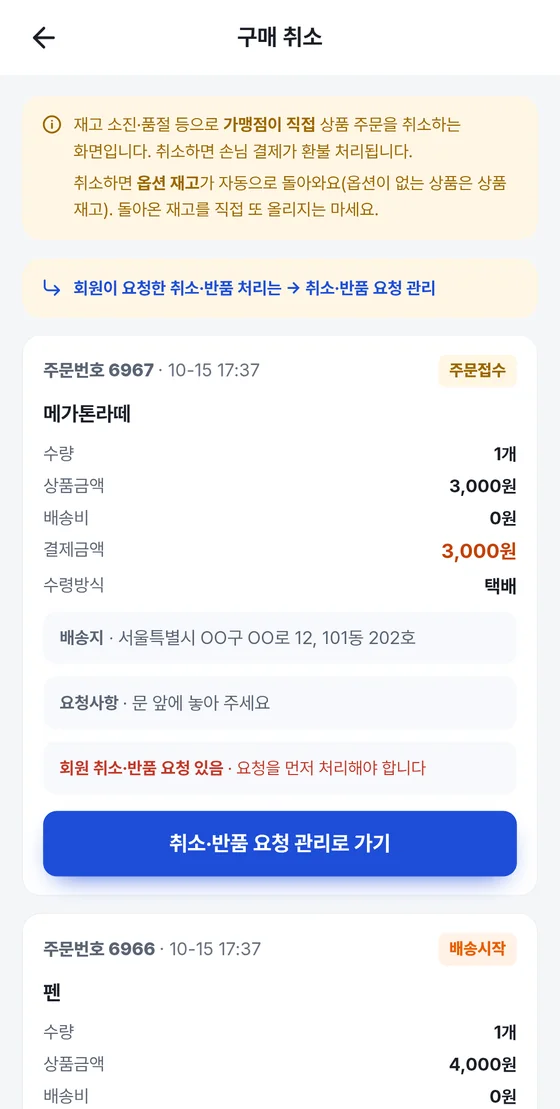
- Open the “Order handling” row on Home or 구매 취소 Cancel purchase under 더보기 More.
- Find the order card you want to cancel and check the order number, stage badge, product, quantity, payment amount, receiving method, delivery address and requests.
- Tap 구매취소 Purchase canceled below the card. In the “Cancel this product purchase? The customer's payment will be refunded.” window, tap 구매취소 Purchase canceled again.
When you cancel, the customer's payment is refunded. There is no button to undo a cancellation, so be sure to check the order number before you tap.
When you cancel, the option stock is returned automatically (for a product without options, the product stock). If you also add the returned stock yourself, the stock will increase twice, so do not add it.
If there are no orders that can be canceled, “There are no product purchases that can be canceled” is shown. When a new product order comes in, you can cancel it here.
I registered a product, but it doesn't show in the customer mall.
If you only register it, it shows only on your My store screen. To appear in the Gpay mall, use 지페쇼핑몰 등록하기 List on the Gpay mall in Edit product to choose a category and post it, and then get it approved in review. If the seller information is empty, customers cannot buy, so please check that as well.
It shows as sold out even though there is stock.
For a product with options, sold-out status is judged by option stock, not by the base stock. If all options are sold out, the product shows as sold out too. Also check that the sold-out status has not been changed to “Sold out”.
I can't enter an option price lower than the selling price.
The option price is the final amount the customer sees, so it cannot be lower than the selling price. To make a cheaper value the default, lower the selling price to that value and enter the more expensive values as options.
I can't see the tracking number field.
There is no tracking number field at the 주문접수 Order received stage. It appears after you tap 다음 단계로 (상품·배송준비) Next step (preparing). There is no tracking number field for in-store pickup orders, and for an order with a pending cancellation or return request you must handle the request first.
Who marks the order as delivered?
The store owner taps 다음 단계로 (배송완료) Next step (delivered) on the card in the shipping started stage.
If I take a product off the mall, does it disappear?
No. It is just not shown in the customer mall. When you post it again, the previous settings come back as they were.
What is the product number used for?
It is the same number as in the admin, so it is used to point to a product when you contact HQ. Tap 복사 Copy on the product card and paste it.
6Sales
You can see how much you have sold, when your busiest hours are, and which menu items sell well, all on one screen just by choosing a period.
Tap the 매출 Sales tab at the bottom. In restaurant mode, the Store sales screen opens, and in online mall mode, the Product sales screen opens (at the very end of this chapter). You can also reach the Store sales screen from 매출 · 정산 Sales · Settlement under 더보기 More.
The “Viewing ○○ store” band at the top of the screen is the name of the store you are logged in as. If the sales figures are not what you expect, first check that this name is correct.
Choose a period
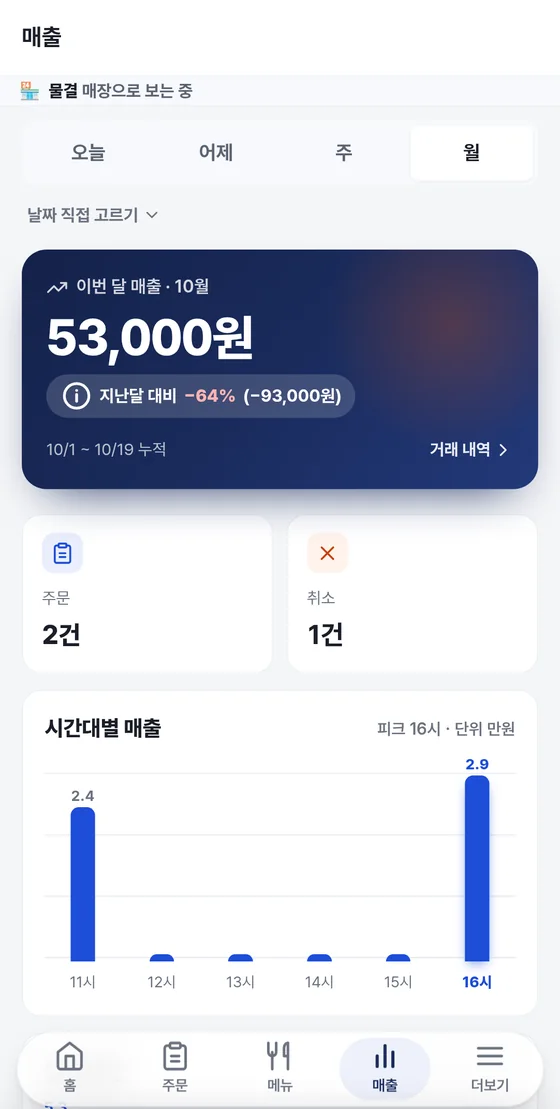
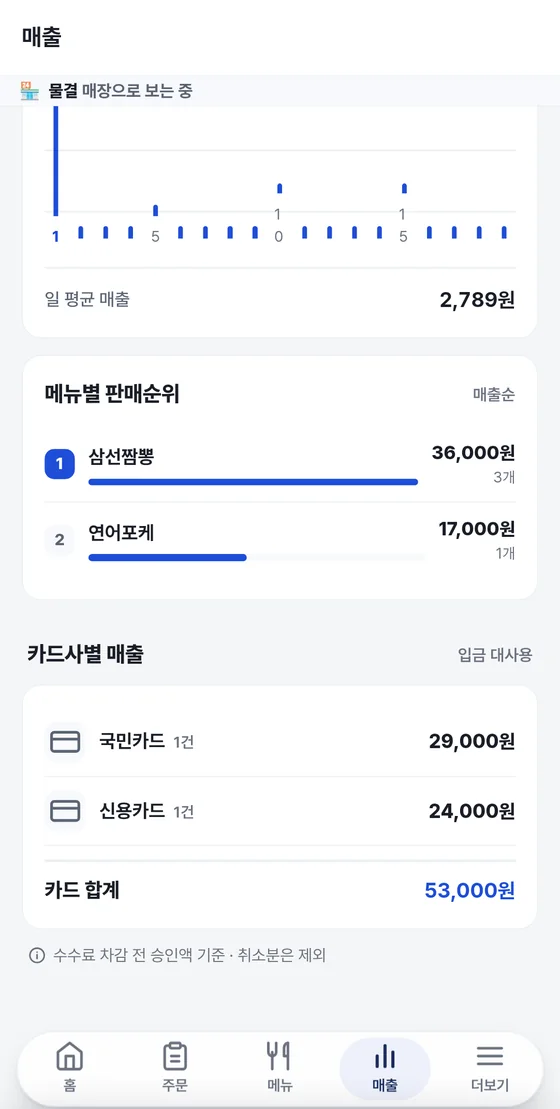
| Button | Period shown | Name of the big card |
|---|---|---|
| 오늘 Today | Just today | Today's sales |
| 어제 Yesterday | Just yesterday | Yesterday's sales |
| 주 Week | The last 7 days including today | Last 7 days' sales |
| 월 Month | Sales accumulated from the 1st of this month to today | This month's sales · Month ○ |
| Pick a date | The start date to the end date you picked | Period sales |
- Tap 날짜 직접 고르기 Pick a date below the period tabs. The start date and end date fields expand.
- Choose a start date and an end date. The 1st of this month to today is already filled in.
- Tap 조회 Search. If the start date is later than the end date, the order is swapped automatically for the search.
주 Week is not this week but the last 7 days including today. 월 Month is the running total from the 1st of this month to today, so the numbers start building up again when the month changes.
How to read the numbers
| Item on the screen | Meaning | Note |
|---|---|---|
| Navy sales card | The total sales for the period you chose. The period is written below the card, like “10/1 ~ 10/19 cumulative” (if you choose just one day, “10/19 sales for the day”). | Tap the card to open Transaction history. |
| Compared with the previous period (badge inside the card) | The increase or decrease compared with the previous period. It shows both the rate and the amount difference, like “+○% (+○ KRW) vs last month”. | 오늘 Today is compared with yesterday, 어제 Yesterday with the day before yesterday, 주 Week with last week and 월 Month with last month, and “Pick a date” is compared with the “previous period”. If there are no sales to compare with, it says “There were no sales in …”. If the comparison value cannot be loaded, the badge is not shown. |
| 주문 Orders | The number of approved (not canceled) orders. | Tap to open Transaction history. |
| 취소 Cancel | The number of canceled orders. | If a “+” follows the count, there may be more. Tap to open Transaction history. |
| Sales by time of day | Shows the total sales for each time slot as bars. The highest time slot is highlighted in blue, and “Peak hour ○” is written next to the title. | The number above each bar is in units of 10,000 KRW. An amount below 100,000 KRW is shown with one decimal place. If there are no orders with an order time, this card is not shown. |
| Daily sales | Shows the total sales for each date as bars. “○ days · Unit: 10,000 KRW” is written next to the title. | If you look up just one day, such as 오늘 Today or 어제 Yesterday, this card is hidden. It is shown with 주 Week, 월 Month and “Pick a date”. |
| Average daily sales | The total sales for the period you looked up, divided by the number of days looked up. | It is at the bottom of the Daily sales card. |
| Sales ranking by menu item | Shows menu items in order, starting with the highest sales (“By sales”). Each menu item has its sales amount and the number sold, and the bar length is based on the menu item with the highest sales. | Only the top menu items are shown. If there are only orders without menu information, the card is not shown. |
| Sales by card company | Collects the number of approvals and the amount for each card company and shows the “Card total” at the bottom. | It is explained in detail under “Sales by card company” below. |
The numbers by time of day, day, menu item and card company are values excluding canceled orders. On a day with many cancellations, look at them together with the 취소 Cancel box.
Sales by card company — for checking deposits
It collects and shows the number of approvals and the amount for each card company. “For deposit reconciliation” is written next to the title, and you use it to compare with the amounts the card companies deposit. The “Card total” at the bottom is the sum of all the amounts by card company.
As the screen says, it is based on approved amounts before fees and excludes canceled amounts. Because it is a plain sum of the card approval amounts, it differs from the actual deposit after fees.
This screen does not show expected deposit dates or settlement status. The actual settlement amount and deposit date depend on your contract. Payments without a card approval (for example, orders paid only with mileage, a full-member benefit) do not appear in sales by card company.
Transaction history and payment details
Tap the navy sales card or the 주문 Orders or 취소 Cancel box and Transaction history slides up from the bottom. The title shows the period you are viewing, like “Transaction history · This month's sales”.
- Tap the sales card (or the 주문 Orders or 취소 Cancel box).
- Recent orders appear at the top. Each row shows the order number, date and time, table number (if there is one), number of menu items, and amount.
- Canceled orders get a “Canceled” badge, and orders paid by splitting across cards get a badge such as “2 cards”. This is when the customer split the payment across cards with multi-card payment (a full-member benefit).
- Tap a row to open Payment details. You can see the order number, payment time, table, payment amount, menu items and quantity, and the “Card payment details” (card company, card number, installments, time, approval code, amount). If the payment was split across cards, it is shown as “N-card split”.
- To close it, tap the ✕ button at the top right.
Transaction history shows only some of the orders, starting from the most recent. If “Most recent ○ of ○ total” appears below the list, look at the navy sales card above for the overall total. The amount in “Total of ○ orders” at the bottom of the list is the sum excluding canceled orders.
Cancel a payment
- Tap 결제취소 Cancel payment at the bottom of the payment details.
- The button changes to 한 번 더 누르면 결제취소 Tap again to cancel payment. A cancellation cannot be undone, so it runs only when you tap twice. If you do not tap for a moment, it goes back to the original button.
- After “Processing cancellation…”, when the cancellation is done, the details close and the list reloads for the same period.
A card payment can be canceled only on the day it was made. For a card payment from an earlier day, “The payment day has passed, so it may not be canceled” is shown below the button. For a payment from an earlier day, refund the customer directly or ask the contact center (1566-4250).
An order that is already canceled shows “This order has already been canceled” instead of 결제취소 Cancel payment. If “Couldn't confirm the result — refresh the list and check” appears, tap the period tab again and first check whether that order has a “Canceled” badge.
Product sales (online mall)
In online mall mode, the 매출 Sales tab at the bottom opens Product sales directly. At the top of the Store sales screen, a 상품 매출 보기 View product sales chip is also shown in mall mode. This chip does not appear in restaurant mode. When you choose a period, the totals change, and in the purchase history below you can search by order number or product name.
| Location | Meaning |
|---|---|
| Period tabs | Choose from 당일 Same day 주간 Weekly 월간 Monthly 기간 Period. Weekly (last 7 days) is selected at first. When you tap 기간 Period, the start and end date fields appear. Then tap 조회 Search. |
| Total product sales · Number of purchases · Number of products sold | The totals for the period you chose. They are based on completed payments and exclude cancellations. |
| Purchase history | Shows some of your purchases, starting with the most recent. Each row shows the product name (the first product name if there are several), a stage badge, order number · date and time · number of products, the buyer's name, and the amount. A canceled purchase gets a “Canceled” badge and its amount is struck through. |
| Stage badge | It is one of “Order received”, “Preparing product and shipping”, “Shipping started”, “Delivered” or “Canceled”. |
| Search field | Finds items in the list that has already loaded, by order number (digits) or product name (text). |
- On the 매출 Sales tab, choose a period.
- In “Purchase history”, tap the row you want to look at. If a purchase shows › on the right of its row, tap it to open its order information.
- In the “Order information” window, check the order number, purchase date and time, buyer, product, payment amount and status, then tap 닫기 Close.
The “Order information” window does not show the buyer's contact details. For the recipient, address and delivery requests you need for shipping, check the order card in 배송 관리 Shipping management (Chapter 5). As the notice at the bottom of the screen says, the actual settlement amount and deposit date depend on your contract.
I looked at only yesterday or today, and there is no daily sales card.
With a single day, there is no day-by-day trend to draw, so the daily sales card is hidden. Try tapping 주 Week or 월 Month.
Only some of the orders show in the transaction history.
The transaction history shows only some orders, starting with the most recent. For the overall total, check the navy sales card at the top.
The total by card company differs from the sales card.
Sales by card company add up only the amounts approved by card. Payments without a card approval (for example, orders paid only with mileage, a full-member benefit) are left out. Canceled amounts are left out too.
I can't see the expected deposit date.
This screen does not show the expected deposit date or the settlement status. Sales by card company are meant for checking against the amount deposited.
I can't cancel a payment.
A card payment can be canceled only on the day it was made. If that day has passed, refund the customer directly or ask the contact center (1566-4250).
I can't see “View product sales”.
It appears only in online mall mode. In “Store mode” under 더보기 More, choose 온라인 쇼핑몰 Online mall, and the 매출 Sales tab opens as product sales.
The message “Couldn't load the sales information” appears.
Your connection may have dropped for a moment. Tap a period tab again.
7Store settings
Set up your store information, business hours, staff accounts, payment method, mileage policy, QR codes, AI ordering instructions and seller information. All settings start from the 더보기 More tab at the bottom.
7.1 Settings menu at a glance
Tap the 더보기 More tab at the bottom to find your store settings gathered in one place. Which settings you see depends on the store mode at the top of the screen (음식점 Restaurant / 온라인 쇼핑몰 Online mall). The mode switch appears only for stores that run both a restaurant and an online mall, and it shows only the features of the mode you choose.
| Settings menu (More) | What you do | Where it appears |
|---|---|---|
| 정보 관리 Info | Store name, phone number, address, food-ready notice message, number of tables, courier fee, store photos, settlement account | Store-wide |
| 결제 방식 Payment method | Choose pay first or pay later | Restaurant settings |
| 영업시간 · 직원 Hours · Staff | Business hours · break time · weekly days off, staff accounts | Restaurant settings |
| 음식점 운영 정책 Restaurant policy | Mileage payout rate · review share · usage limit | Restaurant settings |
| QR 만들기 Create QR | Save the number of tables; save table QR and Quick Pay QR codes | Restaurant settings, online mall settings |
| AI 주문 지시 AI ordering instructions | Write the content that AI ordering refers to in its guidance | Restaurant settings |
| 판매자정보 Seller info | Business details needed to sell in the online mall | Online mall settings |
Changes take effect only after you save them. The name of the save button differs from screen to screen: it appears as 수정 Edit · 전체 저장 Save all · 적용 Apply · 저장 Save. If you leave without saving, your changes are not applied. Depending on the app version, some rows or fields may look different from this guide or may not appear.
7.2 Information management
This is where you edit the store name and contact number, the notice message, the number of tables, store photos and the settlement account. You can find it under “Store-wide” in More.
- Tap the 더보기 More tab at the bottom, then open 정보 관리 Info.
- Enter the new content in the field you want to change, then tap 수정 Edit to the right of that field.
- To save several fields at once, tap 전체 저장 Save all at the bottom of the screen.
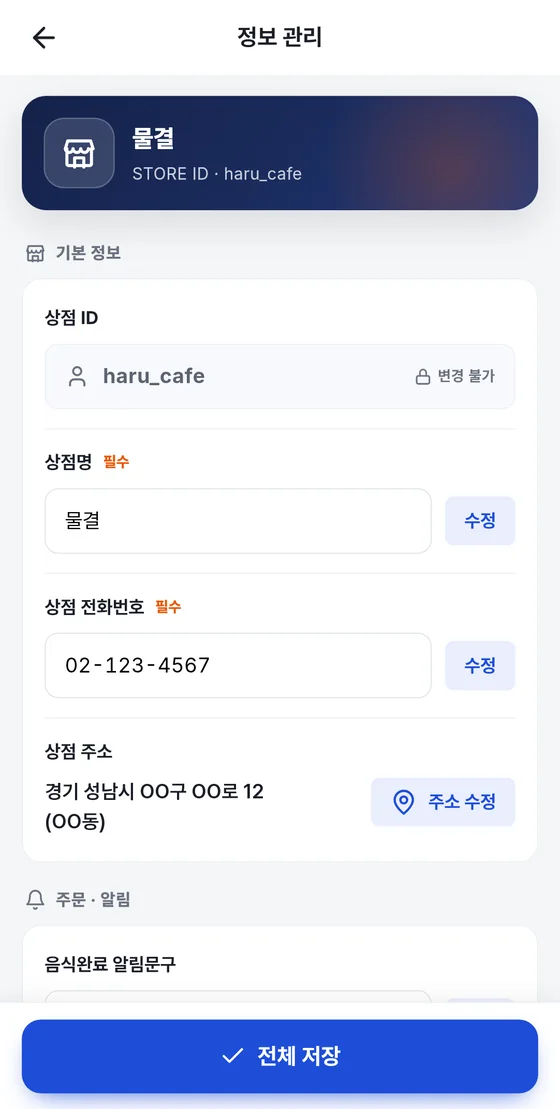
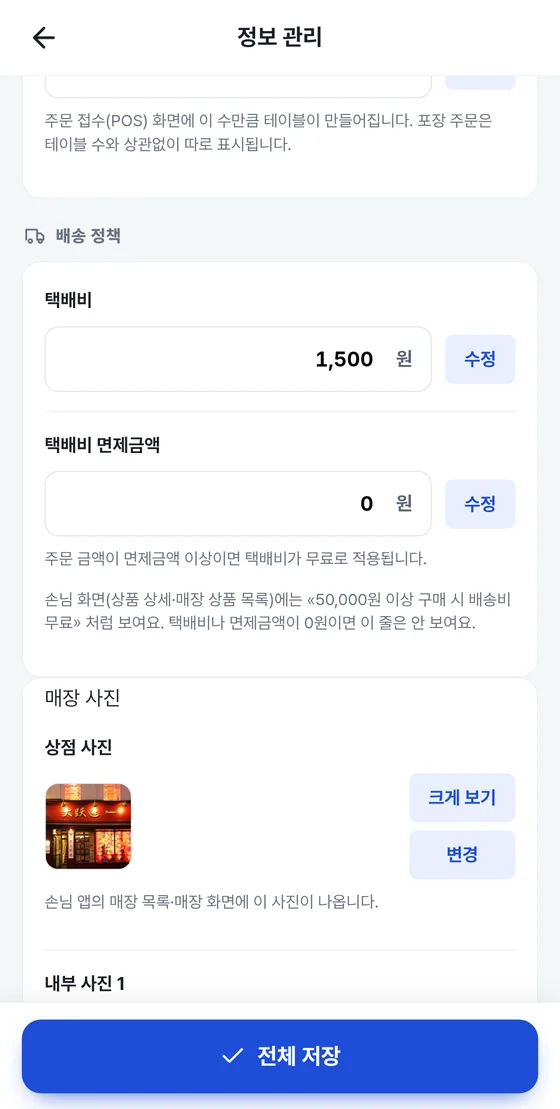
| Field | Description |
|---|---|
| Store ID | The ID that identifies your store. A lock and “Cannot be changed” are shown, so you cannot change it. |
| Store name (required) | Your store's name. If you save with this field empty, the message “Enter the store name” appears. |
| Store phone number (required) | Your store's phone number. If you save with this field empty, the message “Enter the phone number” appears. |
| Store address | Tap 주소 수정 Edit address to go to the address search screen. The address changes as soon as you choose one, so you don't need to tap 전체 저장 Save all separately. |
| Food-ready notice message | The message sent automatically to the customer when cooking is finished. You can write up to 200 characters. |
| Number of tables | Gpay POS creates this many tables on its screen. Takeout orders are shown separately, regardless of the number of tables. Enter a number from 0 to 200. It is the same value as the number of tables in QR 만들기 Create QR. It appears only in restaurant mode. |
| Courier fee · courier fee waiver amount | Applies only to online mall products. If the order amount is at or above the waiver amount, the courier fee is free, and customers see a notice such as “Free shipping for purchases of ○○ KRW or more” on their screen (product details · store product list). If you set the courier fee or the waiver amount to 0, this notice is not shown. |
| Store photos | The main photo shown in the store list and on the store screen in the customer app. If there is no photo, “No photo registered” is shown. |
| Interior photos 1 · 2 | Photo fields that show the inside of your store. Check a photo with 크게 보기 Enlarge and replace it with 변경 Change. |
| Contract | HQ registers it. As the store owner, you can only view it with 계약서 보기 View contract. If no contract is registered, “No contract registered” is shown. |
| Bank · account holder · account number · copy of bankbook | The account that receives your settlement payments. All three fields (bank · account holder · account number) must be filled in before it can be saved. Save with 수정 Edit to the right of the account number field, or save everything at once with 전체 저장 Save all. If the account has changed when you save with 전체 저장 Save all, a “Change the settlement account?” confirmation window appears. Handle the bankbook copy photo with 크게 보기 Enlarge and 변경 Change. |
전체 저장 Save all saves the store name, phone number, notice message, courier fee, courier fee waiver amount and a changed settlement account all at once. Save the number of tables with 수정 Edit, the address with 주소 수정 Edit address and photos with 변경 Change, each separately.
The settlement account is where your settlement payments are deposited. Before you change it, check the bank, account holder and account number once more.
Upload the front of your store as the “Store photo” and the inside as the “Interior photos” so customers can recognize your store more easily. Upload food photos as menu photos (Chapter 4).
7.3 Business hours · staff accounts
Set your business hours and days off, and manage the accounts staff members use to log in to Gpay POS. Open 영업시간 · 직원 Hours · Staff under Restaurant settings in More.
Setting your business hours
- In 영업 시간 Business hours, choose the start time and end time.
- If you have a break, choose its start and end times in 브레이크 타임 Break time. If you don't, leave it empty.
- In 정기 휴무 요일 Weekly day off, tap the days of the week you are closed (Sun–Sat). Selected days are shown darker, and tapping a day again clears it.
- Tap 영업시간 저장 Save hours. The message “Business hours saved” appears.
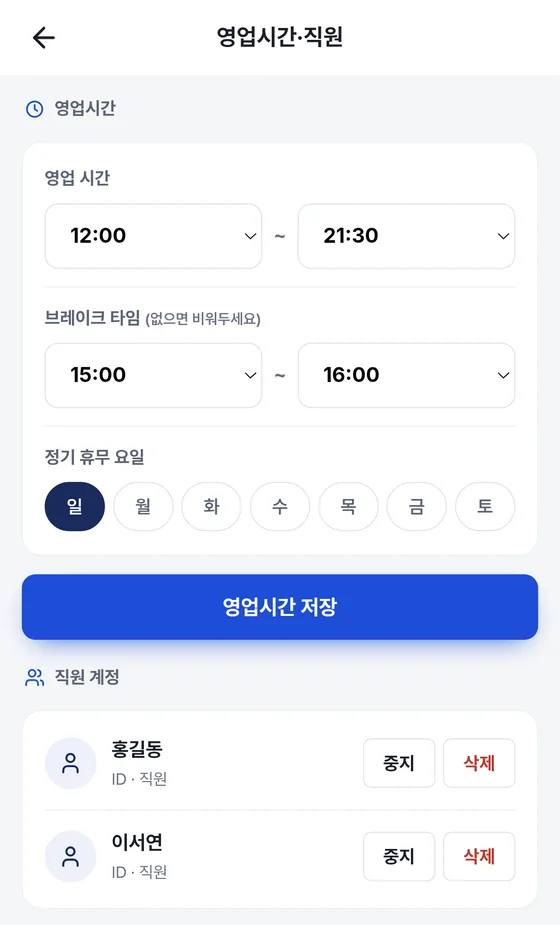
If you save with the business start and end times empty, only the message “Enter the business start and end times” appears and nothing is saved.
Saved business hours appear in the “Business hours” field of the profile at the top of More. The business switch that opens and closes your store for orders is also at the very top of More (Chapter 2).
Adding, stopping and deleting staff accounts
A staff account is the account a staff member uses to log in to Gpay POS. Each row in the list shows a name and “ID · Staff” or “ID · Manager”.
- Enter the name in the “Add staff” field at the bottom of the screen.
- Choose Staff or Manager as the role.
- Enter the login ID and password.
- Tap 추가 Add. The account you added appears in the list.
- 중지 Stop — Temporarily stops the account from being used. A stopped account is marked “Stopped”, and you can tap 사용 Use to use it again.
- 삭제 Delete — Removes the account. It is deleted only when you tap 삭제 Delete in the “Delete this staff member?” confirmation window.
The account is added only when you enter the name, ID and password. You cannot use the characters & and =. For a staff member who has left, tap 중지 Stop or 삭제 Delete on their account right away.
The range of functions staff can use in Gpay POS is set separately in the POS settings. It may differ depending on the POS version, so check the Gpay POS user guide. Change the store owner's login password separately in 비밀번호 변경 Change password (Chapter 8).
7.4 Payment method
This setting decides when the customer pays. Open 결제 방식 Payment method under Restaurant settings in More. The online mall does not have this setting. The method currently in use is shown at the top of the screen, with a field for each method below it.
| Method | When the customer pays | Suitable for |
|---|---|---|
| Pay first | Customers pay right away when they order. | Stores where customers pay at the same time as they order, such as cafes and snack shops |
| Pay later (pay-later store) | Customers sit down, order several times, and pay once when they leave. On the customer's phone, a “Before payment” card with “Request bill” · “Settle bill” appears, and on the POS the orders build up by table. | Stores where customers pay after eating, such as BBQ restaurants and pubs |
- Open 결제 방식 Payment method in More. Check the current method shown at the top.
- Tap the field of the method you want to switch to. If you tap the method you already use, only the message “This is already the current method.” appears.
- In the confirmation window “Switch to ○○ store? It applies from the next order.”, tap OK.
- When a message like “Saved.” appears, you're done.
The method you switch to applies from the next order. Orders that have already come in stay as they are. If there are tables that have not been paid yet, you can switch only after you settle or clear all of them.
Pay later is a feature for pay-later stores that choose this method. Not every store runs on pay later. A store that uses pay later takes payment by table on the 계산하기 Settle bill screen (Chapter 3).
7.5 Operating policy (mileage)
Decide how much mileage to give when a customer pays, how much more to give when they write a review, and how much of a purchase they can pay with mileage. Open 음식점 운영 정책 Restaurant policy under Restaurant settings in More.
Mileage is available to full member customers. Mileage is earned per store and can be used only at the store where it was earned. It is not paid back in cash.
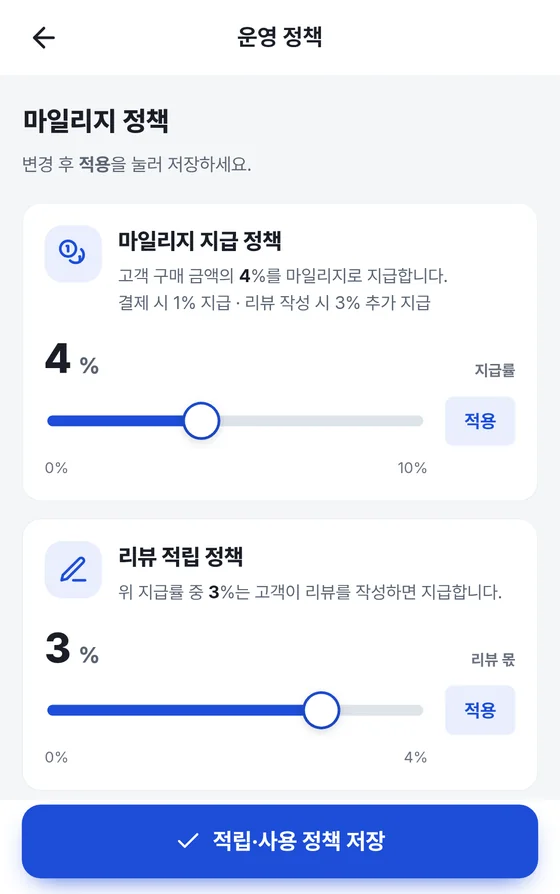
| Sliders | Meaning | Range you can set |
|---|---|---|
| Payout rate (mileage payout policy) | Sets what percent of the customer's purchase amount is given as mileage. | 0–10% (in steps of 1%) |
| Review share (review earning policy) | The part of the payout rate above that is given when a customer writes a review. The rest is given at payment. | From 0% up to the payout rate (it cannot be larger than the payout rate) |
| Usage limit (mileage use policy) | Sets up to what percent of the purchase amount can be paid with mileage. Scroll down the screen to find it. | 0–100% (in steps of 5%) |
- Open 음식점 운영 정책 Restaurant policy in More.
- Move the sliders to set the values. The numbers in the card text change right away.
- Save one card at a time with 적용 Apply to the right of the card, or save everything at once with 적립·사용 정책 저장 Save earning/use policy at the very bottom.
- Check for a message that includes the policy name, such as “Mileage payout policy applied”, or the message “Earning and use policy saved”.
When you set the review share within the payout rate, the wording is split. For example, as in the example on the screen, if the payout rate is 4% and the review share is 3%, it is shown as “1% given at payment · extra 3% given for writing a review”. If you set the review share to 0%, the whole payout rate is given at once at payment.
If you change the policy, it applies to new orders that come in after you apply it. Orders in progress are not affected.
In 온라인 쇼핑몰 Online mall mode, set these separately in 쇼핑몰 운영 정책 Mall policy. Earning rate · review earning · mileage use · customer center hours are set separately from the restaurant.
7.6 Creating QR codes and setting the number of tables
Customers scan a QR code to see the menu and order and pay right away. Create a separate QR code for each table and attach it. Open QR 만들기 Create QR in More.
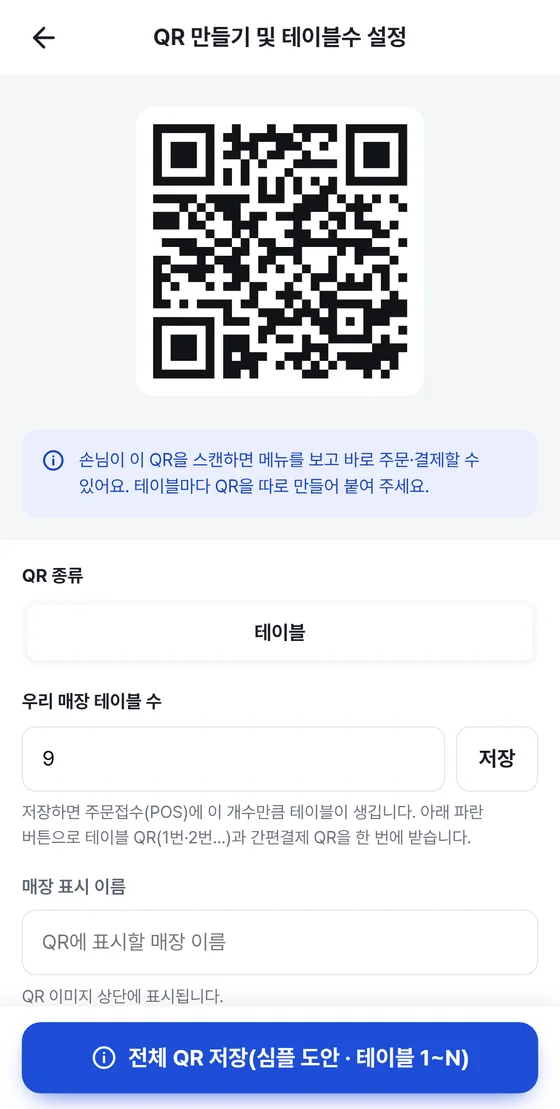
- Enter a number in “Number of tables in your store” and tap 저장 Save. When you save, Gpay POS creates that many tables.
- If you want a name at the top of the QR image, enter it in “Store display name”. If you leave it empty, the store name is used.
- Tap the blue 전체 QR 저장 Save all QRs at the very bottom. The button shows progress, such as “Creating… 1 / N”.
- When it finishes, the message “Handed N QR codes to the app — please check the save notice” appears. Follow the app's save notice and check the saved files.
- What you get at once: the table QR codes for table 1 through the last table, and the Quick Pay QR. They are made in a simple design.
- The Quick Pay QR is a QR code that customers scan, then enter an amount and pay. Quick Pay is a full-member benefit.
- You can have up to 200 tables. This is the same value as the number of tables in Information management.
If you tap 전체 QR 저장 Save all QRs without saving the number of tables, the message “Please save the number of tables first” appears. If the QR files are not saved, your app may be an old version. Update the Gpay Store (지페가맹점) app to the latest version in the app store, then tap again (Chapter 8).
Printing and attaching
- Open the saved QR image and check that the store name and table number are correct.
- To make stickers or stands, print the image and use it. Gpay-made products such as QR cards can be ordered from 회사 쇼핑몰 Company mall in More.
- The QR code contains the table number. Attach it to the table with the same number as on the image.
- After you attach it, scan it yourself with the Gpay app and check that the menu screen for that table opens.
Avoid places that fold or get covered, and shiny places that reflect light. A flat surface makes it easier for customers to scan. If you add tables, tap 전체 QR 저장 Save all QRs again. Everything from table 1 is saved anew, so you can pick out and print only the newly added numbers.
7.7 AI ordering instructions
If you open AI 주문 지시 AI ordering instructions under Restaurant settings in More, you can write in advance what the AI ordering guidance in the Gpay app should refer to. Depending on the app version, this row may not appear, or the way what you write is reflected in AI ordering may differ.
AI ordering is a full-member benefit that customers use in the Gpay app. AI ordering uses an external AI service (OpenAI).
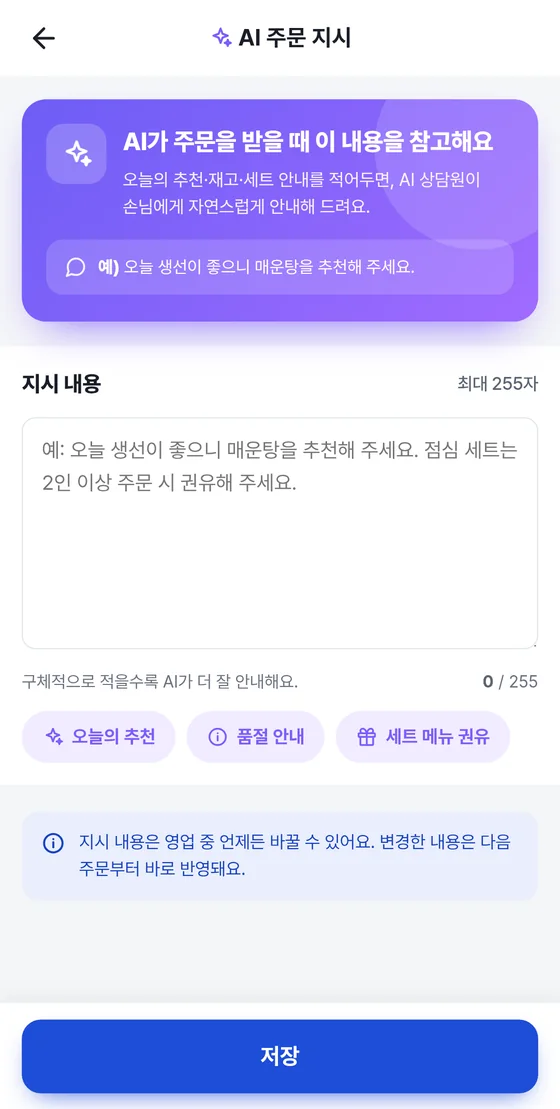
- In the “Instructions” field, write what AI ordering guidance should refer to. The maximum is 255 characters.
- If writing is hard, tap one of the chips. An example sentence is added to the input field and the message “Example added” appears. Edit it to fit your store.
- Tap 저장 Save. You can edit it at any time, even during business hours.
The screen says the AI refers to this content, but there is no promise that customers will be guided exactly as you wrote. How it is reflected in AI ordering may change depending on the app version. Also be sure to set sold-out items with the menu's 품절 Sold out setting (Chapter 4). What you write may be passed to the external AI service, so do not write sensitive content such as personal information or bank accounts.
7.8 Seller information (online mall)
This is the seller information shown to customers when you sell products in the online mall. Customers can see it on the online mall product screen. All required fields must be filled in before customers can buy this store's online mall products. For a store that runs both a restaurant and an online mall, switch the store mode to 온라인 쇼핑몰 Online mall, then open 판매자정보 Seller info under “Online mall settings” in More.
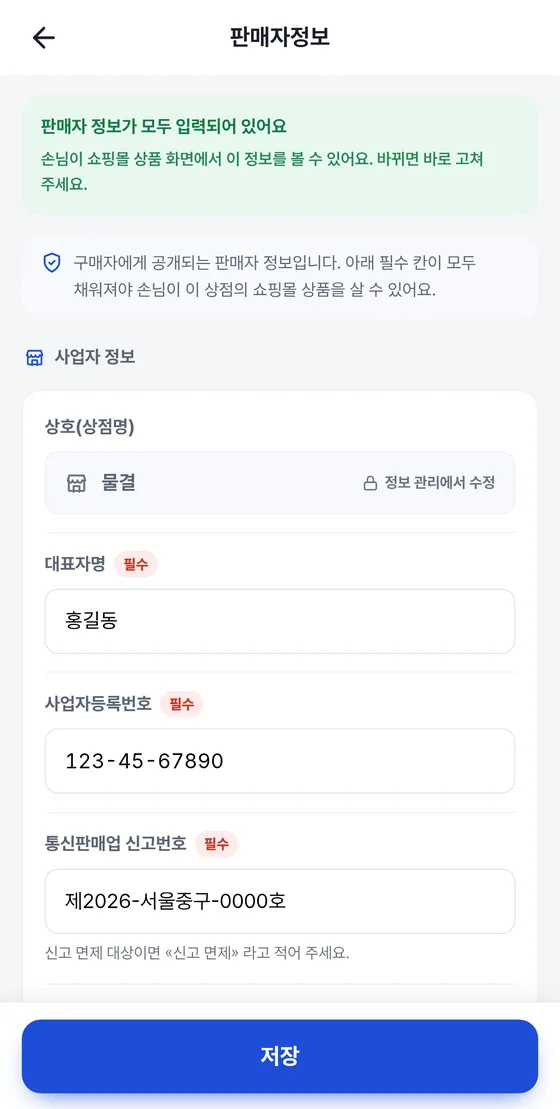
| Field | Required | Notes |
|---|---|---|
| Business name (store name) | - | Edit it in Information management. You cannot change it here. |
| Representative name | Required | Enter the representative's name. |
| Business Registration No. | Required | Enter 10 digits. If the number of digits is different, a message appears when you save. |
| Mail-Order Business Report No. | Required | If you are exempt from reporting, enter “Exempt from reporting”. |
| Inquiry phone number | Required | Enter the number that will receive order and return inquiries. |
| Return address | Required | Enter an address that can actually receive returned products. It is in “Shipping and return notice” at the bottom of the screen. |
| Shipping time notice | Optional | Tells customers how long it takes before the order is shipped. |
| Return shipping fee notice | Optional | Tells customers who pays the return shipping fee. |
If a required field is empty, the notice at the top changes to “Enter the seller information first” and lists the names of the empty fields. Until they are filled in, customers cannot buy this store's online mall products. If you tap 저장 Save with fields empty, the confirmation window “Save with empty fields?” appears. Tap 채우기 Fill in to finish filling them in, or tap 그대로 저장 Save as is to save with them empty.
If your business information or return address changes, update it right away. This information is shown publicly to customers.
8Responding to customers and notices
This explains how to reply to customer reviews, check HQ messages and terms, change your password, and keep the app up to date.
8.1 Review management
Check the reviews customers have left and reply as the store owner. Tap the 리뷰 › Reviews › field in the profile at the top of More to open it. In online mall mode, you can also open it from 상품 리뷰 Product reviews in More.
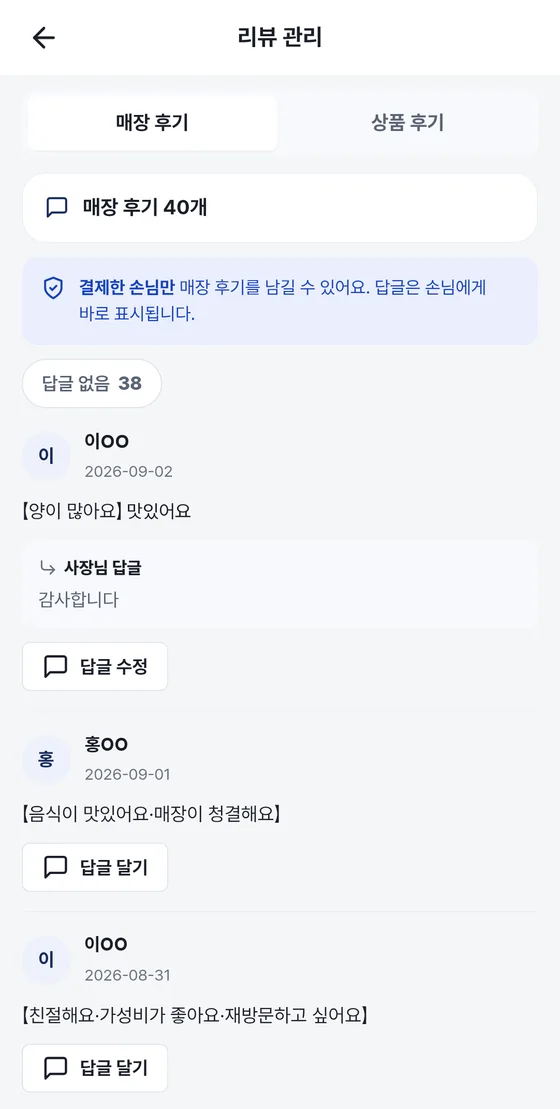
| Tab | Reviews you can see | Star rating |
|---|---|---|
| 매장 후기 Store reviews | Reviews left by customers who paid at the store. The number of reviews is shown at the top. | Shows only the count and the content, with no star rating. |
| 상품 후기 Product reviews | Reviews from buyers of online mall products whose delivery is complete. The average star rating and the star distribution are shown at the top. | There is a star rating. |
Replying to a review
- Tap 답글 달기 Reply below the review you want to reply to.
- Write your reply in the input field (“Enter a reply to leave for the customer”).
- Tap 등록 Post. The message “Reply posted” appears.
A reply you have already posted is shown under “Store owner's reply” below the review. To edit it, tap 답글 수정 Edit reply, change the content, and tap 등록 Post. To back out, tap 취소 Cancel. If you tap 등록 Post with the content empty, the message “Enter the reply content” appears.
Viewing only reviews without a reply
- The number on the 답글 없음 No reply chip is the number of reviews you haven't replied to yet.
- Tap the chip to show only the reviews without a reply. Tap it again to go back to all reviews.
- If you have replied to all of them, the message “There are no reviews without a reply. You have replied to all of them.” appears.
- If more than one product has reviews in 상품 후기 Product reviews, a list for choosing a product appears at the top.
- If there are a great many reviews, only the most recent ones are loaded, and the message “Loaded only the latest ○ reviews” appears at the top of the screen.
Replies are shown to customers right away. Read your reply once before you post it.
Customers who can write reviews are customers who paid (store reviews) or buyers whose delivery is complete (product reviews). For the standards on replies · reports · deletion, check the “Review operating policy” in 약관 · 정책 Terms · policies in More. The share of extra mileage given for writing a review is set in 음식점 운영 정책 Restaurant policy (full-member benefit, Chapter 7).
8.2 The “Support” menu in More
The lower part of More has the menus for HQ news and account management.
| Menu | What you do |
|---|---|
| 본사 메세지 HQ messages | Check notices and guidance sent by HQ. |
| 약관 · 정책 Terms · policies | Read the terms and policies, such as the Terms of Use and the Privacy Policy. |
| 비밀번호 변경 Change password | Change your login password. |
| 앱 업데이트 App update | It may not appear depending on the app version. If you see it, tap it to get the latest version from the store (8.6). |
| 로그아웃 Log out | Logs the account out on this device. |
Check HQ news in 본사 메세지 HQ messages. For inquiries, call the contact center at 1566-4250 (weekdays 09:00–18:00 KST, lunch 11:30–12:30).
8.3 HQ messages
- Open 본사 메세지 HQ messages in More.
- Tap the message you want to read in the list. Each row shows the sender, an “Unread” or “Read” mark, the date, the title and a preview of the content.
- Read the content in the window that slides up from the bottom, then tap 확인 OK.
- A summary such as “Unread ○ · Read ○” appears above the list. When you have read everything, it changes to “All read”.
- If there are many messages, tap 더 보기 Show more at the very bottom to load earlier messages.
- If you have no messages, “No messages received” appears.
8.4 Terms · policies
When you open 약관 · 정책 Terms · policies, a list of terms and policies appears. It is a read-only screen with no agreement step. Tap the item you want to read to open the full text, and tap the arrow at the top left to go back to the list.
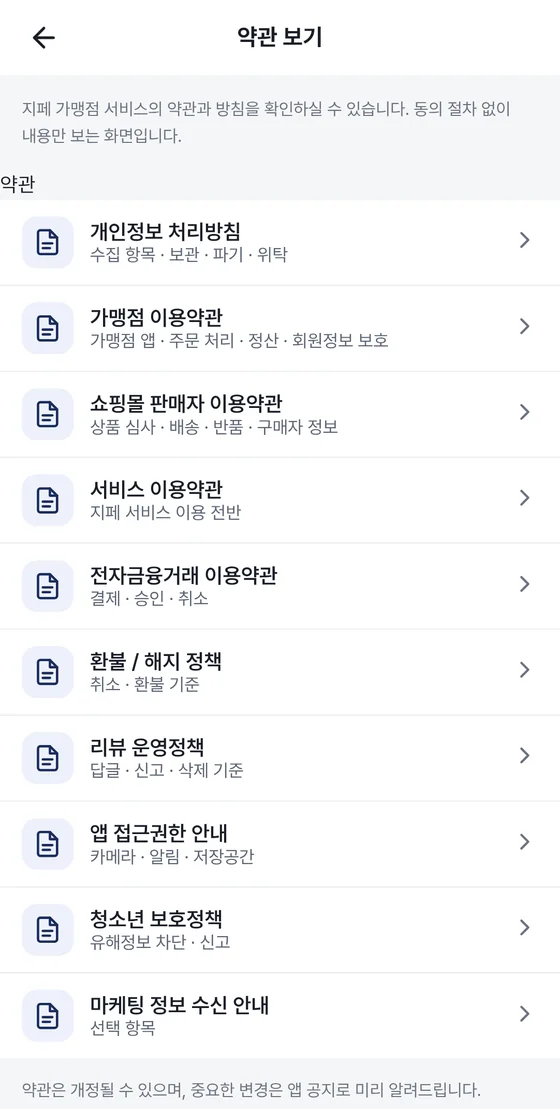
- Privacy policy
- Merchant Terms of Use
- Online mall seller Terms of Use
- Terms of service
- Terms of electronic financial transactions
- Refund / termination policy
- Review policy
- App permissions notice
- Youth protection policy
- Notice on receiving marketing information
If the full text can't be loaded, the message “Could not load the full text of the terms. Please try again in a moment.” appears. Open it again after a short while.
8.5 Change password
- Open 비밀번호 변경 Change password in More.
- In “Current password”, enter the password you use now.
- In “New password” and “Confirm new password”, enter the same password. Tap the eye-shaped button to the right of a field to see what you typed.
- Tap 비밀번호 변경 Change password.
| Message | When it appears |
|---|---|
| Enter your current password. | The current password field is empty. |
| Enter a new password. | The new password field is empty. |
| The new passwords do not match. | The new password and the confirmation field are different. |
| It is the same as your current password. Please choose a different password. | The new password is the same as the current password. |
| The password cannot contain the characters & =. | The password contains & or =. |
After you change it, use the new password from your next login. When the current password is wrong, and when the change is complete, the app tells you in a prompt window. Do not share your password with anyone. Create a separate staff account for each staff member (Chapter 7).
8.6 App update and log out
App update
- If there is an 앱 업데이트 App update row at the very bottom of More, check it. Under the row, the version of the app you have installed is also shown, as in “Get the latest version from Google Play · Now ○.○.○”.
- Tap the row to open the Gpay Store (지페가맹점) app page in the store you use (Google Play or the App Store).
- If there is a new version, tap Update in the store.
The 앱 업데이트 App update row may not appear, depending on the app version. If the row is not there, search the store for Gpay Store (지페가맹점) and update it yourself. The store lists the app under that name, while the top of the app screen shows its in-app name, Gpay Store (지페스토어). If the app is out of date, some features, such as saving QR files, may not work.
Log out
If you tap 로그아웃 Log out at the very bottom of More, you are logged out of the account on this device after a confirmation. On a shared phone or a device that staff share, log out after you use it. When you come back in, follow the login steps in Chapter 1.
9Frequently asked questions
This collects questions store owners ask often. If your problem isn't solved here, call the contact center at 1566-4250 (weekdays 09:00–18:00 KST, lunch 11:30–12:30).
9.1 Joining as a merchant and doing business
How do I join?
You can't sign up on your own in the app. Call the contact center at 1566-4250 to ask about joining as a merchant, and a representative will help with registration and the contract. When registration is finished, log in to the Gpay Store app and register your menu. Before approval, a “You are not an official merchant yet” notice band may appear at the top of Home and More, and during that time your menu items and products are not shown in the Gpay app. There is also a paid service that registers menu items and categories for you, so ask the contact center if you need it.
I turned on the business switch, but no orders come in.
Check in the order below. ① Check whether the top of More says “Open”. If it is off, it shows “Closed” and customers can't order in the Gpay app. ② If you see a “You are not an official merchant yet” notice band on Home or More, you are waiting for approval. Ask the contact center. ③ In the menu tab, check that the menu item is registered and is not in a 품절 Sold out or 숨김 Hidden state. For takeout orders, also check that Home shows 포장 가능 Takeout available. ④ Restaurant orders are received in the Gpay POS PC program or on the order-intake screen on your phone (the 주문 접수 POS Order intake POS tile on Home). If you use Gpay POS, check that POS is on and logged in, and that the “Receiving orders” indicator on the screen is green (Chapter 3). If orders still don't come in, ask the contact center.
9.2 Menu items and products
How do I mark a menu item as sold out?
In the list on the menu tab, tap the switch on the menu item's row to toggle between “On sale” and “Sold out”. You can also tap the menu item to open Edit menu item and choose 품절 Sold out under “Sold-out status”. It is saved as soon as you tap. Sold-out menu items are shown to customers as sold out. To hide a menu item from the customer screen completely, change “Use status” to 숨김 Hidden. See Chapter 4 for details.
How do I change a menu photo? What about the store photo?
To change a menu photo, tap the menu item on the menu tab to open Edit menu item and tap 사진 변경 Change photo. When you register a menu item, upload a photo with 사진 넣기 Add photo; you can also add the photo later. You can upload only one photo per menu item. The store photo shown in the store list and on the store screen in the customer app is changed with 변경 Change under “Store photo” at the bottom of 정보 관리 Info in More. Upload food photos to the menu, and the front-of-store and interior photos to Information management.
I want to take a product down from the online mall.
In the product list in online mall mode, tap 쇼핑몰에서 내리기 Take off the mall on the row of a product that is listed in the mall, or tap 쇼핑몰에서 내리기 Take off the mall on the Edit product screen. When you confirm in the confirmation window, it is no longer visible in the customer's online mall. When you list it again, the previous settings are restored as they were. See Chapter 5 for details.
A customer asked for a cancellation or return. Can I cancel the order myself?
When a customer makes a request, the notice “The customer has requested a cancellation or return for this order — please handle the request first.” appears on that order in Shipping management. Tap 취소·반품 요청 관리로 가기 Go to cancel/return requests and, on the screen that opens, tap 승인 · 재고복구 Approve · restore stock or 거부 Reject. If you approve, stock is restored, and if the whole order is canceled, the card refund is handled automatically as well. If only some of the quantity is canceled, the card refund is handled separately. When you cancel an order yourself because the item is out of stock or sold out, handle it in 구매 취소 Cancel purchase in More, and the customer's payment is refunded when you cancel. See Chapter 5 for details.
9.3 Customer service
I want to reply to a review.
Tap the 리뷰 › Reviews › field at the top of More to open review management, tap 답글 달기 Reply below the review, write your reply, and tap 등록 Post. Edit a reply you have already posted with 답글 수정 Edit reply. Tap the 답글 없음 No reply chip to see only the reviews you haven't replied to yet. Replies are shown to customers right away. See Chapter 8 for details.
Where can I see HQ news, and where do I make inquiries?
Check HQ news in 본사 메세지 HQ messages in More. For inquiries, call the contact center at 1566-4250 (weekdays 09:00–18:00 KST, lunch 11:30–12:30).
9.4 Store settings
I want to change the payment method (pay first / pay later). When does it apply?
Open 결제 방식 Payment method under Restaurant settings in More and tap the field of the method you want to switch to. Confirm in the window “Switch? It applies from the next order.” and it is saved. The method you switch to applies from the next order. Orders that have already come in stay as they are. If there are tables that have not been paid yet, you can switch only after you settle or clear all of them. Pay later is a feature for pay-later stores that choose this method. See Chapter 7 for details.
I want to create or remove a staff account.
In “Staff accounts” at the bottom of 영업시간 · 직원 Hours · Staff in More, enter the name · role (staff / manager) · login ID · password and tap 추가 Add. To stop an account for a while, tap 중지 Stop, and to remove it completely, tap 삭제 Delete. Deleting shows one more confirmation window. The range of functions staff can use in Gpay POS is set separately in the POS settings. See Chapter 7 and the Gpay POS user guide for details.
I want to get the QR codes again. I added tables.
Open QR 만들기 Create QR in More, change “Number of tables in your store”, and tap 저장 Save. Then tap 전체 QR 저장 Save all QRs at the very bottom again. Everything from table 1 through the last table is saved anew, so you can pick out and print only the newly added numbers. If it doesn't save, your app may be an old version, so update the Gpay Store (지페가맹점) app to the latest version in the store (Chapter 8).
I want to change the mileage policy.
In 음식점 운영 정책 Restaurant policy in More, move the sliders and tap 적용 Apply or 적립·사용 정책 저장 Save earning/use policy. A changed policy applies from new orders and does not affect orders in progress. Mileage can be received by full member customers and used only at the store where it was earned. It is not paid back in cash (full-member benefit). See Chapter 7 for details.
I want to change my settlement account.
In “Contract · Settlement account” at the bottom of 정보 관리 Info in More, fill in all three fields (bank · account holder · account number), then tap 수정 Edit to the right of the account number field or 전체 저장 Save all at the very bottom. If the account has changed when you save with 전체 저장 Save all, the confirmation window “Change the settlement account?” appears. This is the account that receives your settlement payments, so be sure to check what you entered again. The contract is registered by HQ, and as the store owner you can only view it.
9.5 Gpay POS and inquiries
Where do I install Gpay POS, and how do I update it?
Gpay POS is a Windows PC program. The installation steps are in the Gpay POS installation guide and the usage steps are in the Gpay POS user guide, each organized separately. You can install it without administrator rights. Each time the program starts, it checks for a new version, and when it gets one, a notice appears on the login screen. Click 지금 다시 켜기 Restart now to apply it.
Do I receive orders in the phone app?
Tables · order entry · payment QR · cash · receipts are handled in the Gpay POS PC program. On your phone, open the order-intake screen from the 주문 접수 POS Order intake POS tile on Home to check new orders and start cooking. If, depending on the app version, the 주문 Orders tab shows a Shipping management notice instead of an order list, check online mall orders on the Shipping management screen. See Chapter 3 and the Gpay POS user guide for details.
Where do I make inquiries?
Call the contact center at 1566-4250. Hours are weekdays 09:00–18:00 KST, and lunch break is 11:30–12:30.
This guide was made from the screens of the merchant app Gpay Store as of October 19, 2026. The names · phone numbers · business information on the screens have been replaced with fictional values. The app may change somewhat with updates. For inquiries about joining as a merchant or operating your store, call the contact center at 1566-4250 (weekdays 09:00–18:00 KST, lunch 11:30–12:30). ※ No platform brokerage fee — card payment fees and paid merchant services apply separately.