
User guide · revised October 12, 2026
Merchant screen “Restaurant” user guide
For restaurant operators · for POS operation, see the Gpay POS user guide
0 About this guide
The pictures show the PC screen of an example store (“Mulgyeol”) (the merchant screen opened inside POS). Staff names, IDs, phone numbers, addresses and business numbers are masked on the screen, and sales and orders are sample data, so the numbers differ from a real store.
- This guide covers the “Restaurant” side of the merchant screen. It is where you edit menu items, view sales and change store settings.
- It does not cover POS operation (table screen, order entry, payment QR, receipts). There is a separate Gpay POS user guide.
- It also does not cover the online mall side (products, shipping, cancellations/returns). There is a separate Merchant screen “Shopping mall” user guide.
- The text on screen follows the PC (window width 900 or more) layout. On a phone or a narrow window, the same features appear in the earlier layout (bottom tabs · windows that slide up from the bottom) — Chapter 7.
1 Getting started
1.1 Where to open it
- Phone: Open the Gpay Store app and log in with your merchant account.
- PC: You see the same screen inside POS. The merchant login is a different account from the POS login — it is the ID and password you use for the merchant phone app. Once you log in, this machine remembers it, so it doesn't ask again.
1.2 Choosing what your store does
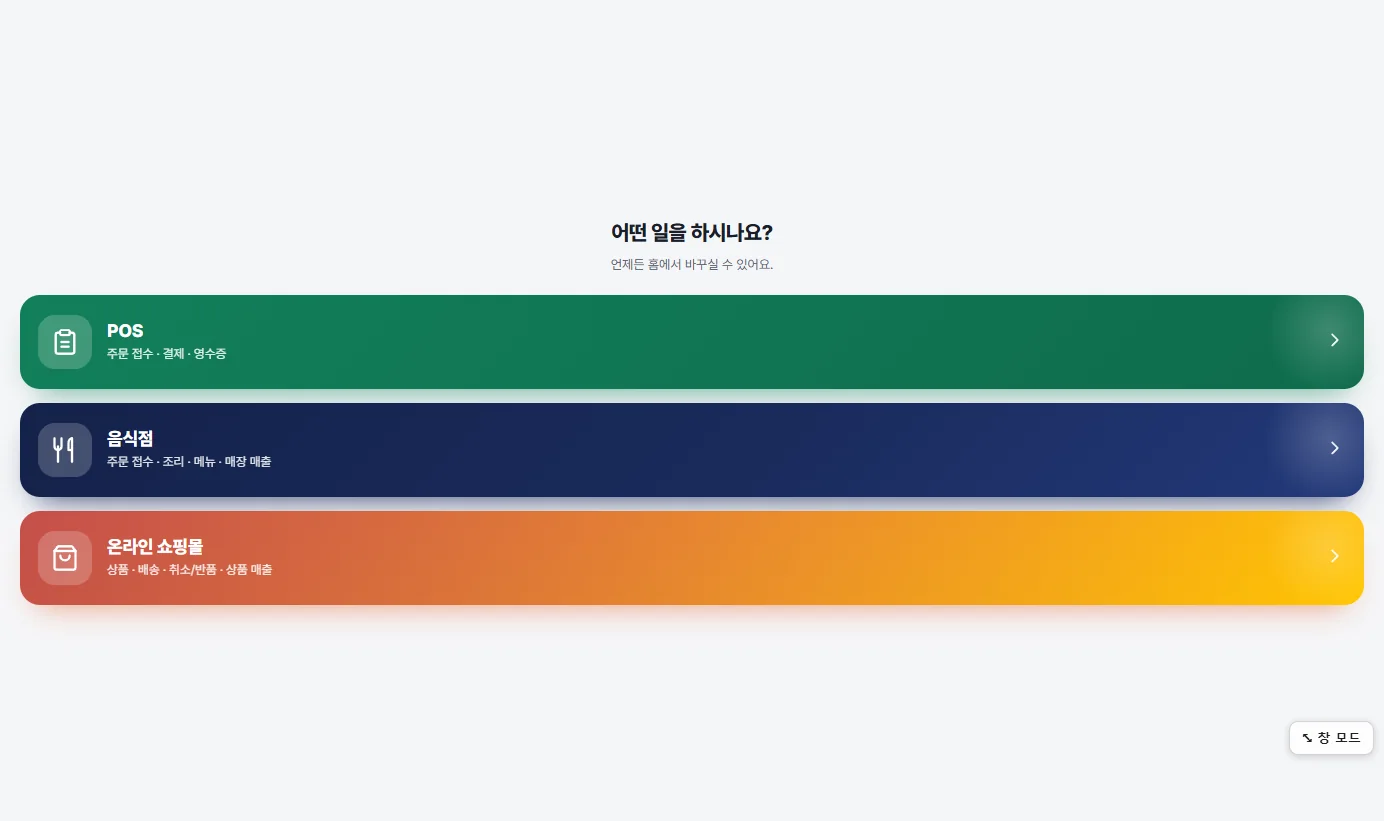
- This choice appears only for stores that do both restaurant and online mall business. A store that does only restaurant business opens the restaurant screen directly.
- The first time you go in, “What kind of work do you do?” appears. On PC there are three branches — POS (receiving orders · payment · receipts) · Restaurant (receiving orders · cooking · menu · store sales) · Online mall (products · shipping · cancellations/returns · product sales). This guide covers the screens after you choose Restaurant.
- Only the features of the side you choose are shown. You can switch at any time with the “Store mode” switch (Restaurant | Mall) at the very bottom of the left menu bar. It is in the same place on every screen. See 1.3 for details.
1.3 Screen layout
There is a vertical menu on the left (five items with text and pictures together), and the content appears on the right. Click an item to switch to that screen.
| Left menu | What you do |
|---|---|
| Home | The place you work today. Today's numbers · orders in progress · settle bill · takeout orders · favorites Chapter 2 |
| Orders · POS | Click it to go to the POS order screen (first the confirmation window “Go there?” appears 1.4). If there are orders waiting to be handled, an orange number badge appears Chapter 3 |
| Menu | Registering and editing menu items · sold out · categories Chapter 4 |
| Sales | Sales today and by period, ranking by menu item, breakdown by card company, transaction history Chapter 5 |
| More | All settings Chapter 6 |
You can also tell which mode you are in by the color of the menu bar. Restaurant mode has a light blue background and online mall mode has a light orange background, and only the item you are viewing is filled with a dark color and white text.
The store mode switch is at the very bottom of the menu bar. The two items “Restaurant” and “Mall” are stacked one above the other, and the one for the current mode is filled with a dark color. Click the other item to switch to that mode, and the items in the menu bar change to match the mode (in mall mode, a “Shipping” item is added). On Home and More, it switches right there. If you click it on another screen, it switches the mode and then goes to Home. For a store that has a contract for only one side, the item for the side it has not contracted has a lock, and clicking it opens the contract application screen.
On every screen, the screen name is in the top line (the header), and the buttons used most often on that screen are gathered on the right. Inside a settings screen, there is ‹ More (go back) on the left. The bell icon on the right of the header on Home is HQ messages, and the gear icon is the Merchant options window (1.4). More (settings) is More in the left menu.
1.4 Merchant options (gear)
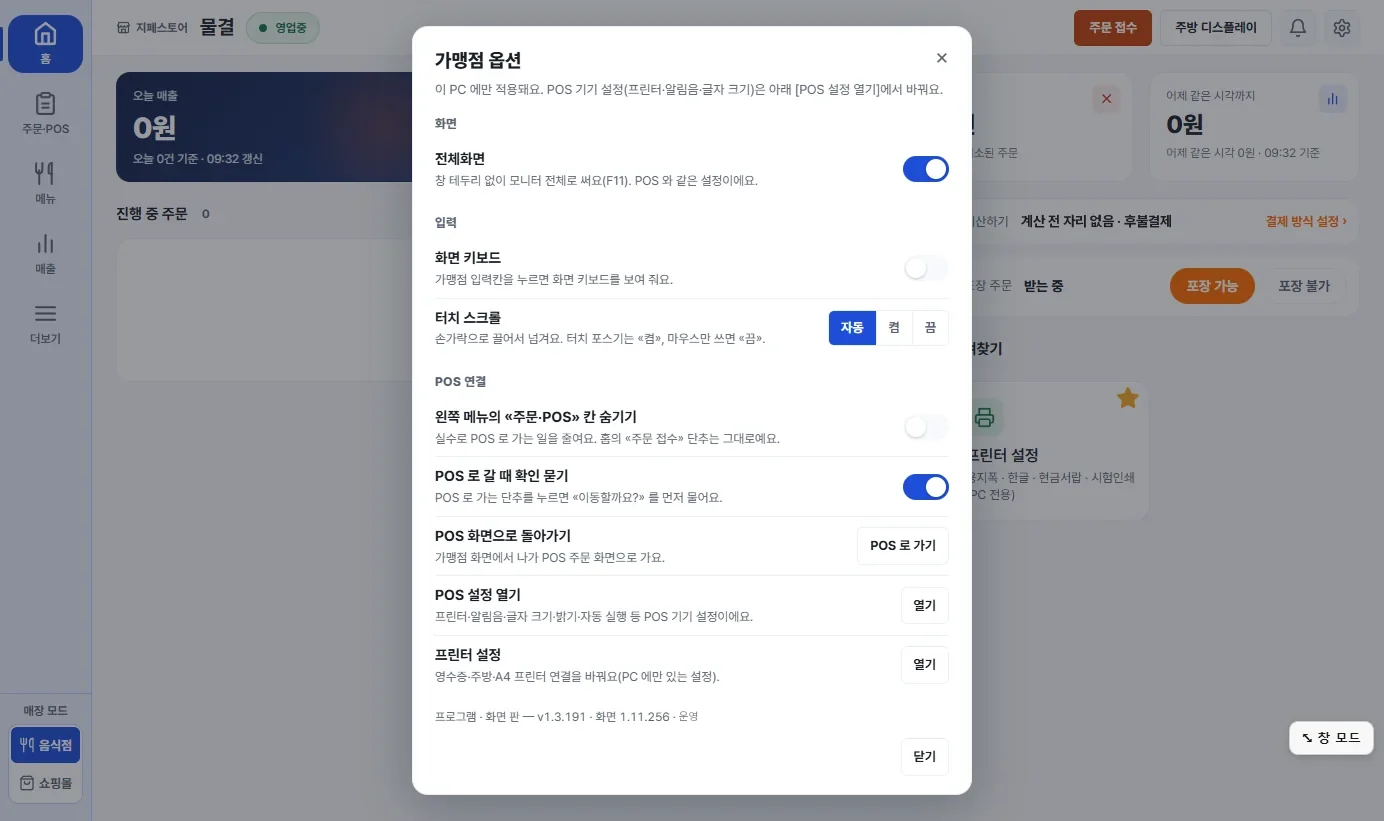
Click the gear icon at the right of the top line of Home and the Merchant options window opens. These settings apply only to this PC, and when you change a value it applies right away (there is no save button). On a phone, the gear goes to the More (settings) screen.
| Item | What you do |
|---|---|
| Full screen | Uses the whole monitor with no window border (F11). It is the same setting as in POS. |
| On-screen keyboard | Shows the on-screen keyboard when you click a merchant input field. It is the same setting as the “On-screen keyboard” row in More in restaurant mode. |
| Touch scroll | A way of scrolling by dragging with a finger. Auto turns it on only when Windows reports a touch screen. Set it to On if it is a touch POS terminal but dragging does not scroll, and to Off if you only use a mouse and dragging to select text turns into scrolling. |
| Hide the “Orders · POS” item in the left menu | When on, the “Orders · POS” item disappears from the left menu (window width 900 or more). This is to reduce the chance of going to the POS screen by mistake. The 주문 접수 Order intake button on Home stays, and even if you hide the item, you can still go with POS 로 가기 Go to POS below. |
| Ask for confirmation when going to POS | It is on from the start. When you click the “Orders · POS” item on the left, 주문 접수 Order intake on Home, or the “POS screen” row in More, “Go to the POS screen?” appears first. If you click 머무르기 Stay (default), you stay on the merchant screen, and you go only if you click POS 로 이동 Go to POS. If you turn it off, you go straight there without confirmation. |
| Go to POS | Goes to the POS order screen without confirmation. It is the way to get there when you have hidden the “Orders · POS” item. |
| Open POS settings | Goes to the POS order screen and opens the POS settings window (printer · notification sound · text size · brightness · auto-start, etc.). |
| Printer settings | Goes to the window for connecting the receipt, kitchen and A4 printers. Printers are a PC-only setting. |
| The bottom row | Shows the program version · screen version · server you are using now. Please tell us these when you make an inquiry. |
Text size is a setting that applies only to the POS screen, so it is not in this window. Change it in the POS settings window. The hide and confirm values in this window are saved on this PC only and do not carry over to your phone or other PCs.
2 Home
2.1 Shortcuts · number strip
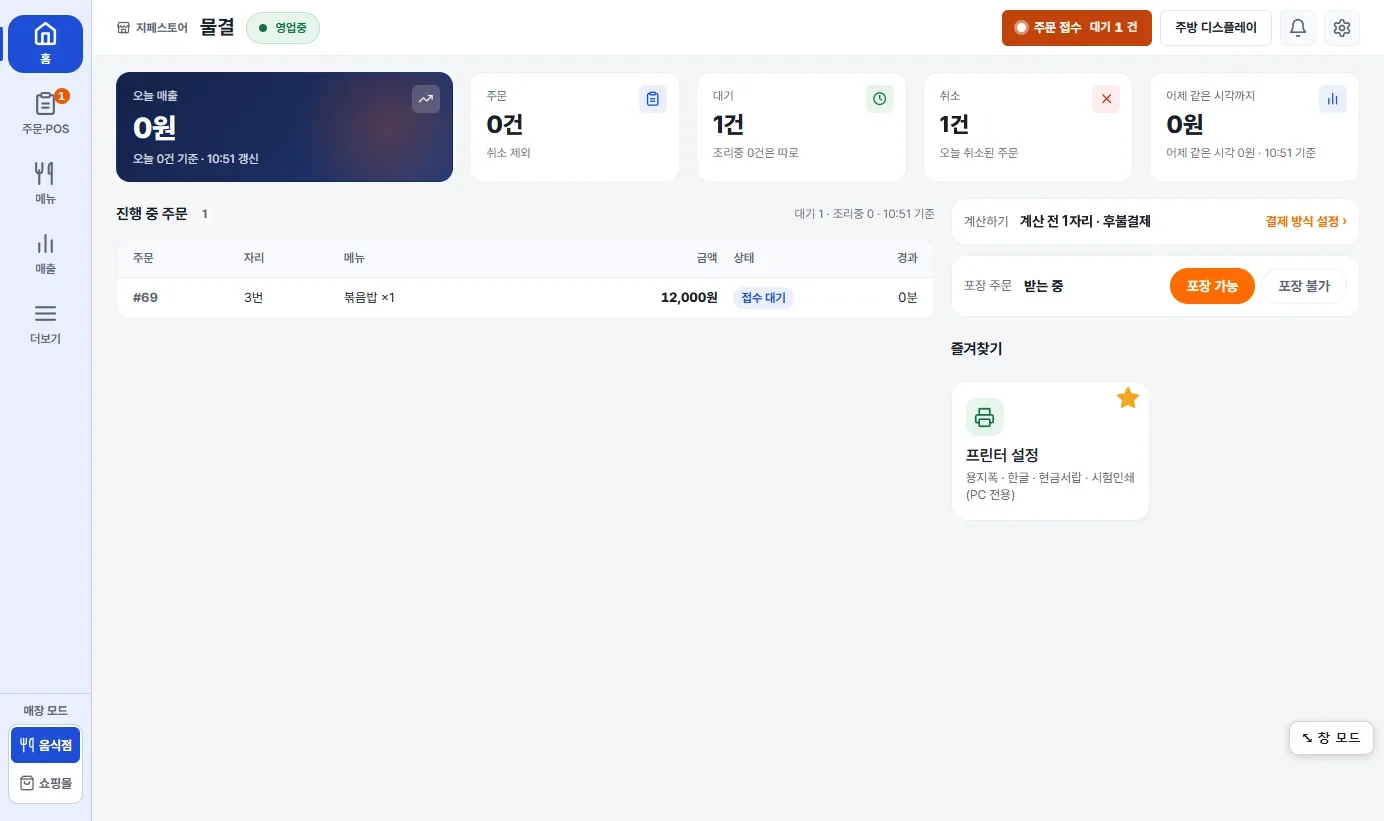
- 주문 접수 Order intake: Goes to the POS order screen. The number of waiting orders is shown inside the button (example: “1 waiting”).
- 주방 디스플레이 Kitchen display: Goes to the real-time cooking ticket screen. Chapter 3
- The “Open” indicator next to the name only shows the current status. Clicking it does not turn it on or off; it goes to More. Change the business status in More. 6.1
- The number strip below it: today's sales (big tile) · orders (excluding canceled) · waiting (those being cooked are counted separately) · canceled (orders canceled today). The “Up to the same time yesterday” tile at the far right is yesterday's sales up to the same time of day — depending on the server version, the value in this tile may look empty.
2.2 Orders in progress
- In the “Orders in progress” table on the left, orders that are waiting to be handled or being cooked appear one row at a time as order number · table · menu item · amount · status · elapsed (minutes). Status shows the current step, such as “Waiting to be received”.
- Orders that have waited the longest appear at the top, and if there are many orders, only the first few are shown. To see them all, go to the POS order screen with 주문 접수 Order intake.
- When there are no orders, “No orders in progress” appears.
2.3 Settle bill · takeout orders
- The Settle bill row shows the number of tables that haven't been paid yet and the current payment method (example: “Before payment 1 table · pay later”). Change it with 결제 방식 설정 › Payment settings › on the right. 6.3
- The takeout orders row shows the current status (example: “Receiving”), and you change it with 포장 가능 Takeout available 포장 불가 No takeout. The side that is on now is orange.
- The takeout setting is reflected right away on the customer map and the store introduction. It does not change until the server accepts it — if you click and it stays the same, click again.
2.4 Favorites
- Put the settings you use often on the right side of Home as cards. Click the star (★) to the right of an item in the More list to put it up, and click it again to take it down. A filled orange star means it has been added.
- There is no limit on how many you can add. Cards are placed two per row.
- Restaurant and online mall favorites are kept separately. What you add on one side does not mix into the Home of the other.
- They are saved on this machine only. Even for the same account, they do not carry over to other PCs or phones.
- This feature and the Printer settings card (paper width · Korean characters · cash drawer · test print) are PC only.
3 Orders · kitchen
The merchant screen has no place to handle orders. Click 주문·POS Orders · POS in the left menu or 주문 접수 Order intake on Home and you go to the POS order screen (to keep you from going by mistake, the confirmation window “Go to the POS screen?” appears first — 1.4).
- Receiving orders · cooking · payment · cancellation are all done on the POS screen. Gpay POS user guide
- Cooking tickets are handled by the kitchen display (KDS). You keep it in the kitchen and use it there. You open it with 주방 디스플레이 Kitchen display on Home, or Kitchen display (KDS) in the More list.
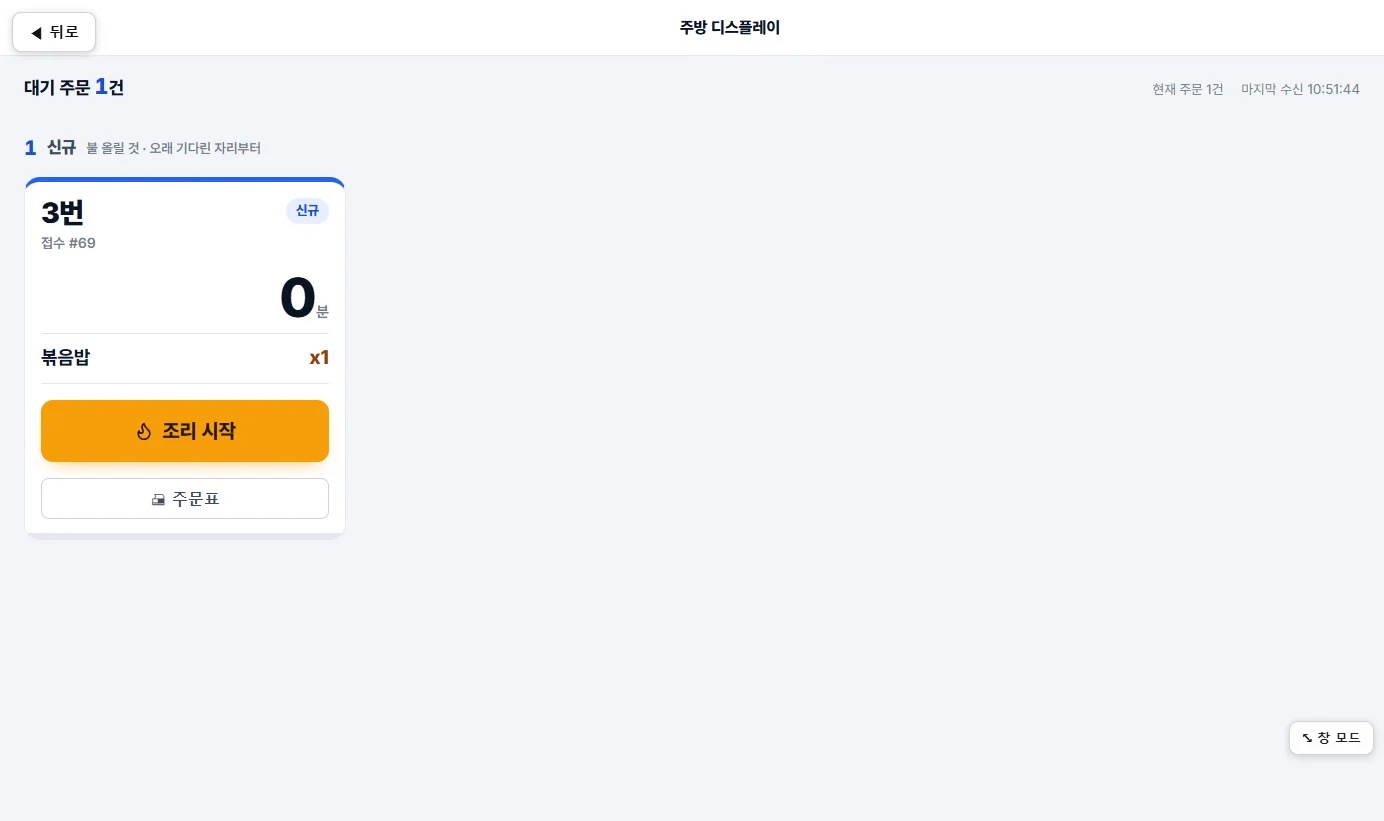
- Cards appear in groups such as “New — start cooking · longest-waiting tables first”.
- The big number inside a card is the waiting time (minutes).
- Mark the start of cooking with 조리 시작 Start cooking, and print a paper order slip with 주문표 Order slip.
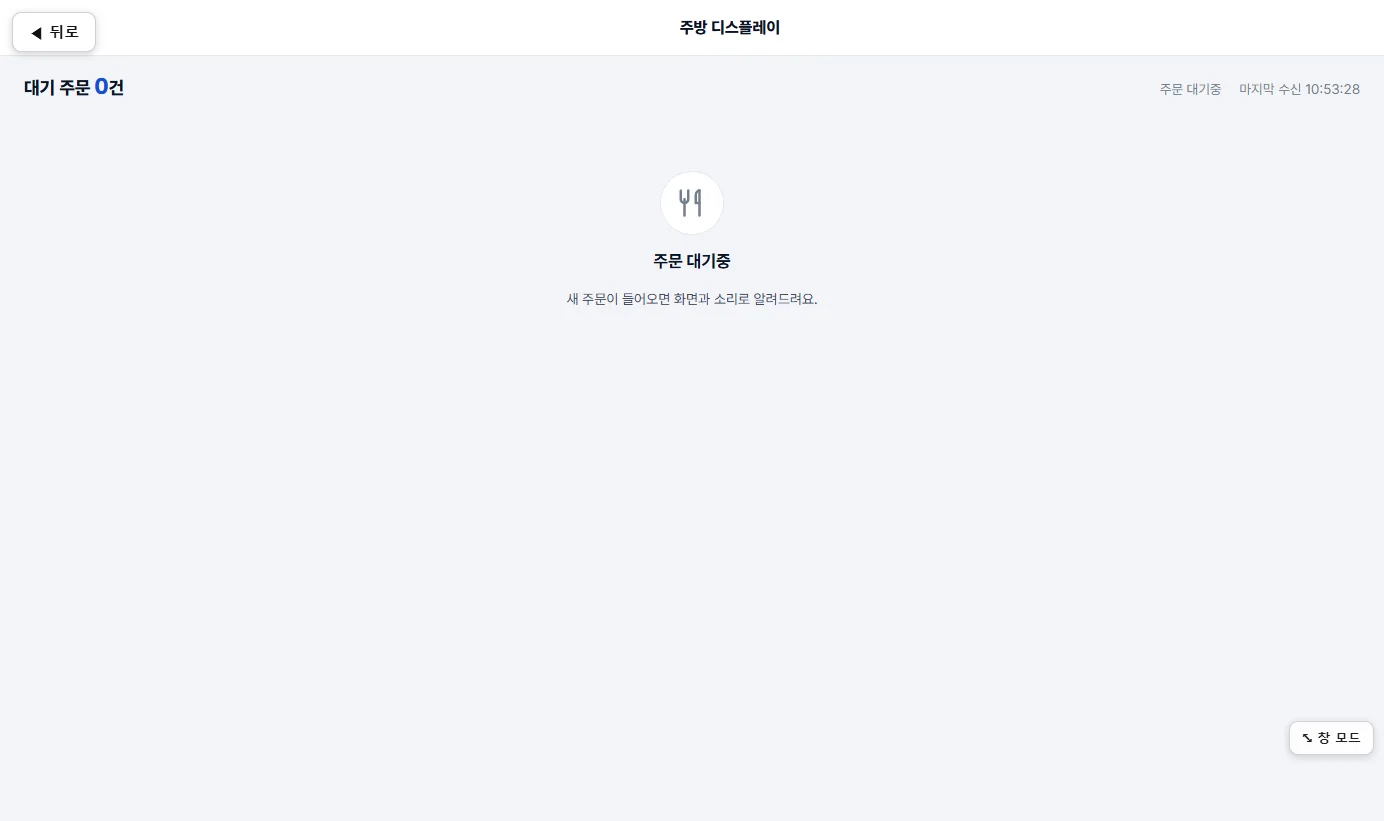
- At the top are the number of waiting orders, and on the right the connection status and the time of the last order received.
- Click ◀ 뒤로 ◀ Back at the top left to return to the screen you came from. The kitchen screen has no left menu.
3.1 Orders that appear in the kitchen · orders that don't
Not every order goes up to the kitchen. The rule is set for each order.
| Ordering | In the kitchen |
|---|---|
| Pay-later order | Appears. It goes up even if it hasn't been paid yet |
| Pay-first order — payment complete | Appears |
| Pay-first order — not paid yet | Does not appear. It goes up when the customer pays |
| Canceled orders | Does not appear |
| Quick Pay (only an amount received through the counter QR) | Does not appear. There is no food to make |
For example, at a pay-later store, an order that has not been paid yet appears in the kitchen right away. If the same order is pay-first, it does not appear before payment.
If some orders have been filtered out of the kitchen, “N orders not meant for the kitchen display (pay-first orders waiting for payment · Quick Pay) are not shown here” may be displayed at the bottom of the screen. If the kitchen screen looks empty even though orders came in, it is usually a pay-first order that hasn't been paid yet.
The payment method follows the store setting at the moment the order is placed. Even if you change the method, orders that have already come in stay as they are. 6.3
4 Menu
4.1 Menu list
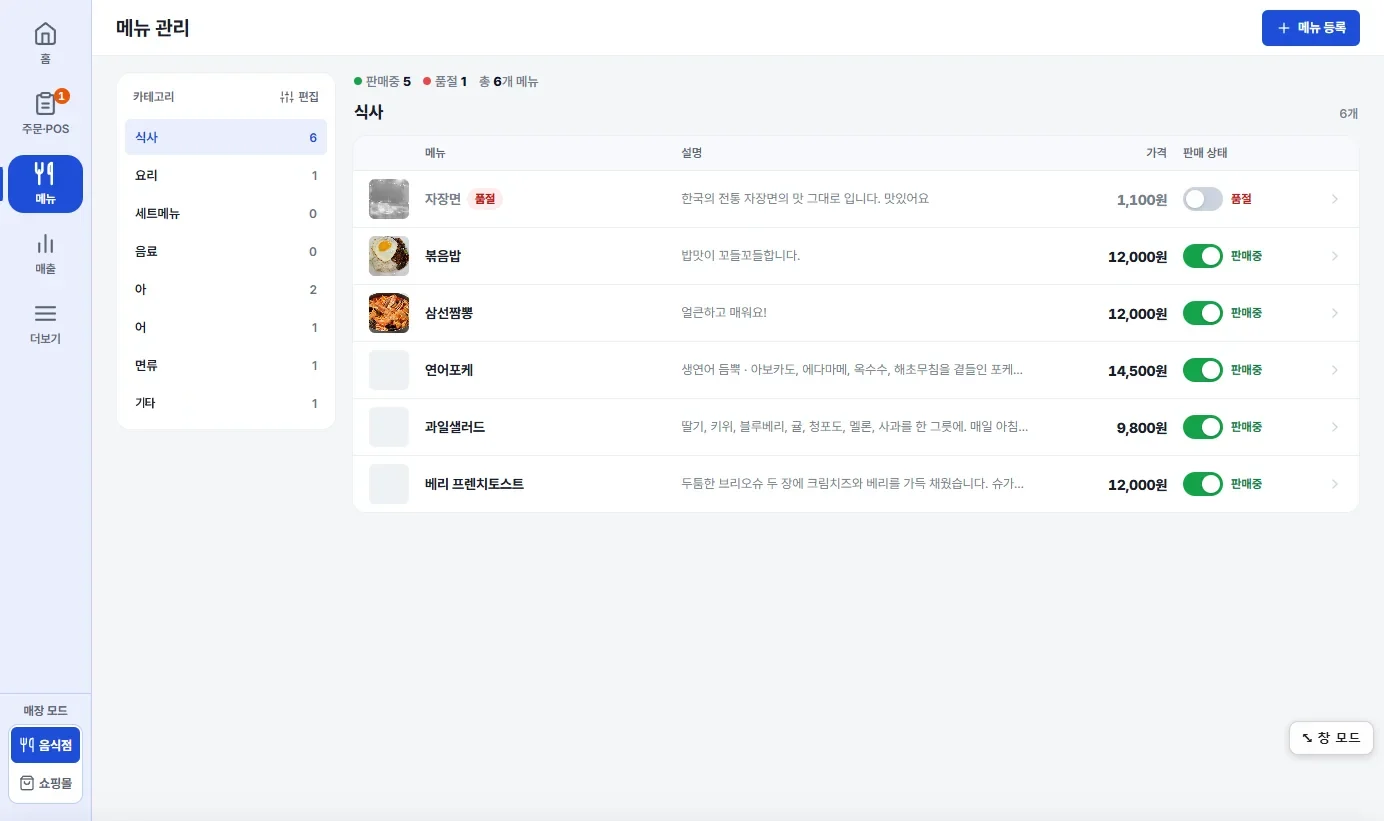
- Click a category in the Categories list on the left to view by category. The number to the right of a category name is the number of menu items in that category.
- At the top left of the table, “On sale N · Sold out N · N menu items in total” is shown.
- The table shows photo · menu item · description · price · sale status on one row per item. If an item is sold out, a “Sold out” badge appears next to its name and the photo is dimmed.
- Use the sale status toggle on the right to switch between on sale and sold out right away. When it is on, the item is on sale.
- Click a menu photo to see it larger in a big window (the row does not open, only the photo gets bigger). Move through the photos on the same screen with the ← → keys and close with Esc, by clicking outside, or with ×.
- Click a row and the “Edit menu item” window opens from the right side of the screen (the screen doesn't change, and the menu table stays behind it). 4.3
- Create a new menu item with + 메뉴 등록 + Add menu item at the top right. The same right-side window opens as “Add menu item”. 4.3
4.2 Editing categories
Click 편집 Edit above the category list on the left and the “Category management” window slides up from the bottom.
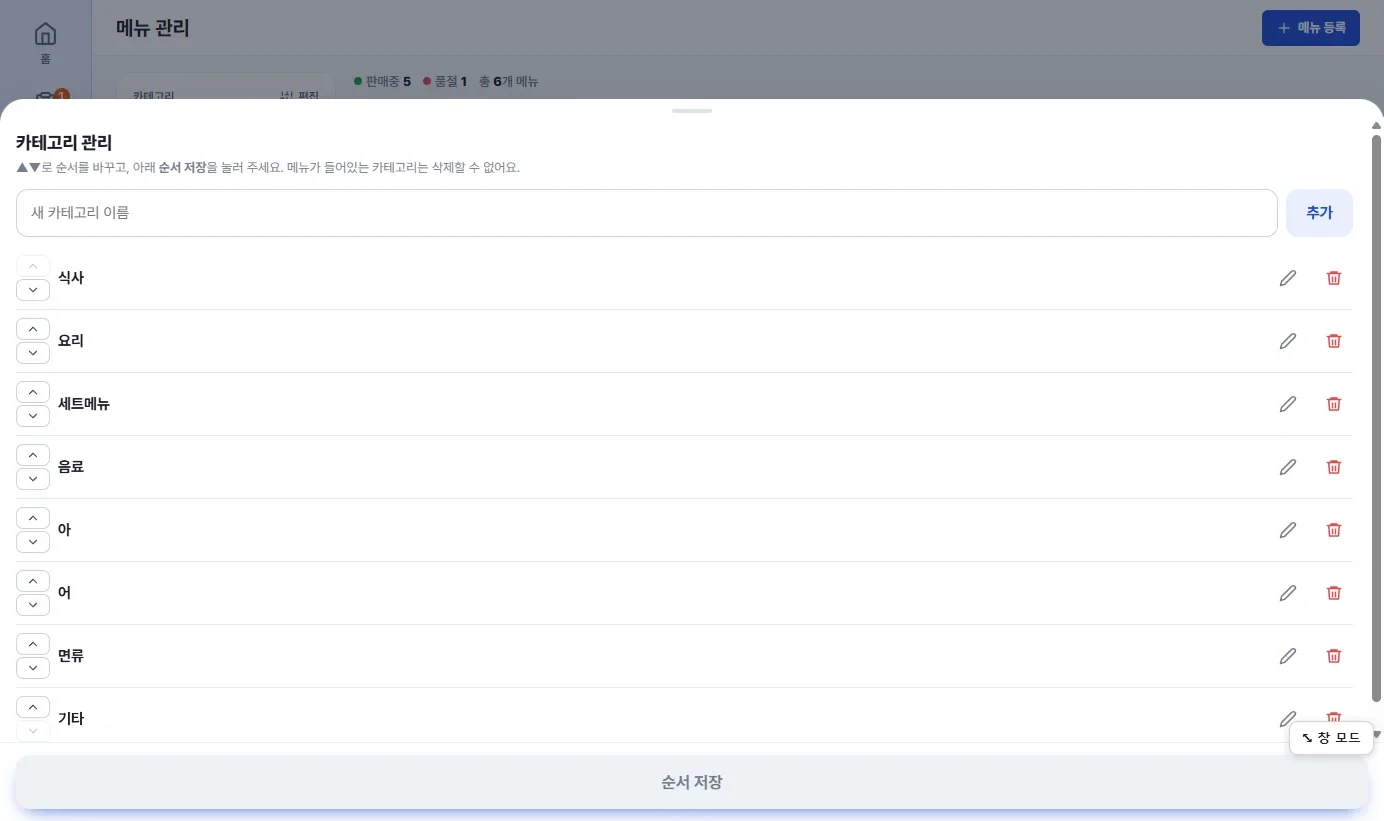
- New category: Enter a name in the field above and click 추가 Add.
- Order: Move a row up or down with the up and down arrows on its left, then click 순서 저장 Save order at the bottom. If you don't, the change is not applied.
- Rename with the pencil and delete with the trash can.
- You cannot delete a category that has menu items in it. First move the menu items to another category or delete them.
4.3 Add and edit menu items
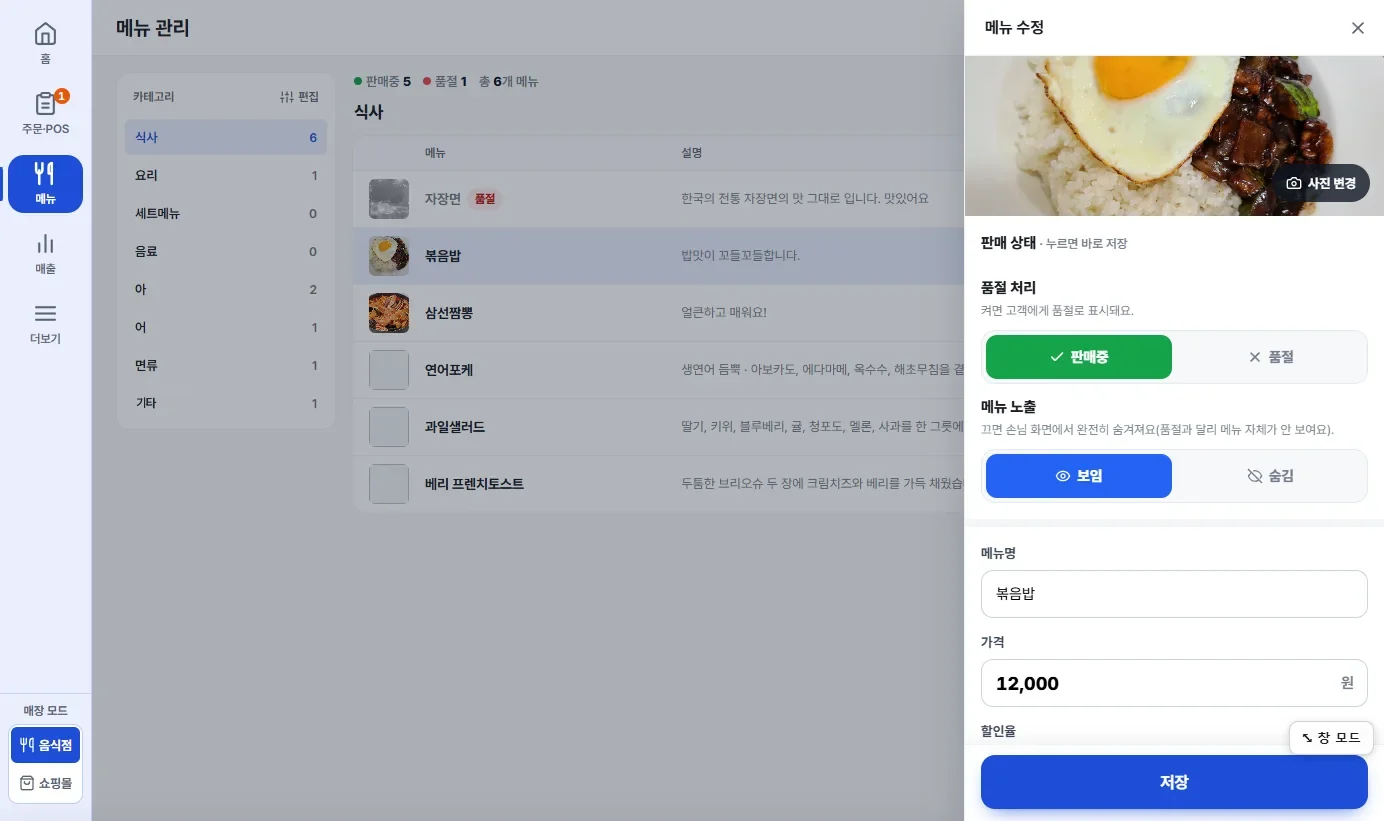
To create a new item, click + 메뉴 등록 + Add menu item at the top right. To edit one, click its row in the table. Either way, a window opens on the right side of the screen (“Add menu item” or “Edit menu item”). To close the window, click the × at the top right (or press Esc). What you enter is applied only when you click the button at the bottom of the window: 메뉴 등록 Add menu item for a new item, 저장 Save for an edit.
However, “Sale status” (sold-out setting · menu visibility) at the top of the edit window is saved the moment you click it. If you change only these two, you don't need to click 저장 Save. The window for a new item shows photo · menu name · price · description · category from the top down, and because the item doesn't exist yet, nothing in it is “saved instantly” — you have to click 메뉴 등록 Add menu item to save everything.
| Item | Description |
|---|---|
| Photo | Change the photo with 사진 변경 Change photo at the lower right of the photo. For a new item the button is 사진 넣기 Add photo, and you can add the photo later |
| Sold-out setting | It's at the top, under “Sale status”. Choose 판매중 On sale / 품절 Sold out; the choice is saved the moment you click it. Use it to pause sales for a short time |
| Menu visibility | It's at the top, under “Sale status”. Choose 보임 Visible / 숨김 Hidden; the choice is saved the moment you click it. 숨김 Hidden hides the item completely from the customer screen — unlike sold out, the menu item itself is not shown |
| Menu name · Price | Required |
| Discount rate | Enter a percentage. If it is 0, “No discount” is shown below |
| Mileage earning | Choose 적립 포함 Earns mileage / 적립 제외 No mileage. The default is “Included”, and if you choose 적립 제외 No mileage, no mileage is earned on this menu item (this is separate from the store-wide setting). Like sale status, this field is saved the moment you click it. |
| Description | Shown on the customer screen. Up to 200 characters (the number of characters you have written appears at the top right of the field). Write the weight and cooking method here, not in the name (for example: 250g · charcoal-grilled). It also appears as one line in the list |
| Category | Choose which category the item goes in. You can't change it after the menu item is registered. |
Options (choices)
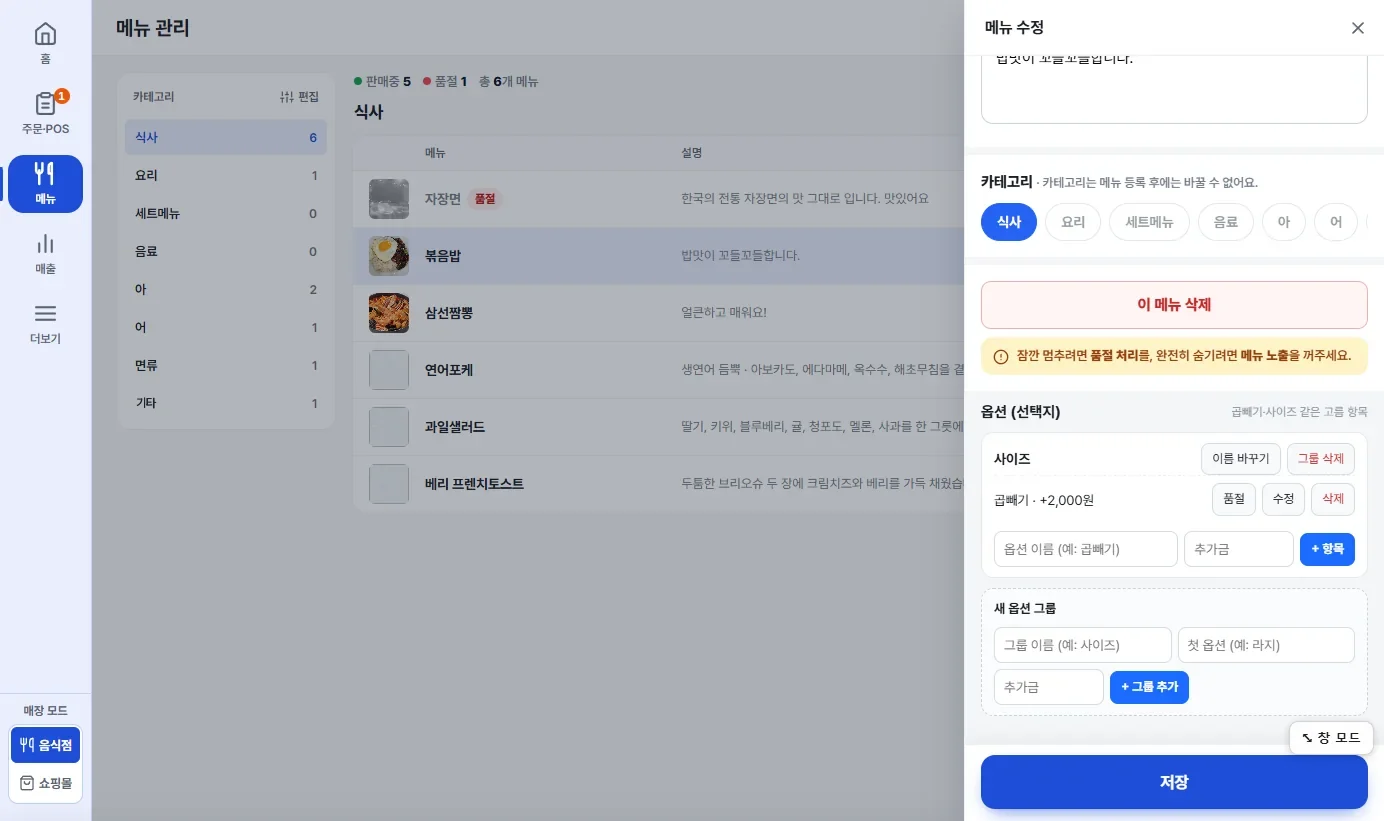
These are choices the customer picks, such as double portion, size or flavor. Under a group (for example “Size”), you add items (for example “Double portion +2,000 KRW”).
- Add an item: in the empty field inside the group, enter a name and the extra charge, then click + 항목 + Item.
- Each item has 품절 Sold out · 수정 Edit · 삭제 Delete. You can mark an option alone as sold out.
- Add a group: under “New option group”, enter the group name, the first option and the extra charge, then click + 그룹 추가 + Add group.
- Each group has 이름 바꾸기 Rename · 그룹 삭제 Delete group.
Delete a menu item
- Click 이 메뉴 삭제 Delete this item, which is below the category and just above the options, and a “Delete this menu item?” confirmation prompt appears. Choose 취소 Cancel 삭제 Delete. Deleting can't be undone. It's better to use the sold-out setting to pause an item for a while, or to set menu visibility to 숨김 Hidden to hide it completely. This is PC only.
When you close the window while editing
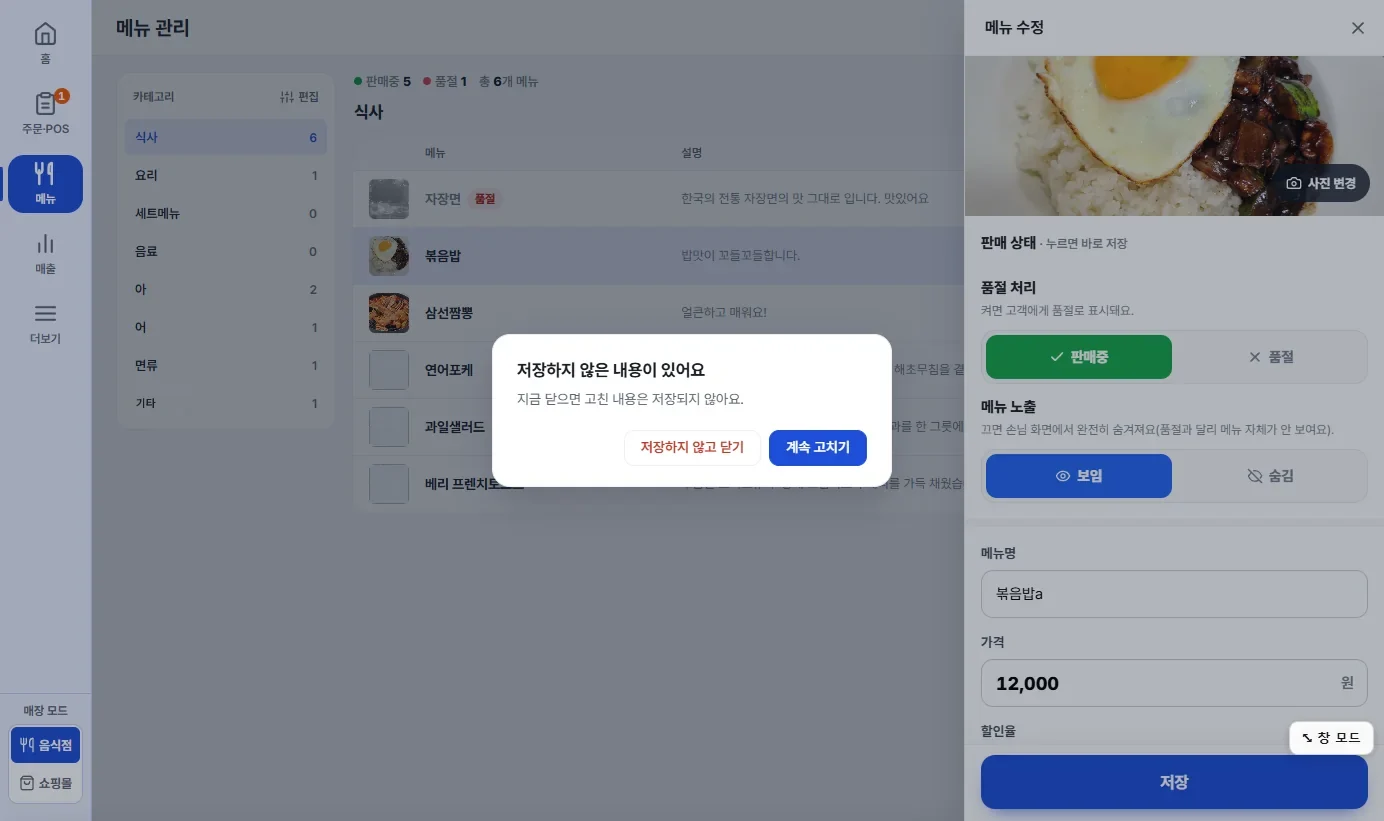
- If you edit a field that is applied with 저장 Save, such as the name, price or description, and then close the window with ×, “You have unsaved changes” appears. 계속 고치기 Keep editing keeps you in the window, and 저장하지 않고 닫기 Close without saving discards your edits and closes it.
- If you haven't changed anything, this prompt doesn't appear and the window simply closes. Anything that is saved the moment you click it, such as sale status, is already saved, so it has nothing to do with this prompt.
5 Sales
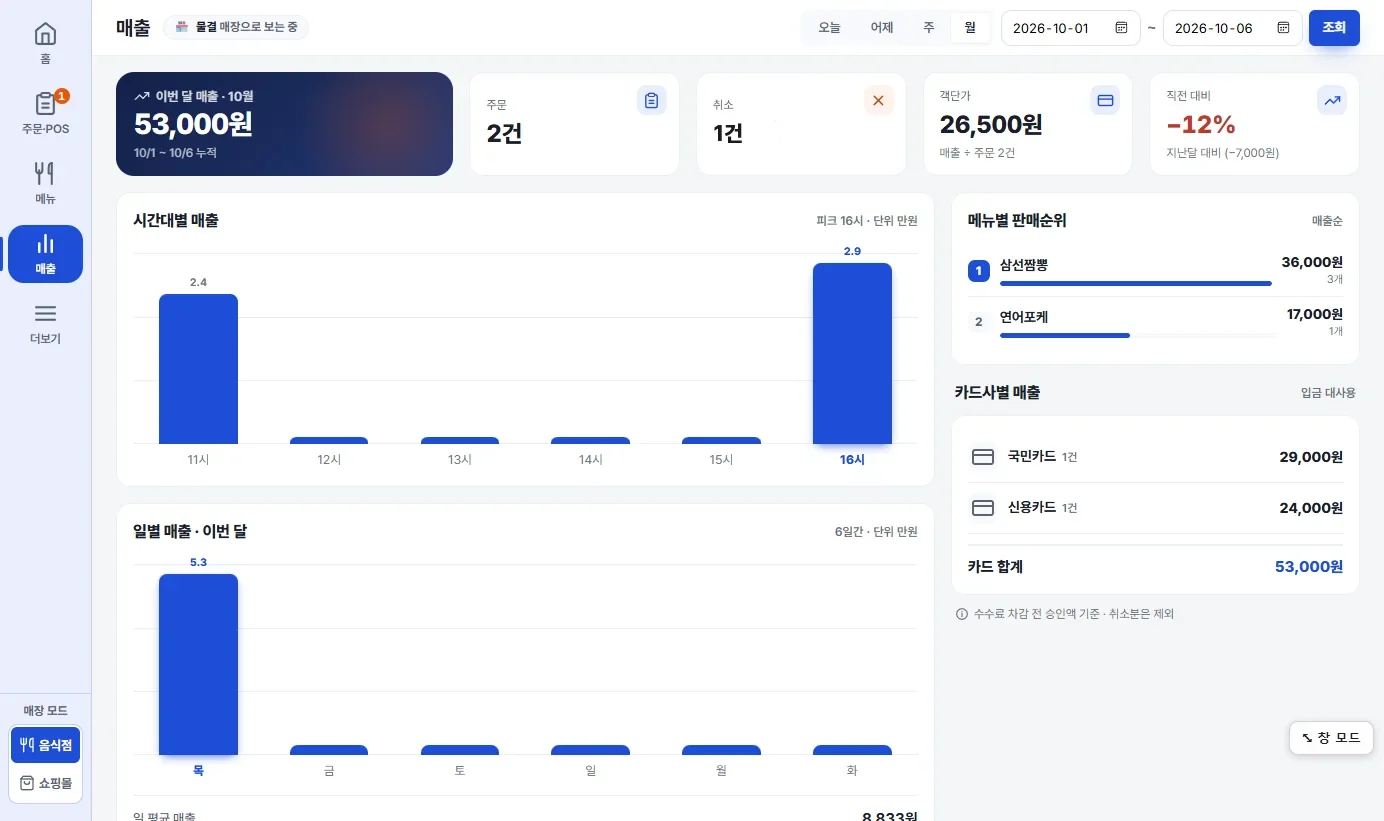
- The period options are the four buttons 오늘 Today 어제 Yesterday 주 Week 월 Month at the right of the top bar. You can also set your own period: enter the dates you want in the two date fields next to them and click 조회 Search. The date fields are always visible.
- The number strip at the top: Sales (the large box — “Today's sales” for today, “This month's sales” for a month) · Number of orders · Number of cancellations · Average order value (sales ÷ number of orders) · Change from previous period (a comparison with the previous period, for example “Same as yesterday” · −12%).
- Left column: Sales by time of day (in units of 10,000 KRW) · Daily sales (with Average daily sales below it).
- Right column: Menu sales ranking (by sales) · Sales by card company — this is for reconciling deposits. It is based on approved amounts before fees are deducted, and canceled payments are excluded. Use it to check against the money you receive from the card companies.
- If there are no paid sales in the period you chose, the time-of-day, daily, ranking and card-company sections are not shown, and you see only the number strip and the transaction history.
5.1 Transaction history and payment details
At the very bottom of the screen, the “Transaction history” table always shows the list of individual transactions for the chosen period. Click a row and the “Payment details” window opens on the right.
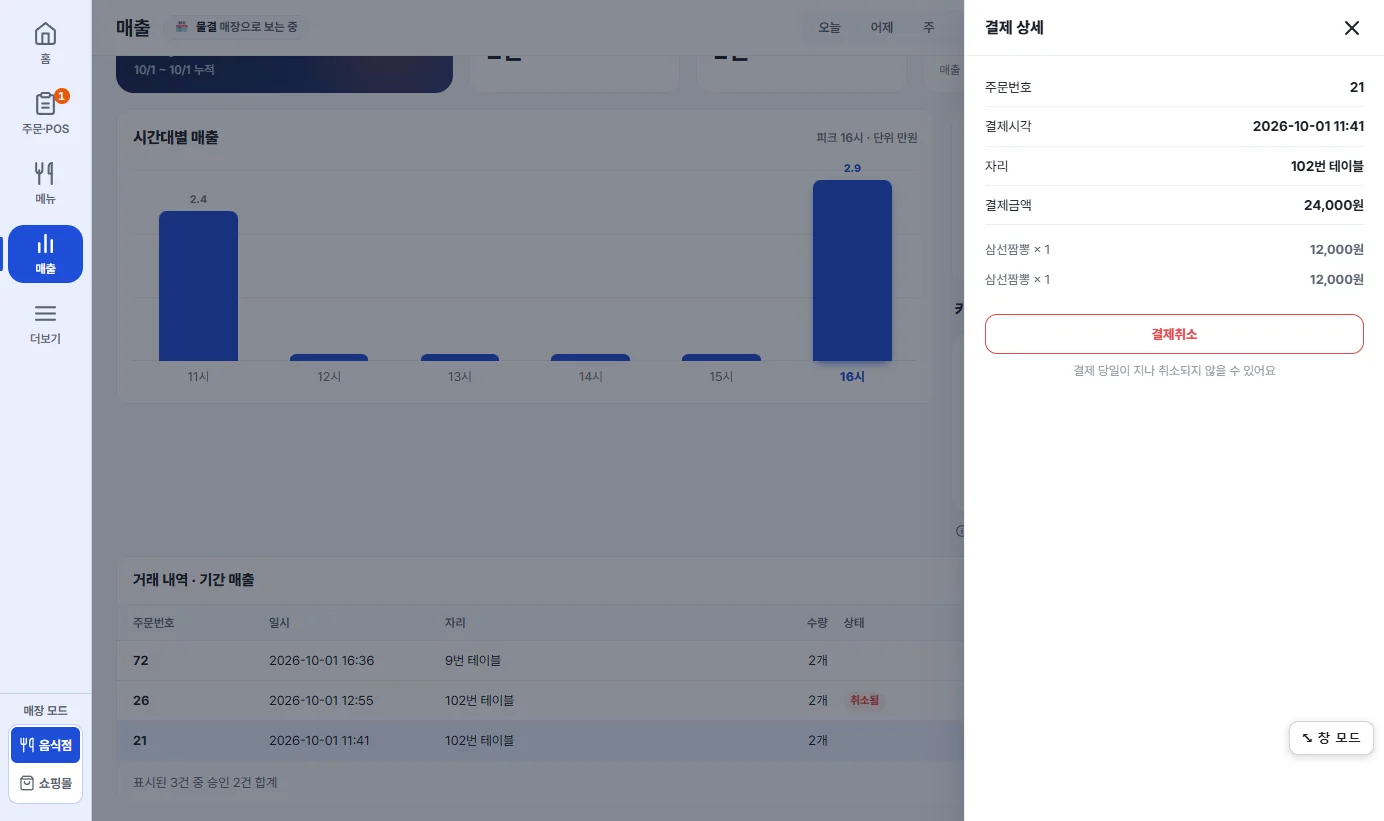
- The table shows the order number · date and time · table · quantity · status · amount for each transaction.
- A canceled transaction gets a “Canceled” badge in its status, its amount is struck through, and it is left out of the total.
- At the bottom of the table you see “Total of M approved out of N shown” — the total of the M transactions that were not canceled among the N loaded on the screen. N is the number of transactions loaded on the screen. If a period has a very large number of transactions, only some of them may be loaded, so N can differ from the total number of transactions in that period.
- Payment details shows the order number · payment time · table · payment amount · amount per menu item. You can cancel that payment with 결제취소 Cancel payment below, and a notice says that a payment may not be cancelable after the day of payment.
6 More (Settings)
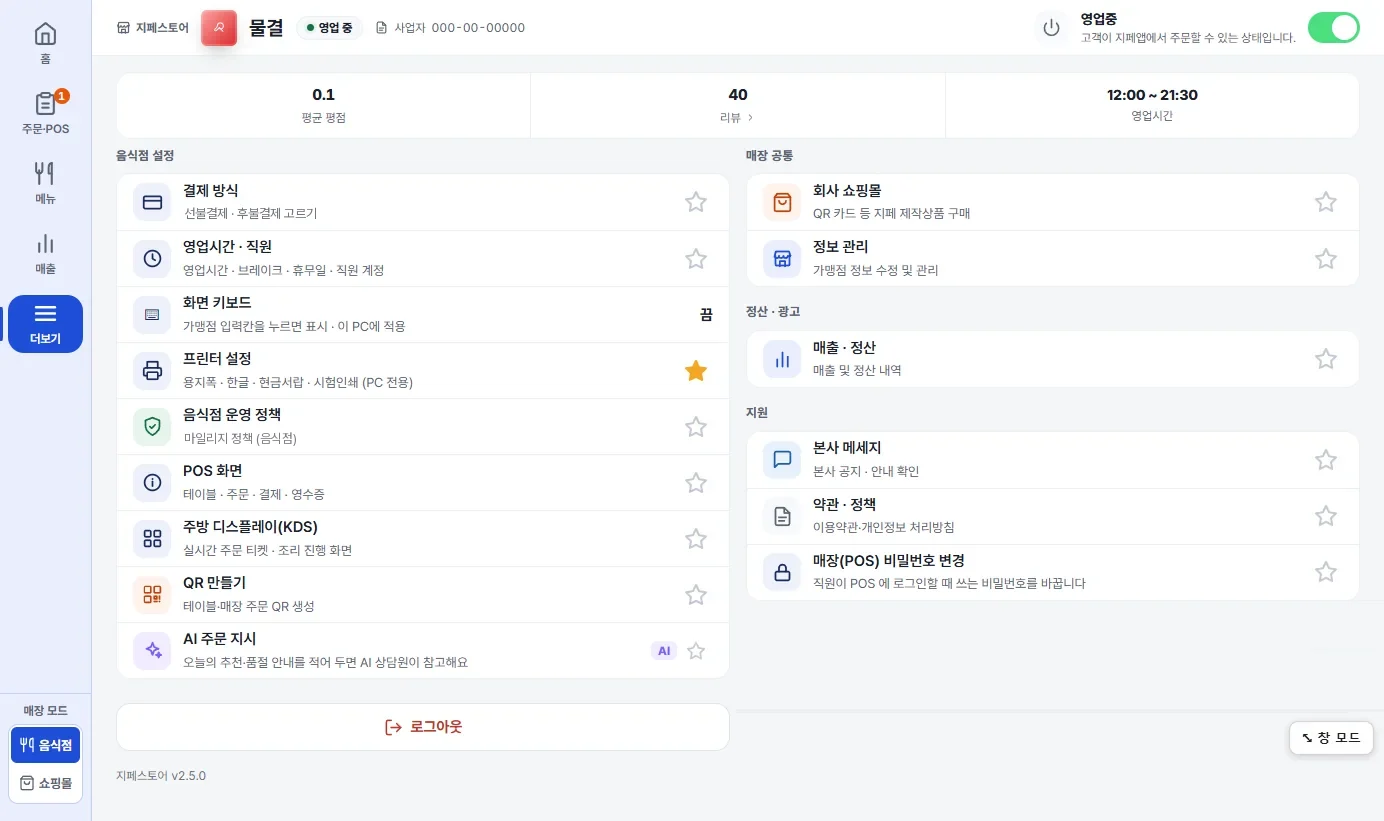
6.1 Settings list
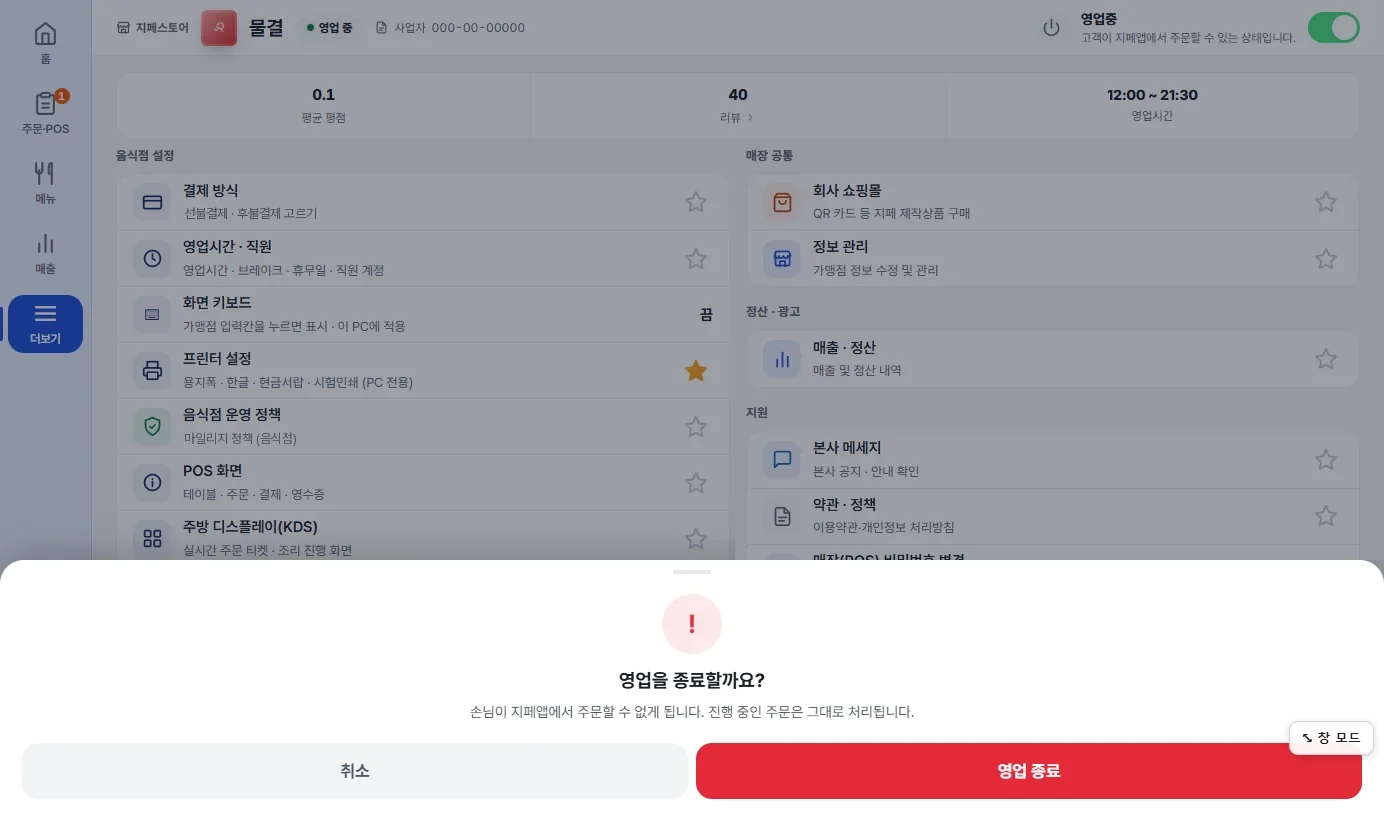
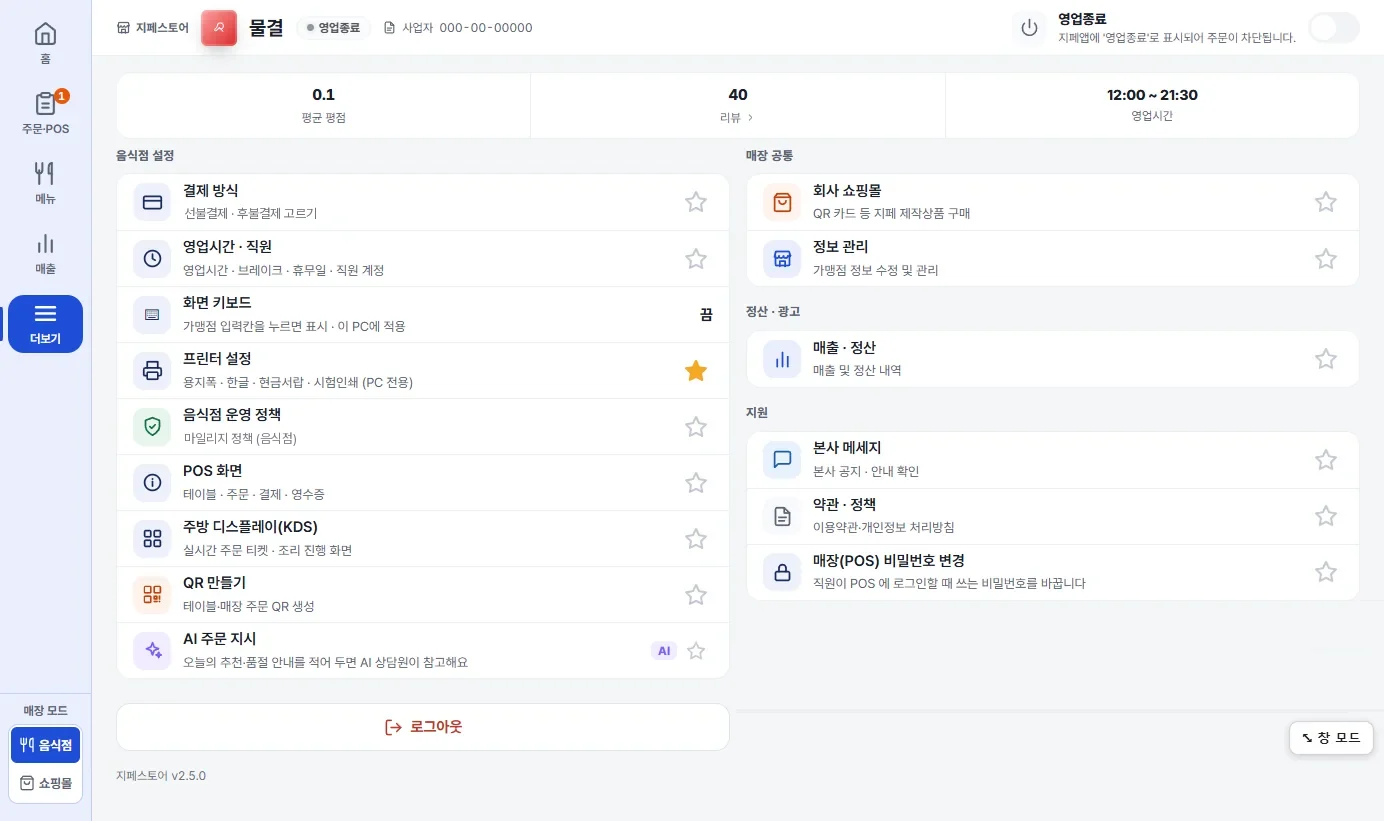
- The Open switch at the top right — when it is on, customers can order in the Gpay app. When it is off, the Gpay app shows “Closed” and orders are blocked. Turn it off when business is over. When you try to turn it off, a “Close for business?” confirmation prompt slides up from the bottom, and the switch turns off only when you click 영업 종료 Close store (if you click 취소 Cancel, nothing changes). Turning it back on happens right away, with no confirmation.
- Below it, average rating · number of reviews · business hours appear on one line.
- Store mode is changed not on this screen but with the switch at the very bottom of the left menu bar. 1.2
- Click the star (★) at the right of a list item to add it to the Home favorites. 2.4
| Group | Item | What you do |
|---|---|---|
| Restaurant settings (left column) | Payment method | Choose pay first or pay later 6.3 |
| Hours · Staff | Business hours · break time · days off · staff accounts 6.4 | |
| On-screen keyboard | Makes the on-screen keyboard appear when you click an input field. The current setting, “Off” or “On”, is shown on the right. It applies only to this PC. PC only | |
| Printer settings | Paper width · Korean text · cash drawer · test print PC only | |
| Restaurant policy | Mileage policy 6.5 | |
| POS screen | Goes to the POS order screen (tables · orders · payment · receipt). PC only | |
| Kitchen display (KDS) | Real-time order tickets and cooking progress screen Chapter 3 | |
| Create QR | Create table and store order QR codes 6.6 | |
| AI ordering instructions | Write down today's recommendation and sold-out notice 6.7 | |
| Store-wide (right column) | Company mall | Buy Gpay-made products such as QR cards |
| Manage info | Edit and manage merchant information 6.8 | |
| Settlement · Ads | Sales · Settlement | Sales and settlement history Chapter 5 |
| Support | HQ messages | Check HQ notices and announcements |
| Terms · policies | Terms of use · privacy policy | |
| Change store (POS) password | Changes the password that staff use to log in to POS |
로그아웃 Log out at the bottom of the left column logs you out of the merchant account.
A store that runs both a restaurant and an online mall also sees online shopping mall settings (product management · shipping management · product reviews · shopping mall operating policy · seller information · purchase cancellation) when “Online shopping mall” is chosen. They are not covered in this guide.
There is no Staff management item in the PC list. Staff accounts are created and managed under “Business hours · Staff”. 6.4
6.2 How to save — common to all settings screens
Settings screens such as Information management, Operating policy, Business hours and AI ordering instructions all save in the same way. No screen has its own large button at the bottom; you save everything at once from the right side of the top bar.
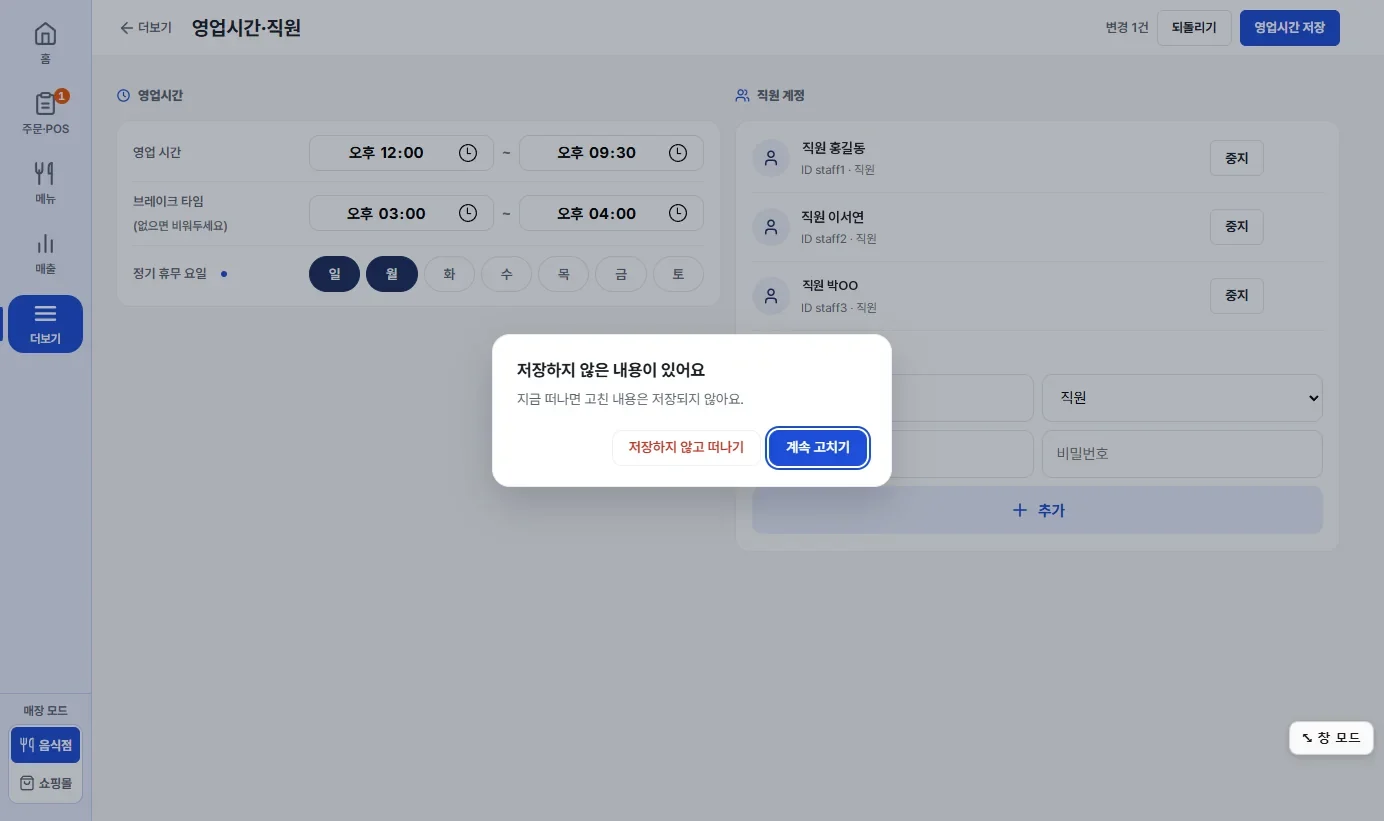
- When you edit a field, “n changes” appears at the right of the top bar and 되돌리기 Undo and 저장 Save become active (the name of the save button differs from screen to screen — for example, 영업시간 저장 Save hours). When nothing has been changed, both buttons are dimmed and can't be clicked.
- A small blue dot appears next to the name of each field you changed, so you can see what you edited. On screens with many sections, such as Information management, the table of contents on the right also shows the number of changes in each section.
- 되돌리기 Undo restores everything you changed to its original value. Click 저장 Save (or press Ctrl+S on the keyboard) to save everything at once.
- If you try to leave without saving, by clicking ‹ More or another menu, a “You have unsaved changes” confirmation prompt appears. 계속 고치기 Keep editing keeps you on that screen, and 저장하지 않고 떠나기 Leave without saving discards your changes. The default (Enter or Esc) is 계속 고치기 Keep editing.
- Exceptions: things that change the moment you click them, such as the photo and address in Information management, and adding, stopping and deleting staff on the business hours screen, are handled right away, separately from this 저장 Save.
6.3 Payment method
- Pay first · Pay later — choose one of the two. The screen says which kind of store each method suits.
- Pay first — the customer pays right away when ordering. For stores where payment happens at the same time as ordering, such as cafes and snack shops.
- Pay later — the customer sits down, orders several times, and pays once when leaving. For stores where people pay after eating, such as barbecue restaurants and bars. Pay later is a feature used by pay-later stores that chose this method.
- The method currently in use is marked “✓ Current method”, and the other box has “Switch to this method ›”. Click it to switch.
- When you click it, a “Change it? This applies from the next order.” confirmation prompt appears. The change is saved only when you click 바꾸기 Change; with 취소 Cancel, nothing changes.
- Once changed, it applies from the next order. Orders that have already come in stay as they are.
- You can't switch while any table has an unfinished payment. Switch after paying for or clearing that table (the same notice appears under “Things to check before switching” on the right).
- The current method is shown on the “Settle bill” row on Home. 2.3
6.4 Business hours · Staff
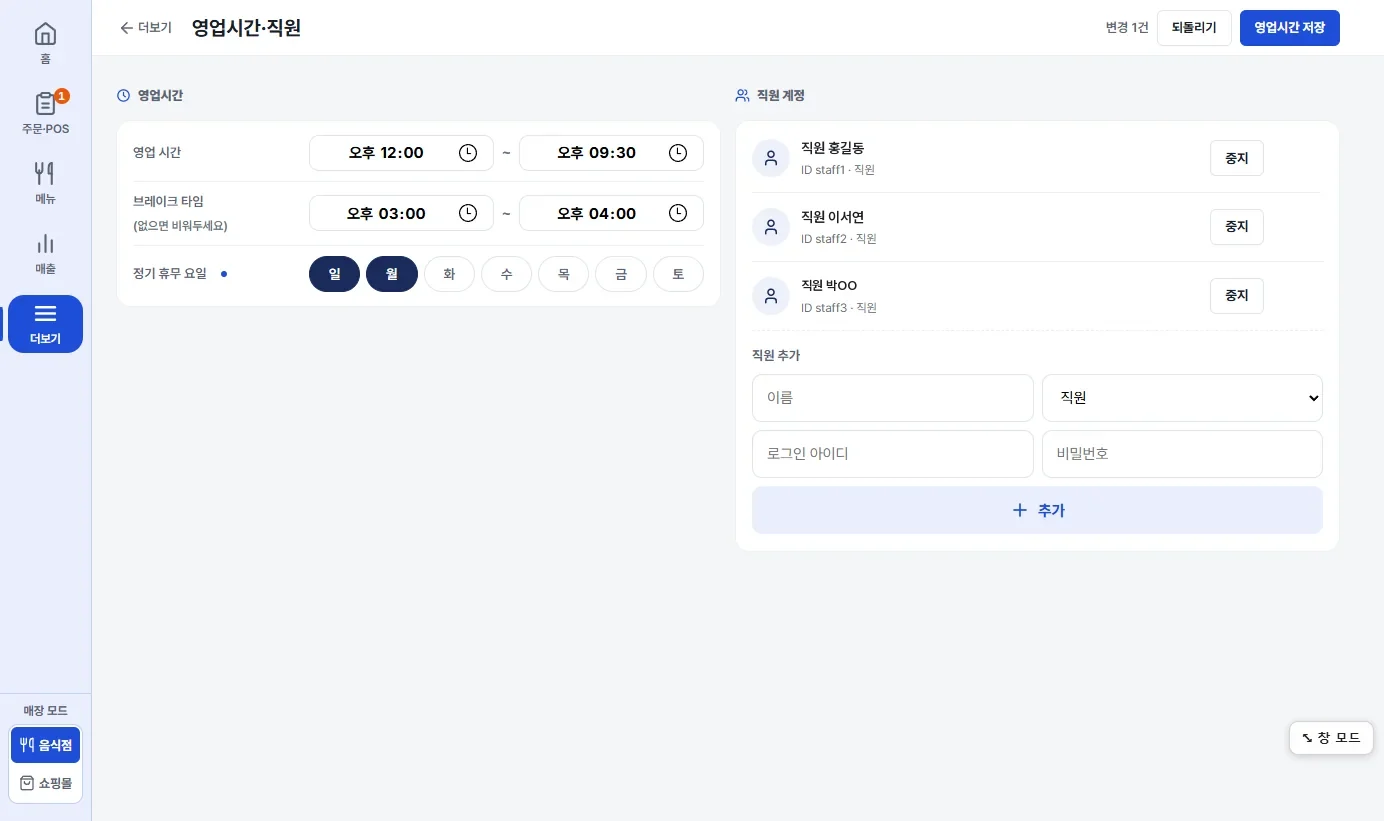
Business hours
- Business hours — choose the opening and closing times.
- Break time — the time when you rest. Leave it empty if you have none.
- Weekly days off — from Sunday to Saturday, click the days you are closed. The days you pick are shown in bold.
- When you change something, “n changes” 되돌리기 Undo 영업시간 저장 Save hours become active at the right of the top bar. Your changes apply only when you click 영업시간 저장 Save hours (or press Ctrl+S). 6.2
Staff accounts — accounts that staff use to log in to POS.
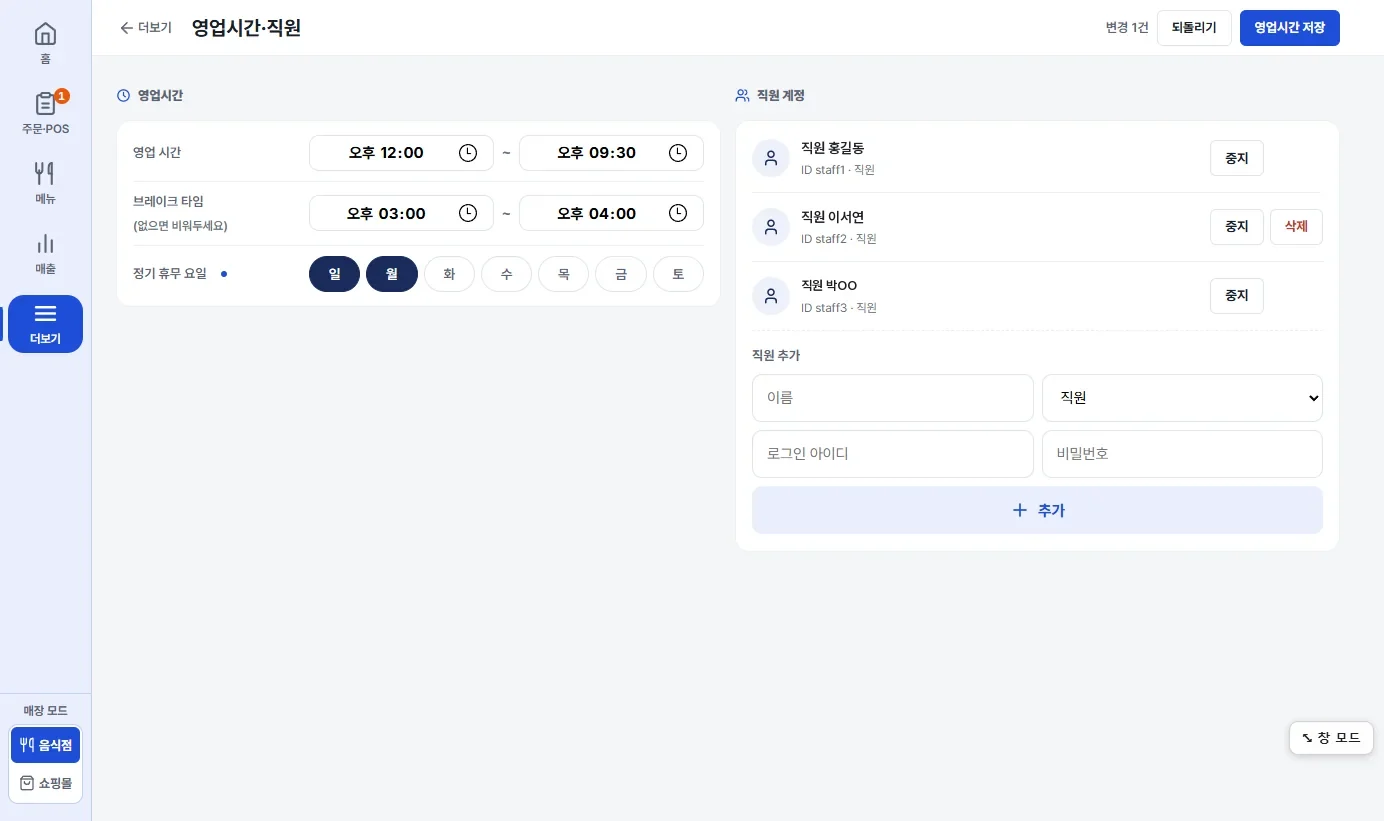
- The list shows each staff member's name, ID and role, and every row has 중지 Stop. 삭제 Delete appears only when you move the mouse over the row (it also appears when you select that row with the keyboard). To disable an account for a while, stop it; to remove it for good, delete it. When you click delete, you are asked once more: “Delete this staff member?”
- Add a staff member: enter the name · role · login ID · password, then click + 추가 + Add.
What staff can do in POS (canceling payments, using the cash drawer) is set separately in the POS settings. Gpay POS user guide
6.5 Restaurant operating policy
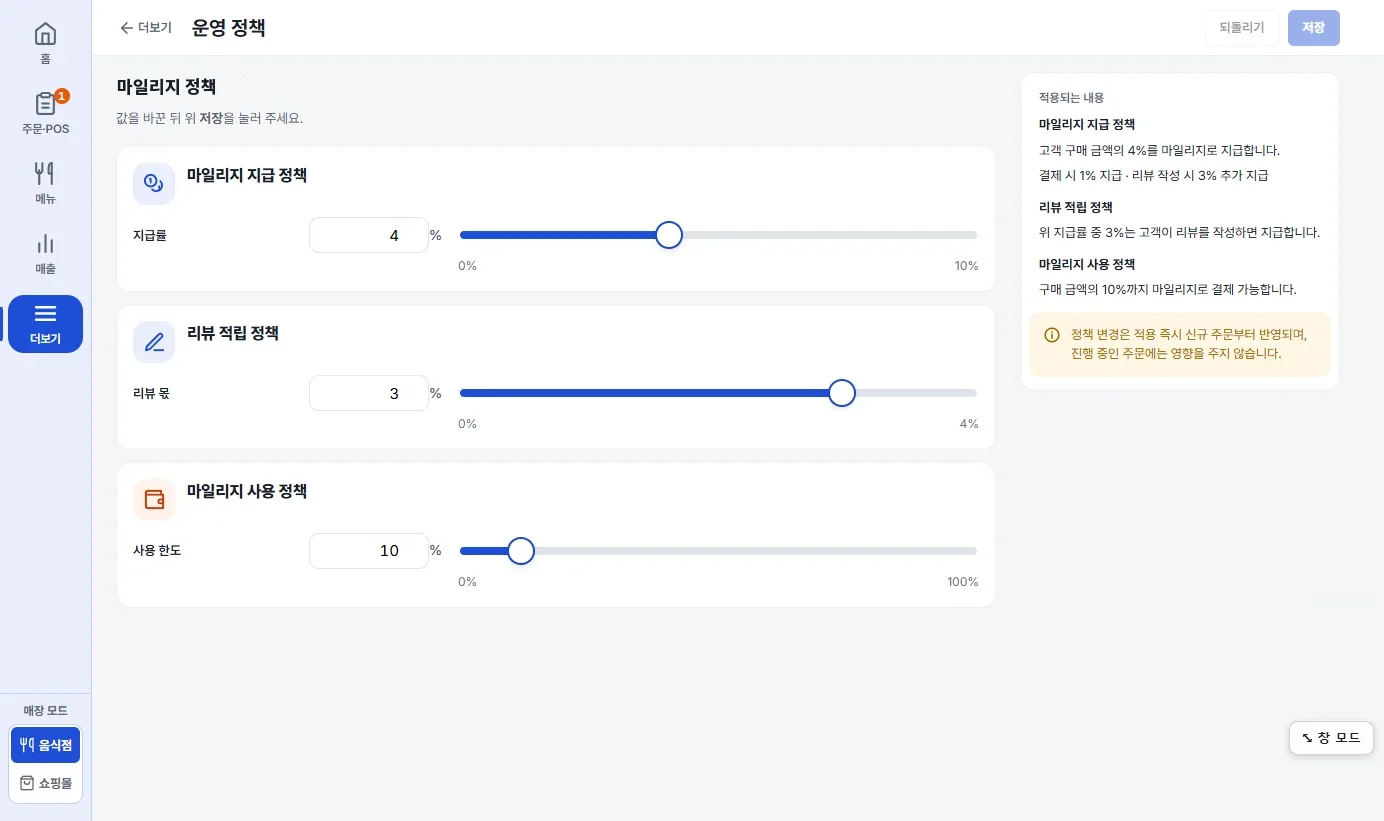
- Mileage award policy — set what percentage of the customer's purchase amount is given as mileage. Set a value from 0 to 10% by typing it in the number field or using the slider.
- That rate is split into two parts — the share given at payment and the extra share given when a review is written.
- Review reward policy — set how much of the award rate above, in %, goes to review rewards. It cannot be higher than the award rate (in the picture, the end of this slider is 4%, the same as the award rate).
- Mileage use policy — the limit on how much of a purchase a customer can pay with mileage at one time (what % of the purchase amount). Set it from 0 to 100%.
- There is no 적용 Apply button to save each card separately. After you change the values, click 저장 Save (or press Ctrl+S) once at the right of the top bar, and everything is applied. 6.2
- Under “What applies” on the right, the current values are written out as sentences, such as “1% given at payment · 3% extra given for writing a review”. When you change the policy, it takes effect from new orders and does not affect orders in progress.
6.6 Create QR codes
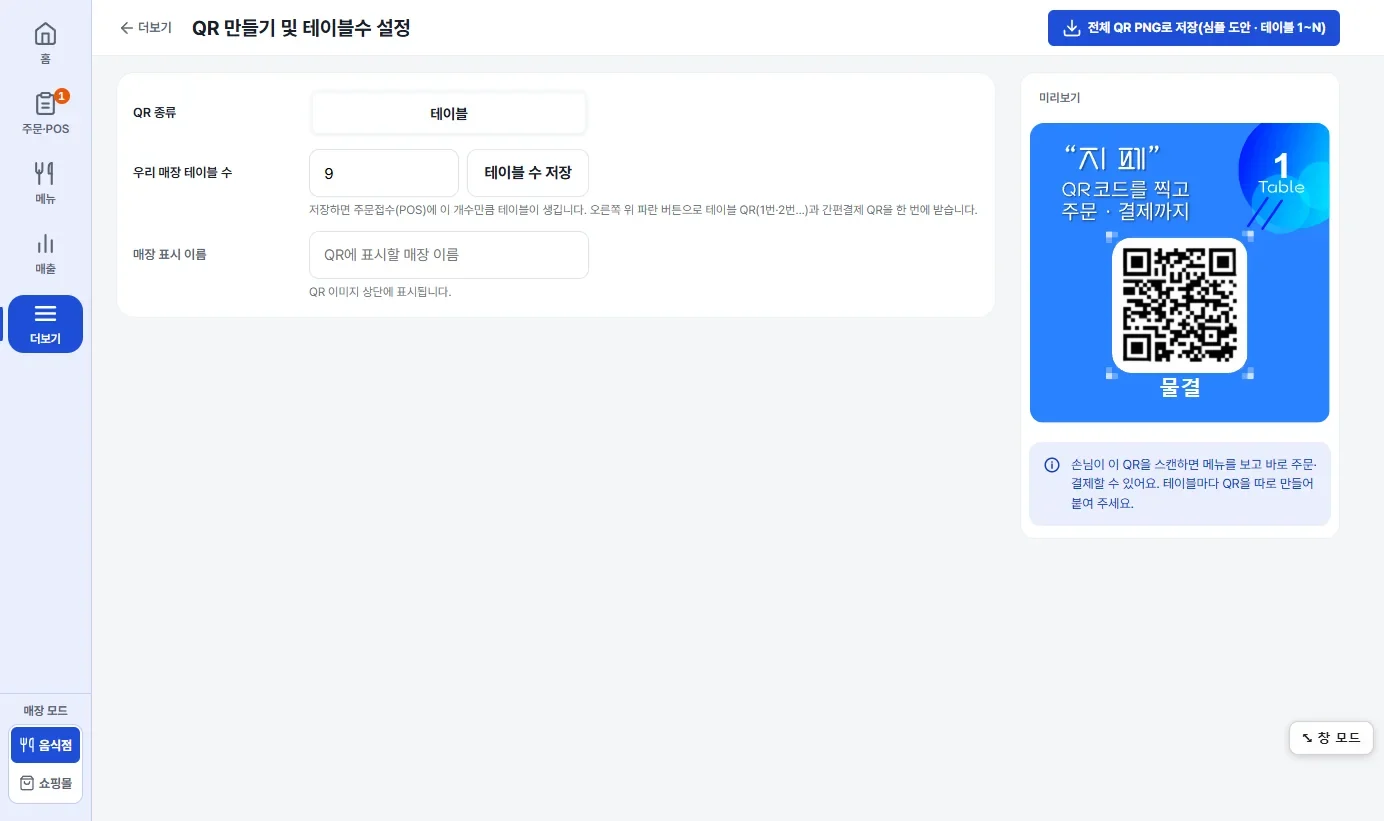
- Enter your store's number of tables and click 테이블 수 저장 Save table count, and that many tables are created in order intake (POS). It is the same value as “Number of tables” in Information management. 6.8
- If you enter a store display name, it is shown at the top of the QR image. If you leave it empty, the store name is used.
- The actual design appears in the preview on the right. You don't choose a table number separately. The preview always shows table 1.
- Click the blue 전체 QR PNG로 저장 Save all QRs as PNG at the right of the top bar to download the table QR codes from table 1 up to the number of tables, plus the Quick Pay QR all at once.
6.7 AI ordering instructions
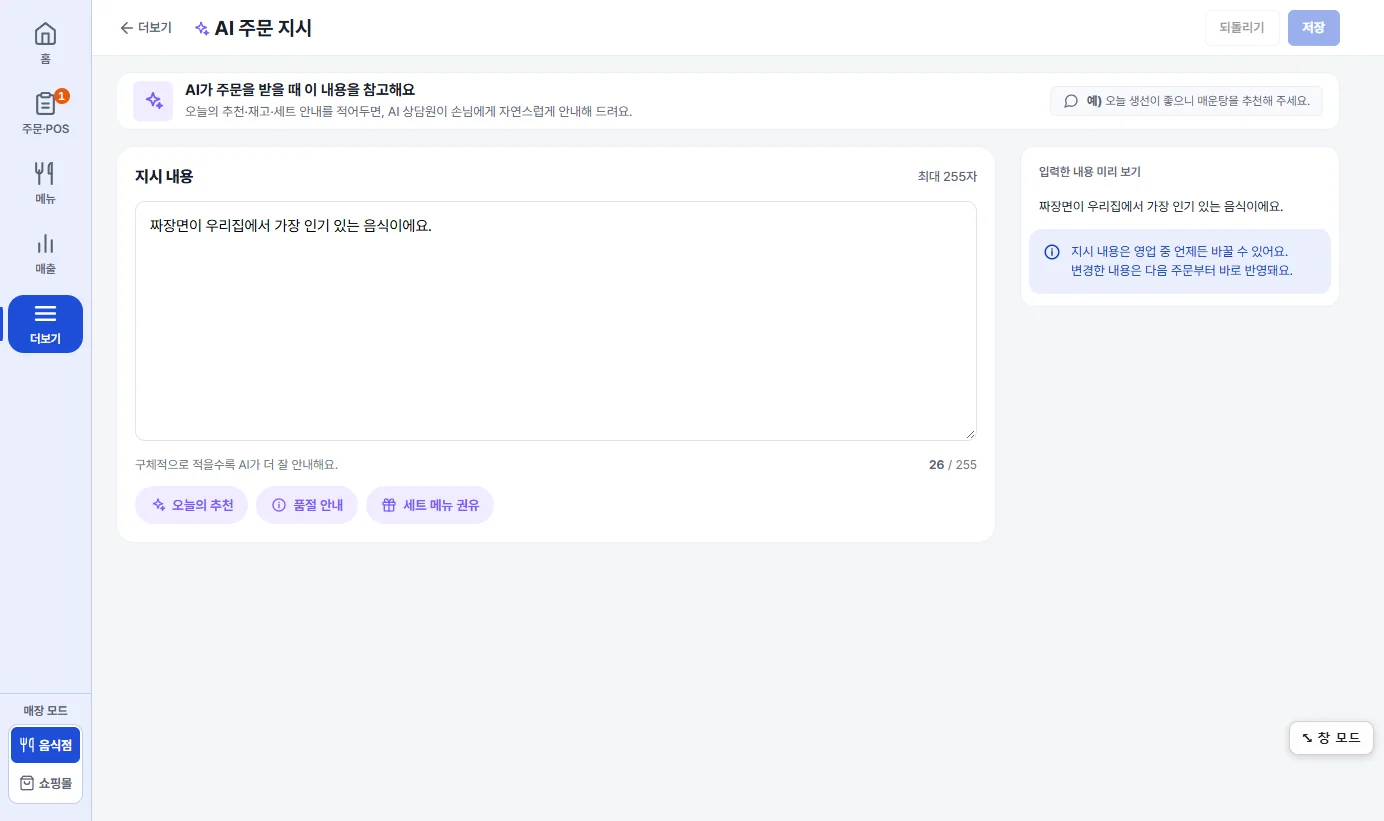
- Write down today's recommendation, stock and set-menu notes. Example: “The fish is good today, so please recommend the spicy fish stew.”
- Up to 255 characters. The number of characters you have written is shown below the field. The more specific you are, the better the AI guides customers.
- Click 오늘의 추천 Today's pick 품절 안내 Sold-out notice 세트 메뉴 권유 Suggest set menus below, and a sentence template is inserted.
- You can change this at any time during business hours, and your changes apply from the next order.
- When you are done, click 저장 Save at the right of the top bar (or press Ctrl+S). 6.2
6.8 Information management
| Section | What you enter |
|---|---|
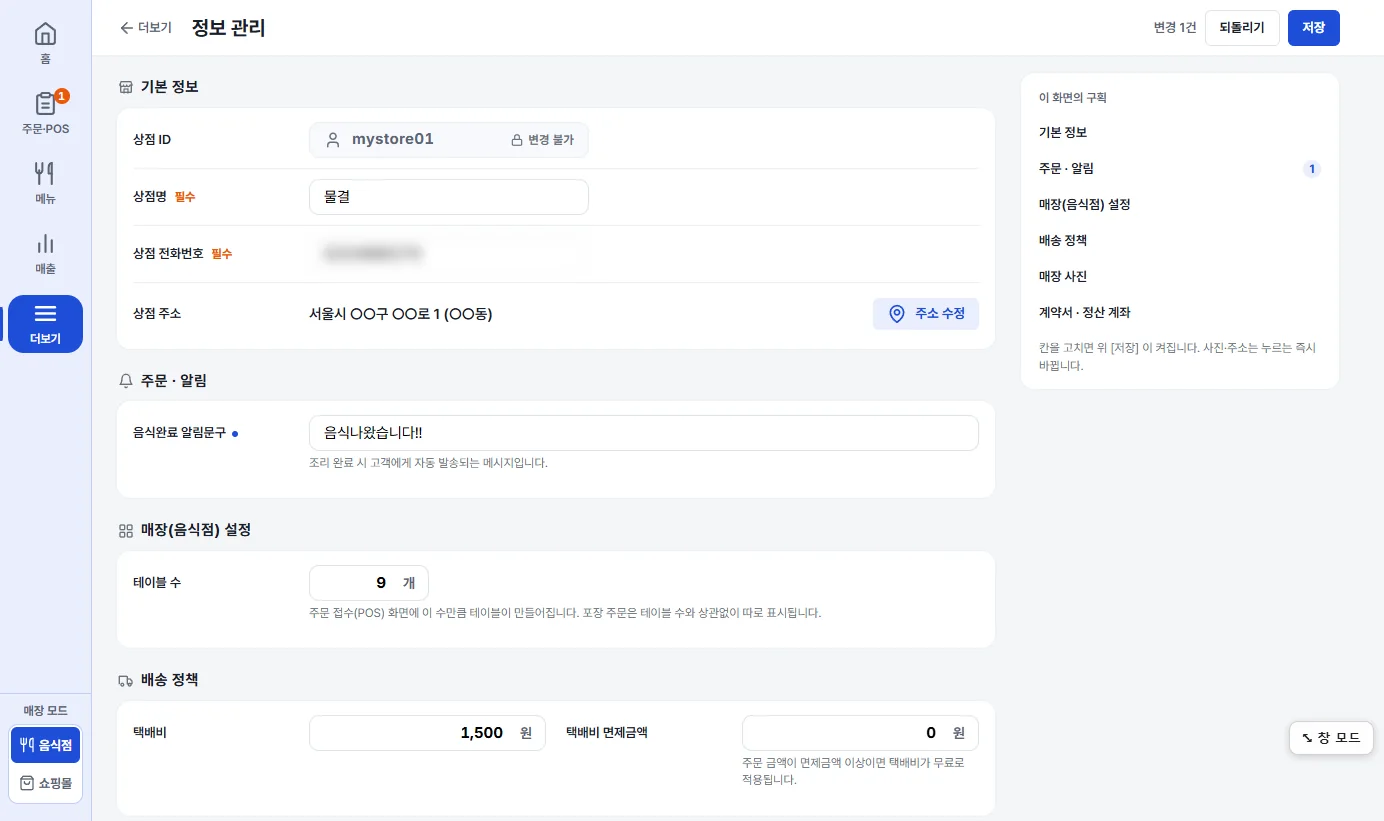
| Basic information | Store ID (cannot be changed) · store name (required) · phone number (required) · address (changes the moment you click 주소 수정 Edit address) |
| Orders · Notifications | Food-ready notice message — a message sent automatically to the customer when cooking is finished |
| Store (restaurant) settings | Number of tables — that many tables are created on the order intake (POS) screen. Takeout orders are shown separately, regardless of the number of tables |
| Shipping policy | Courier fee · courier fee waiver amount — these are shopping mall items. They have nothing to do with restaurant orders |
| Store photos | Store photo · interior photo. Upload them with 변경 Change (the change applies the moment you click) |
| Contract · settlement account | View contract; bank · account holder · account number · copy of the bankbook. Saving a change to the account brings up one more confirmation prompt |
A blue dot appears next to the name of each edited field, and “n changes” 되돌리기 Undo 저장 Save become active at the right of the top bar. Photo and address edits take effect the moment you click them, so they are not counted. Saving works the same way as in 6.2.
7 Differences between phone and PC (POS)
The same merchant screens are used on a phone and on a PC (inside POS). The functions and wording are the same; only the layout differs. The pictures in this guide are PC screens. On a PC with a narrow window (width under 900) and on a phone, the screens appear in the older layout shown in the “Phone” column below.
| What | Phone (narrow window) | PC (wide window) |
|---|---|---|
| Moving between screens | Five tabs at the bottom of the screen | Vertical menu on the left (text and icons) |
| Home | Large buttons and rows stacked top to bottom | Shortcut buttons on the top bar · number strip · table of orders in progress · “Settle bill” / “Takeout” / “Favorites” on the right |
| When you select a row in a list | The screen changes, or a window slides up from the bottom | A window opens on the right (close it with × orEsc). The menu table and the transaction history table stay as they are behind it |
| Saving settings | Large button at the very bottom of the screen | “n changes · Undo · Save” at the right of the top bar, Ctrl+S, a confirmation prompt when you leave |
| Going back from settings | The “Back” button on the screen, or the app's back action | ‹ More at the left of the top bar |
| The gear icon on Home | More (Settings) screen | The Merchant options window (full screen · on-screen keyboard · touch scrolling · the way to POS) 1.4 |
| Going to the POS screen | The Orders tab at the bottom | The “Orders · POS” item on the left · 주문 접수 Order intake on Home — a confirmation prompt appears when you click it, and the item can be hidden 1.4 |
| Sales | Continues below the large card | Number strip · chart on the left · ranking on the right · transaction history table below |
- The merchant login is a different account from the POS login. 1.1
- Only on PC: the Home favorites and the Printer settings in More, the on-screen keyboard and POS screen in More, 이 메뉴 삭제 Delete this item in the edit menu item window, and the POS item in the mode chooser. When you use full screen, a 창 모드 Window mode button floats at the lower right, so you can switch back to a normal window.
- Not on PC: the Staff management item in More. Staff accounts are managed under Business hours · Staff. 6.4
- Favorites are saved on this device only. 2.4
- 주문·POS Orders · POS in the left menu takes you to the POS order screen. Chapter 3
This guide is the revision of October 12, 2026 (based on program version 1.3.191 and screen version 1.11.256). The pictures are example screens, so the numbers differ from those of a real store. POS operation is covered in the Gpay POS user guide.