
User guide · revised October 12, 2026
Merchant screen “Shopping mall” user guide
For online shopping mall operators · For POS operation, see the Gpay POS user guide; for the restaurant side, see the Merchant screen “Restaurant” user guide
0 About this guide
The pictures show the PC screens of an example store (“Mulgyeol”), taken from the merchant screens opened inside POS. The recipient, phone number, address, business registration number and email are masked and replaced with other values, and the orders and amounts are sample data, so the numbers differ from a real store. Product photos are blank in these pictures.
- This guide covers the “Shopping mall” side of the merchant screens — where you register products, move incoming orders through the shipping stages, upload tracking numbers, and handle cancellation and return requests.
- POS operation (table screen · order entry · payment QR · receipts) is not covered. There is a separate Gpay POS user guide. The restaurant screens (menu · kitchen · restaurant sales) are in the Merchant screens “Restaurant” guide.
- The wording on the screens is based on PC (window width 900 or more). On a phone or in a narrow window, the same functions appear in the older layout, and some of them (the table for selecting many orders at once · A4 printing · Excel) are available only on the PC screen — Chapter 7.
- Shopping mall orders show only orders whose card payment is complete. Orders that the customer did not pay for, or canceled, do not appear in the list.
1 Getting started
1.1 Where to open it
- Phone: Open the Gpay Store app and log in with your merchant account.
- PC: You see the same screen inside POS. The merchant login is a different account from the POS login — it is the ID and password you use for the merchant phone app. Once you log in, this machine remembers it, so it doesn't ask again.
1.2 Entering shopping mall mode
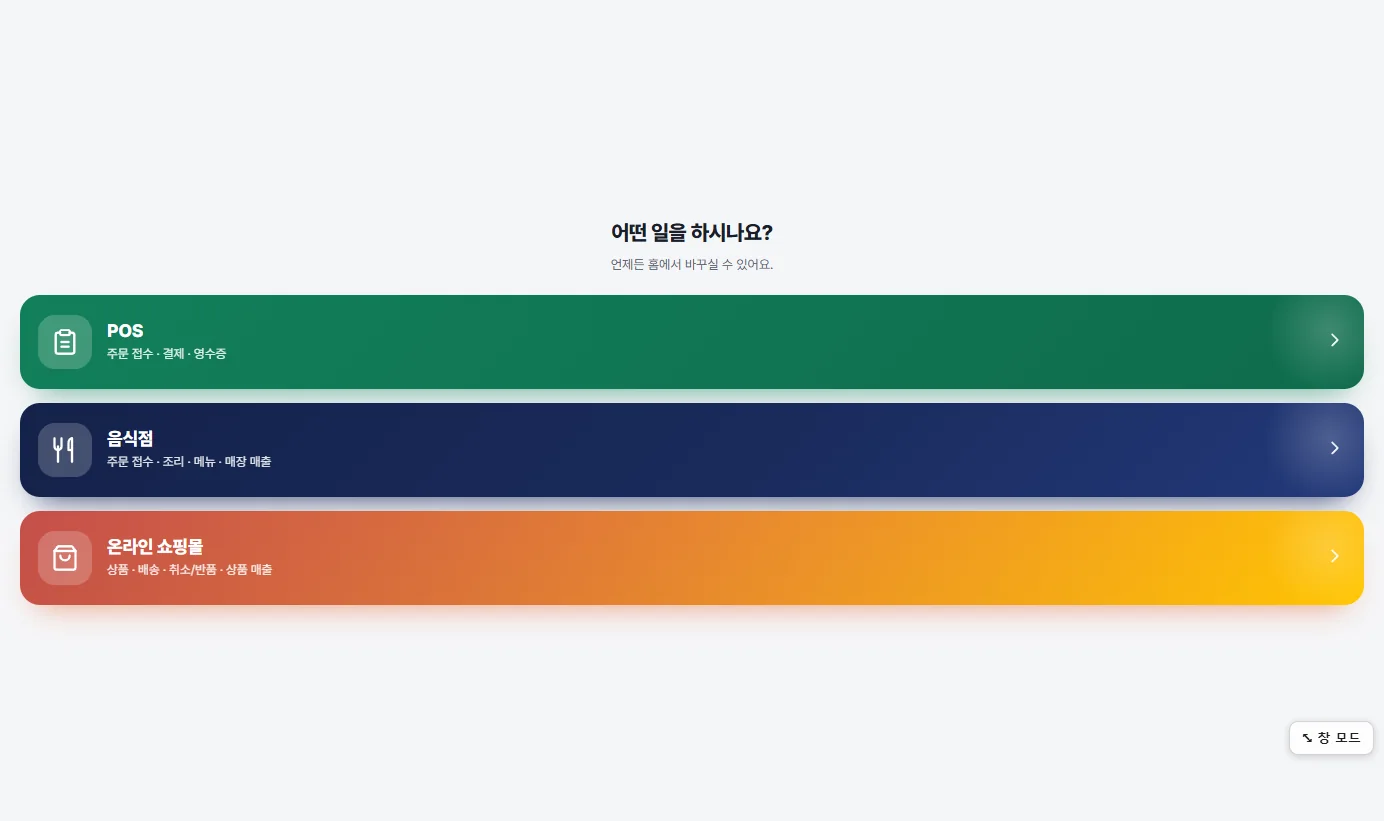
- This choice appears only for stores that run both a restaurant and an online shopping mall. A store that runs only a shopping mall goes straight to the shopping mall screen.
- After you choose, you can switch at any time with the “Store mode” switch (Restaurant | Shopping mall) at the very bottom of the left menu bar. It is in the same place on every screen.
- In shopping mall mode, the menu bar has a light orange background, and only the item you are viewing has a dark orange background with white text (restaurant mode uses light blue).
1.3 Screen layout
There is a vertical menu on the left, and the content appears on the right. Click an item to switch to that screen.
| Left menu | What you do |
|---|---|
| Home | Today's numbers · orders in progress · shortcuts Chapter 2 |
| Orders · POS | Click it to go to the POS order screen (the in-store order screen, unrelated to the shopping mall). A “Go there?” confirmation prompt appears first 1.4 |
| Shipping | All shopping mall orders on one screen — shipping stages · tracking numbers · cancellations and returns Chapter 3 |
| Products | Adding and editing products · stock · options · categories Chapter 4 |
| Sales | Product sales · purchase history Chapter 5 |
| More | All settings Chapter 6 |
Every screen has its screen name on one line at the top (the header bar), and the buttons used most often on that screen are grouped on the right. Inside settings screens, ‹ More (to go back) is on the left. The gear icon at the right of the Home header bar opens the Merchant options window (1.4).
1.4 Merchant options (gear)
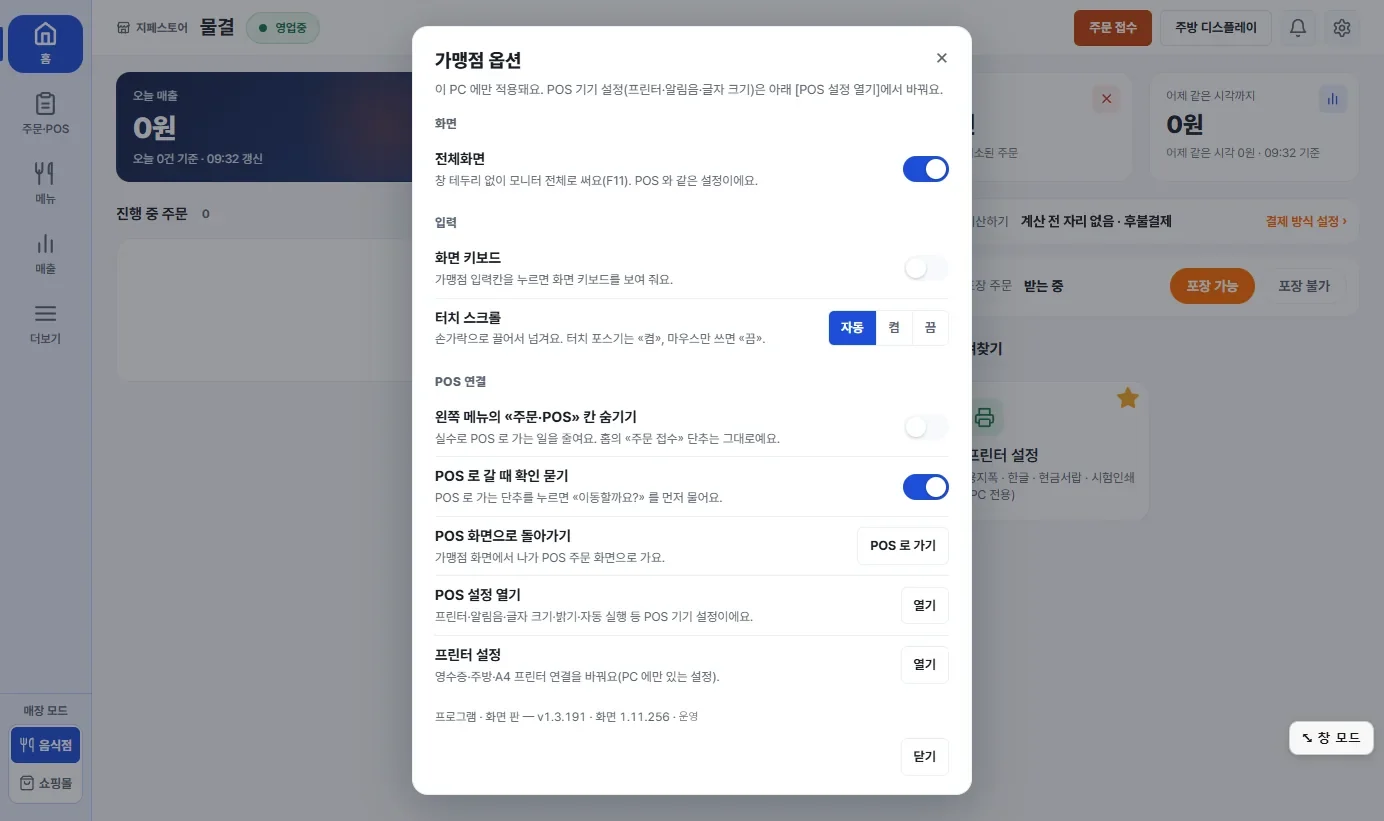
Click the gear icon at the right of the top line of Home and the Merchant options window opens. These settings apply only to this PC, and when you change a value it applies right away (there is no save button). On a phone, the gear goes to the More (settings) screen.
| Item | What you do |
|---|---|
| Full screen | Uses the whole monitor with no window border (F11). It is the same setting as in POS. |
| On-screen keyboard | Shows the on-screen keyboard when you click a merchant input field. It is the same setting as the “On-screen keyboard” row in More in restaurant mode. |
| Touch scroll | A way of scrolling by dragging with a finger. Auto turns it on only when Windows reports a touch screen. Set it to On if it is a touch POS terminal but dragging does not scroll, and to Off if you only use a mouse and dragging to select text turns into scrolling. |
| Hide the “Orders · POS” item in the left menu | When on, the “Orders · POS” item disappears from the left menu (window width 900 or more). This is to reduce the chance of going to the POS screen by mistake. The 주문 접수 Order intake button on Home stays, and even if you hide the item, you can still go with POS 로 가기 Go to POS below. |
| Ask for confirmation when going to POS | It is on from the start. When you click the “Orders · POS” item on the left, 주문 접수 Order intake on Home, or the “POS screen” row in More, “Go to the POS screen?” appears first. If you click 머무르기 Stay (default), you stay on the merchant screen, and you go only if you click POS 로 이동 Go to POS. If you turn it off, you go straight there without confirmation. |
| Go to POS | Goes to the POS order screen without confirmation. It is the way to get there when you have hidden the “Orders · POS” item. |
| Open POS settings | Goes to the POS order screen and opens the POS settings window (printer · notification sound · text size · brightness · auto-start, etc.). |
| Printer settings | Goes to the window for connecting the receipt, kitchen and A4 printers. Printers are a PC-only setting. |
| The bottom row | Shows the program version · screen version · server you are using now. Please tell us these when you make an inquiry. |
Text size is a setting that applies only to the POS screen, so it is not in this window. Change it in the POS settings window. The hide and confirm values in this window are saved on this PC only and do not carry over to your phone or other PCs.
2 Home
2.1 Number strip
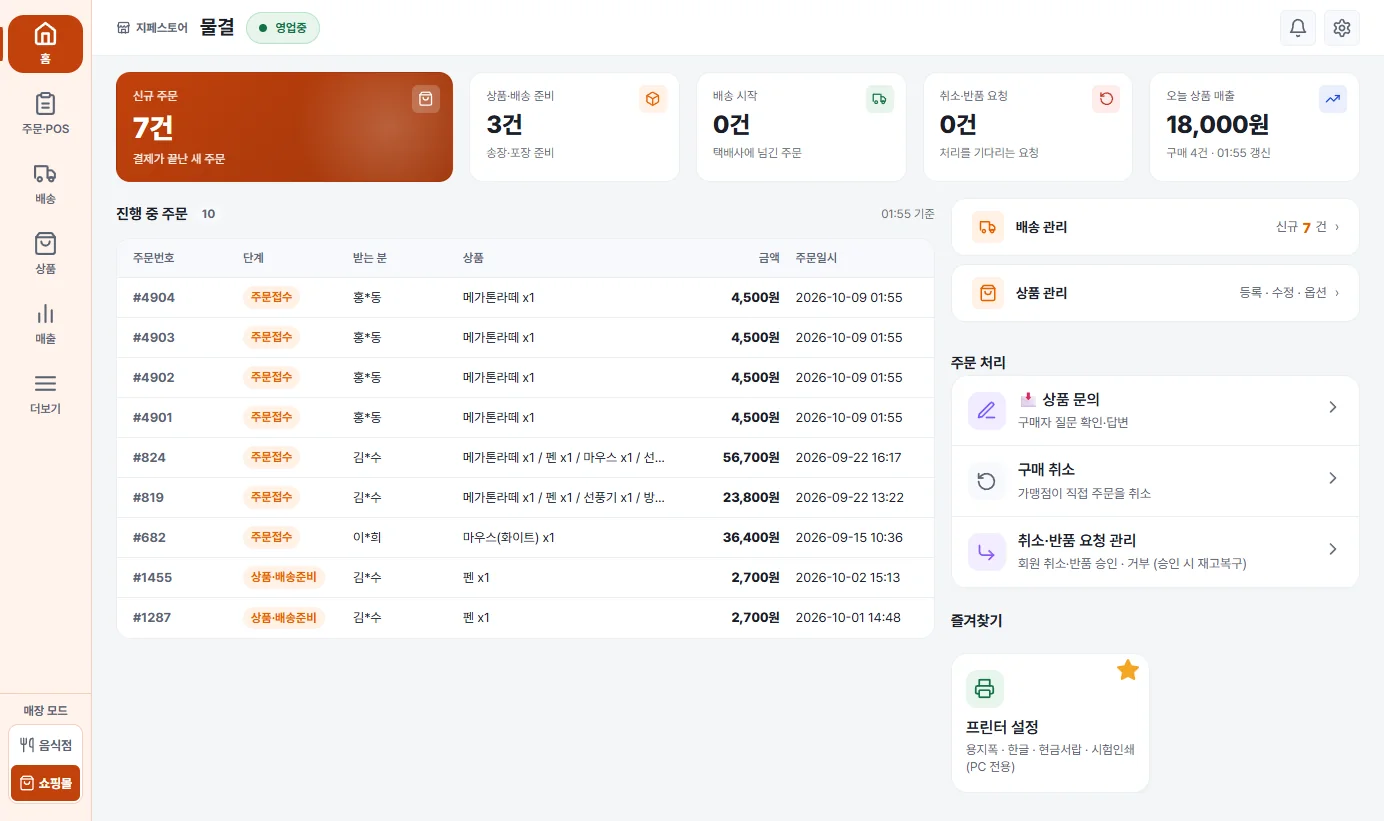
- New orders (the large box): the number of new orders whose payment is complete.
- Preparing product and shipping: orders whose tracking number and packing are being prepared. Shipping started: orders handed over to the courier. Cancellation and return requests: requests that customers have submitted and that are waiting to be handled.
- Today's product sales: shown together with today's number of purchases (the time of the last update is shown).
2.2 Orders in progress
- The table on the left lists the orders you need to handle now, one row each, with order number · stage · recipient · product · amount · order date and time. The recipient's name is shown with the middle character hidden (for example: Hong*dong).
- If there are many orders, only the first few are shown. To see and handle them all, go to 배송 관리 Shipping management on the right or 배송 Shipping in the left menu Chapter 3.
2.3 Shortcuts · Favorites
- The Shipping management row shows the number of new orders as an orange number, and the Product management row goes to the registration, editing and options screens.
- Order handling group: Product inquiries (check and answer buyers' questions) · Purchase cancellation · Manage cancellation and return requests. “Purchase cancellation” and “Manage cancellation and return requests” open the cancellations and returns side of the shipping screen 3.9.
- Favorites: click the star (★) at the right of an item in the More list, and it is added as a card on the right of Home. Shopping mall and restaurant favorites are kept separately, and they are saved on this device only. This feature and the Printer settings card are PC only.
3 Shipping — shopping mall orders
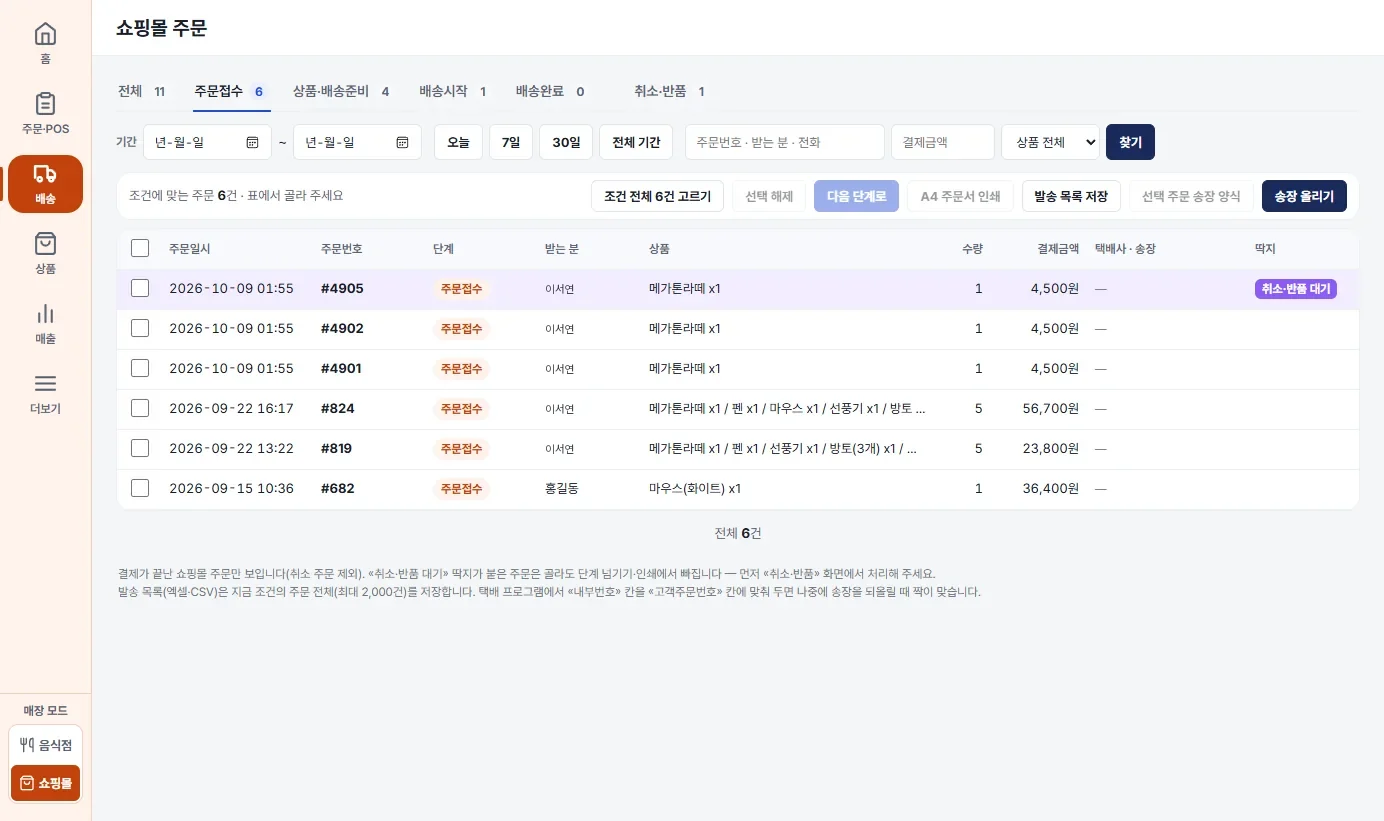
Click 배송 Shipping in the left menu (or 배송 관리 Shipping management on Home), and the all-in-one shopping mall order screen opens. You view orders by stage, select many at once, and do everything up to printing, Excel and uploading tracking numbers on this screen. Shipping management · Purchase cancellation · Manage cancellation and return requests in More also open this same screen (on a different tab).
3.1 Tabs and search
| Tab | Meaning |
|---|---|
| All | All orders except canceled orders |
| Order received | Orders whose payment is complete and whose preparation has not started yet |
| Preparing for shipment | Orders where the products are being gathered and a tracking number is awaited |
| Shipping started | Orders whose tracking number has been saved and that have been handed over to the courier |
| Delivered | Orders that have been delivered (when the customer confirms the purchase, or it is confirmed automatically, a Purchase confirmed badge appears 3.10) |
| Cancellations and returns | Cancellation and return requests submitted by customers — approve or reject 3.9 |
- The numbers next to the tabs do not change when you change the period or switch tabs (they are the counts for the period you have chosen).
- Period: enter a start date ~ end date yourself, or click the 오늘 Today 7일 7 days 30일 30 days 전체 기간 All time buttons. In the Search field, enter an order number, recipient or phone number; in the Payment amount field, enter an amount; and with Product you can also pick just one product. Set your conditions and click 찾기 Find.
- If no orders match your conditions, buttons such as “Clear search · Show 30 days · Clear filters · Show all” appear.
- The list shows 100 orders at a time, and you turn pages with ◀ 이전 ◀ Previous 다음 ▶ Next ▶ below. The orders you selected stay selected when you turn the page.
3.2 Selecting orders
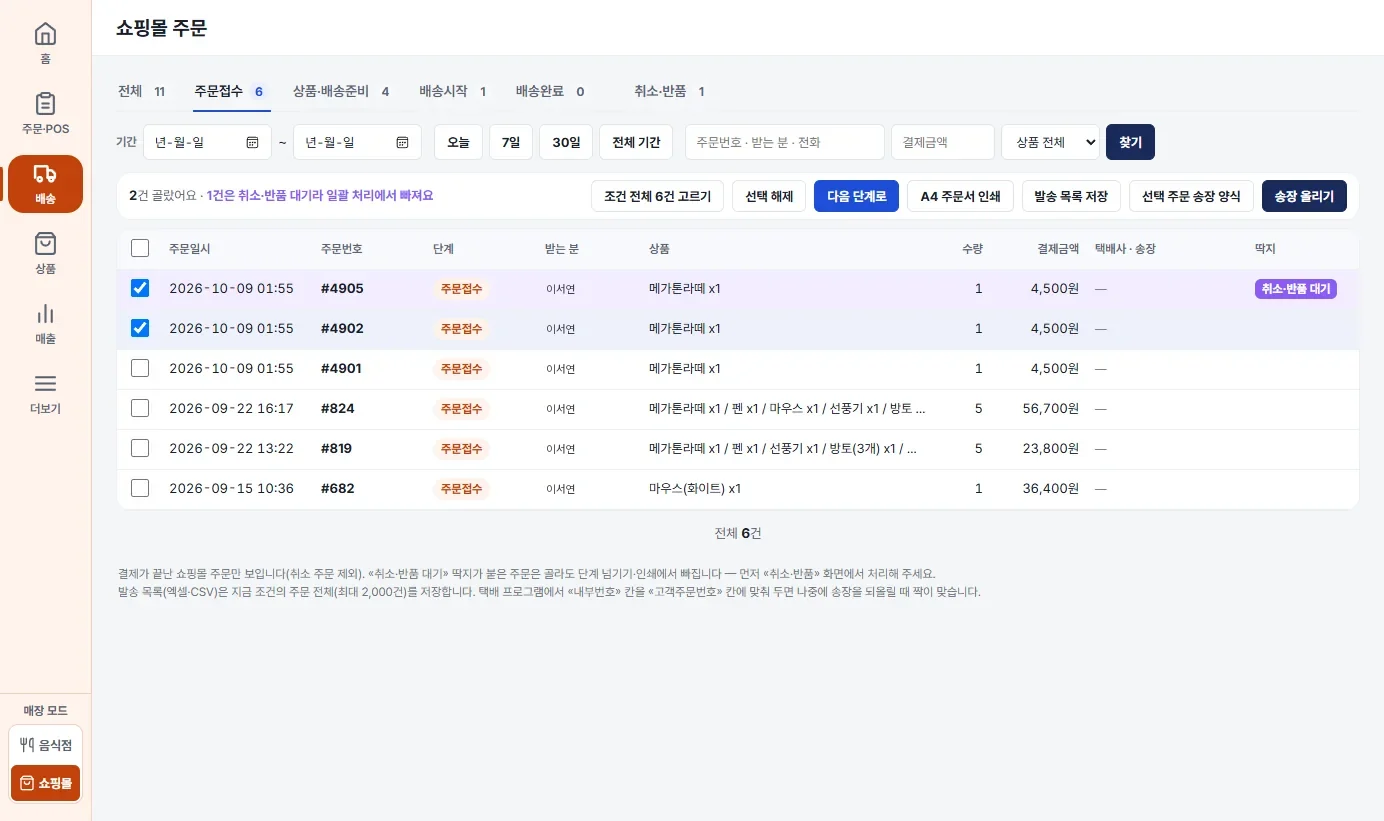
- Click the checkbox at the left of a row to select it. The checkbox at the very top selects everything on the page currently shown.
- 조건 전체 N건 고르기 Select all N matches selects all orders that match the current conditions, regardless of page (up to 2,000 orders). Clear the selection with 선택 해제 Deselect.
- At the left of the button row, you see how many orders you have selected. Orders with a “Cancel/return pending” badge are left out of moving to the next stage and printing even if you select them, and the same row tells you in purple text how many are left out. Handle them first on the Cancellations and returns tab.
3.3 Order details — handling one order at a time
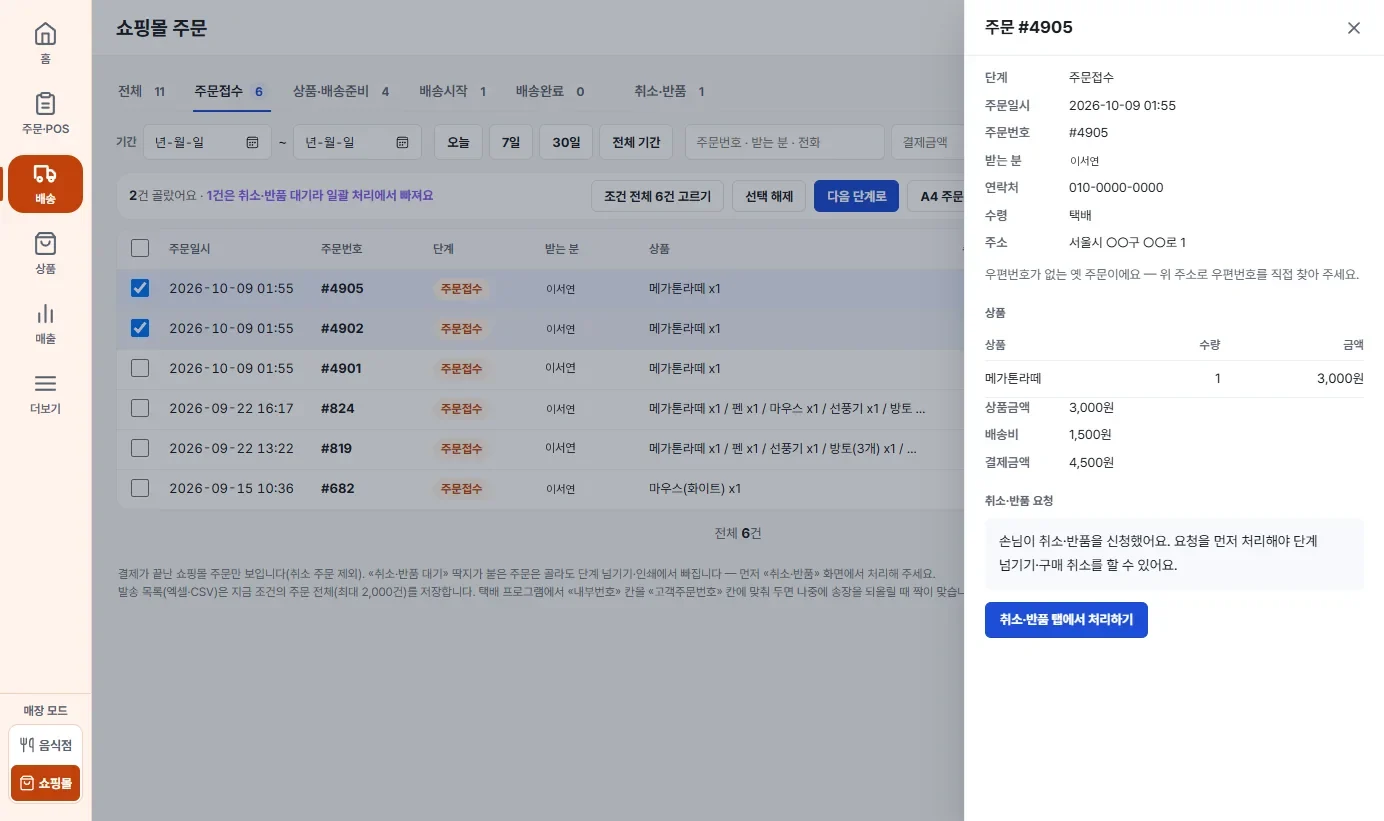
- You see stage · order date and time · order number · recipient · contact · receiving method (courier/in-store pickup) · address and the product table · product amount · shipping fee · payment amount all at once. For older orders with no postal code, it says “Please look up the postal code yourself from the address above”.
- If the customer has submitted a cancellation or return for the order, only a “Handle on the Cancellations and returns tab” button appears below (see the picture above). You can move the order to the next stage or cancel the purchase only after you have handled that request.
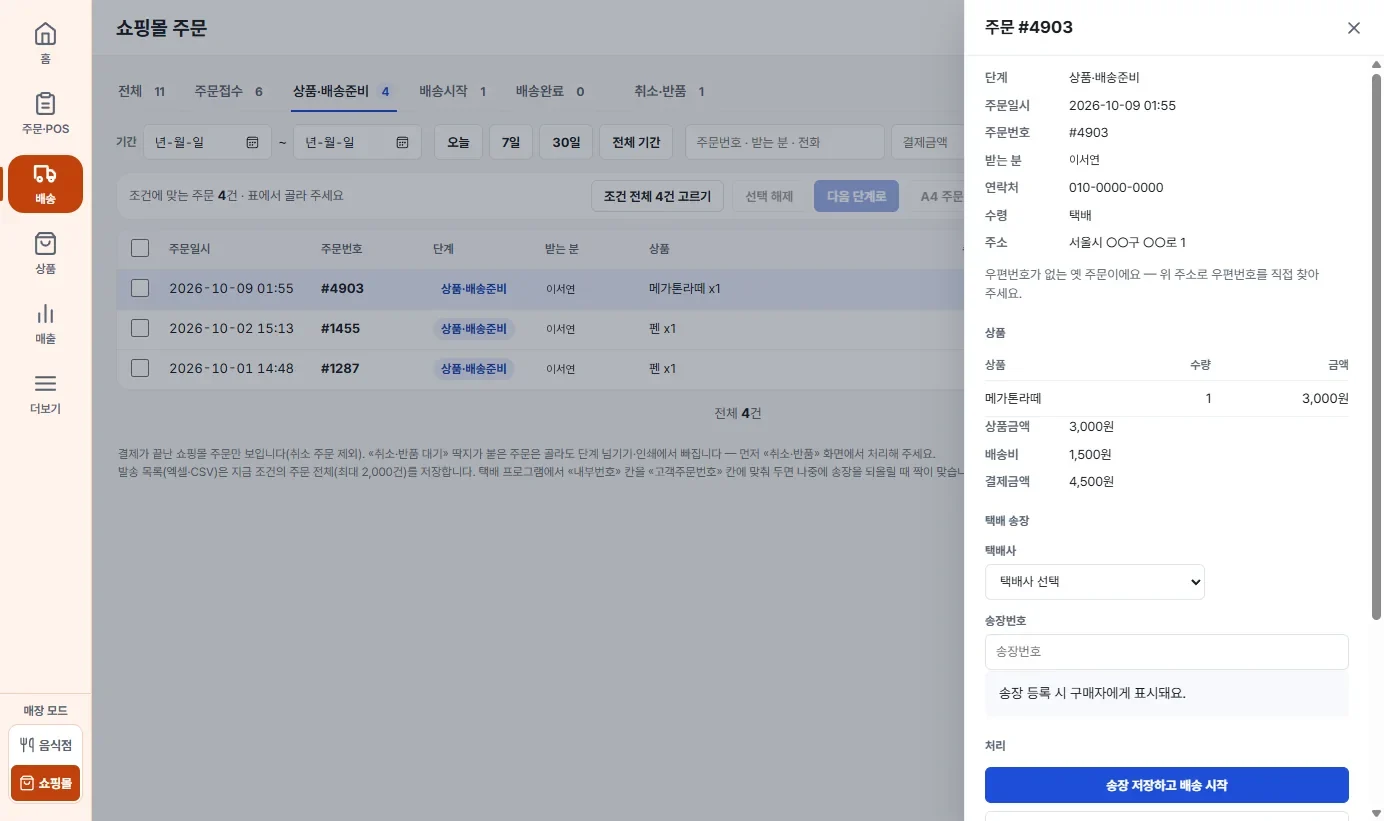
The handling buttons below differ at each stage.
| Order stage | What you do in the details window |
|---|---|
| Order received | 다음 단계로 (상품·배송준비) Next step (preparing) |
| Preparing for shipment | Choose the courier from the list (if it is not listed, “Other (enter manually)”), enter the tracking number, then use 송장 저장하고 배송 시작 Save tracking and ship (the customer gets a shipping-started notification) · 송장만 저장(배송은 나중에) Save tracking only (ship later) · 송장 없이 배송 시작 Ship without tracking (a confirmation prompt appears; if a tracking number is already saved, it changes to “Start shipping with the saved tracking number”) |
| Shipping started | 송장 변경 저장 Save tracking change (a confirmation prompt appears — the customer receives one more “Tracking info registered” notification) · 다음 단계로 (배송완료) Next step (delivered) |
| Delivered | It only shows the courier and tracking number (an order that moved to Delivered without a tracking number says so). “Customers earn mileage when they confirm the purchase” |
- A tracking number is 4 to 40 characters of digits, letters and hyphens; Korean characters are not allowed. If you do not choose a courier or the format is wrong, the reason appears below the field.
- In-store pickup orders have no courier tracking field and have only 다음 단계로 Next step.
- If a details window with a tracking number or rejection reason you were typing is open and you change the tab, period, search or page, a “You have unsaved changes” confirmation prompt appears first.
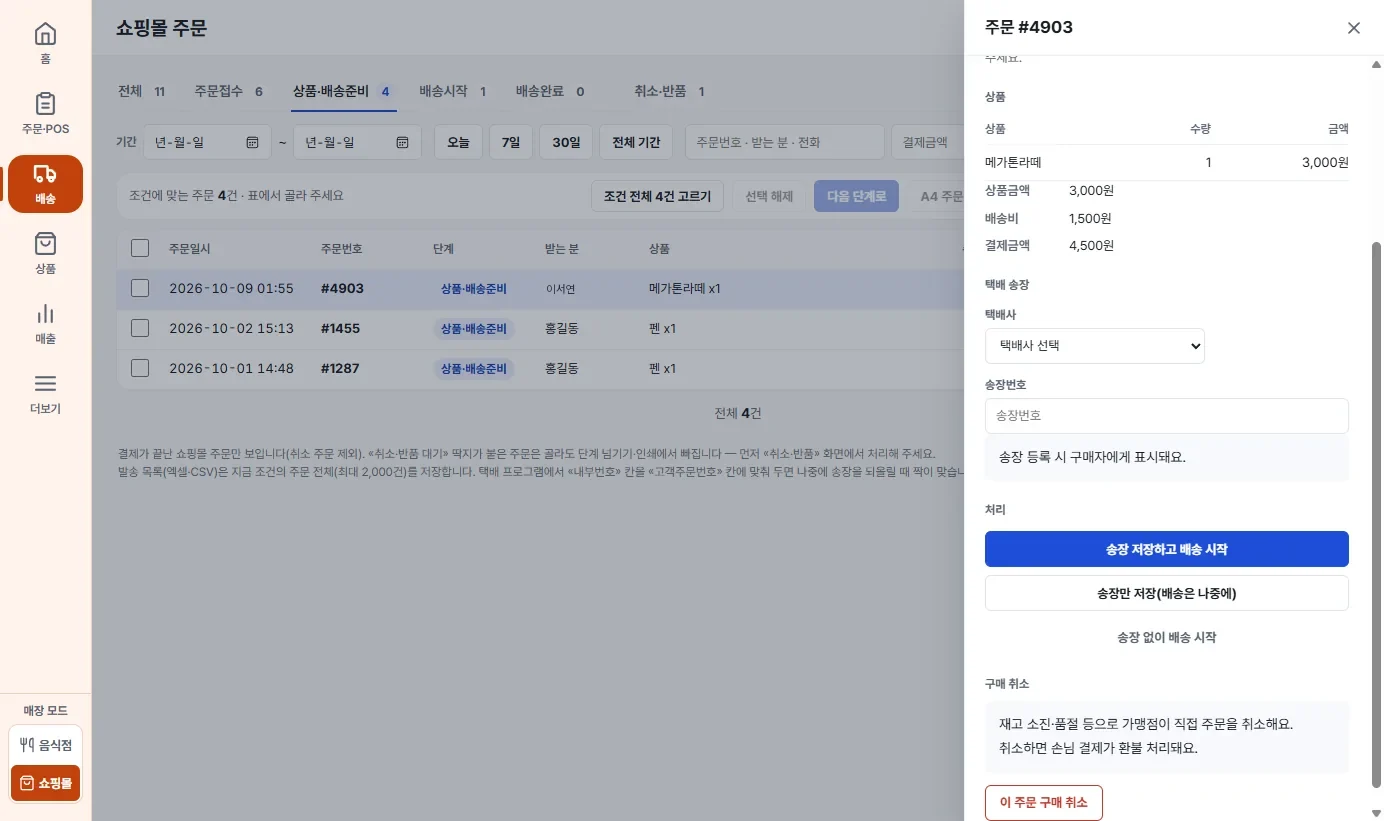
이 주문 구매 취소 Cancel purchase of this order is the button the merchant uses to cancel an order directly, for example when stock runs out or an item is sold out. When you click it, a confirmation prompt (“The customer's payment will be refunded. This cannot be undone”) appears, and when you confirm, the customer's payment is refunded. For an order the customer has asked to cancel, do not use this button; approve it on the Cancellations and returns tab.
3.4 Moving to the next stage
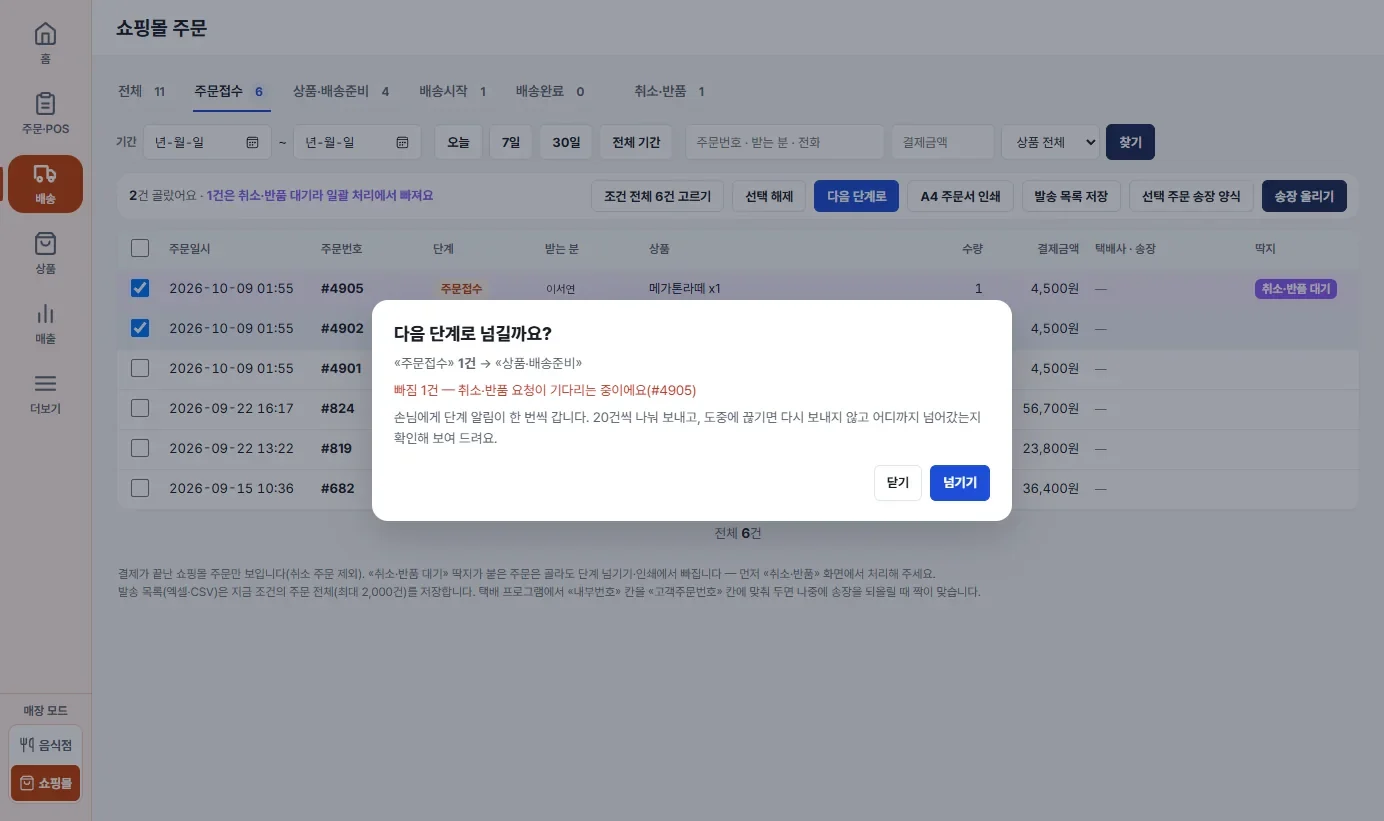
- Orders move one stage at a time, in the order Order received → Preparing product and shipping → Shipping started → Delivered. Moving orders this way is easiest when all the orders you selected are at the same stage.
- Each customer receives one stage notification. They are sent in batches of 20, and if sending is interrupted partway, it does not resend automatically but checks and shows how far it got (this is so that orders that have already moved do not get a notification twice).
- To move orders to Shipping started, you usually use 송장 올리기 Upload tracking (3.8), which saves the tracking numbers at the same time. For just one order, you can also use 송장 저장하고 배송 시작 Save tracking and ship in the details window.
3.5 Printing A4 order sheets
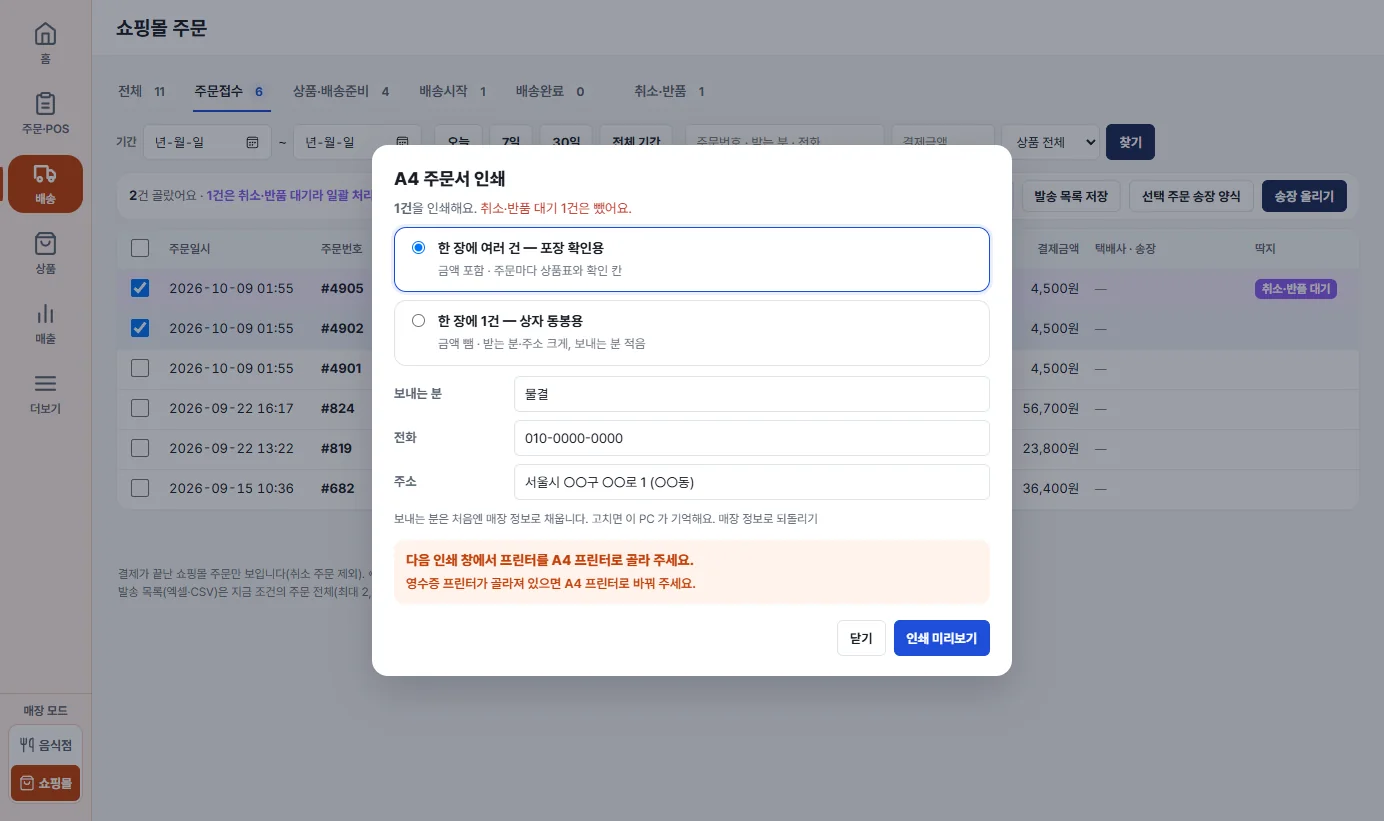
- Several orders per sheet — for checking packing: each order has a product table, including amounts, and a check box. 1 order per sheet — to put in the box: amounts are left out, the recipient and address are printed large, and the sender is written in.
- Sender name · phone · address are filled in from the store information at first. If you edit them, this PC remembers them, and you can restore the original values with 매장 정보로 되돌리기 Reset to store info.
- After the preview, you must choose the A4 printer in the print window. If the receipt printer is selected, change it to the A4 printer (this notice is there so that A4 order sheets do not come out on the receipt printer).
- Orders marked “Cancel/return pending” are left out of printing. The notice text is not printed.
3.6 Saving the shipping list
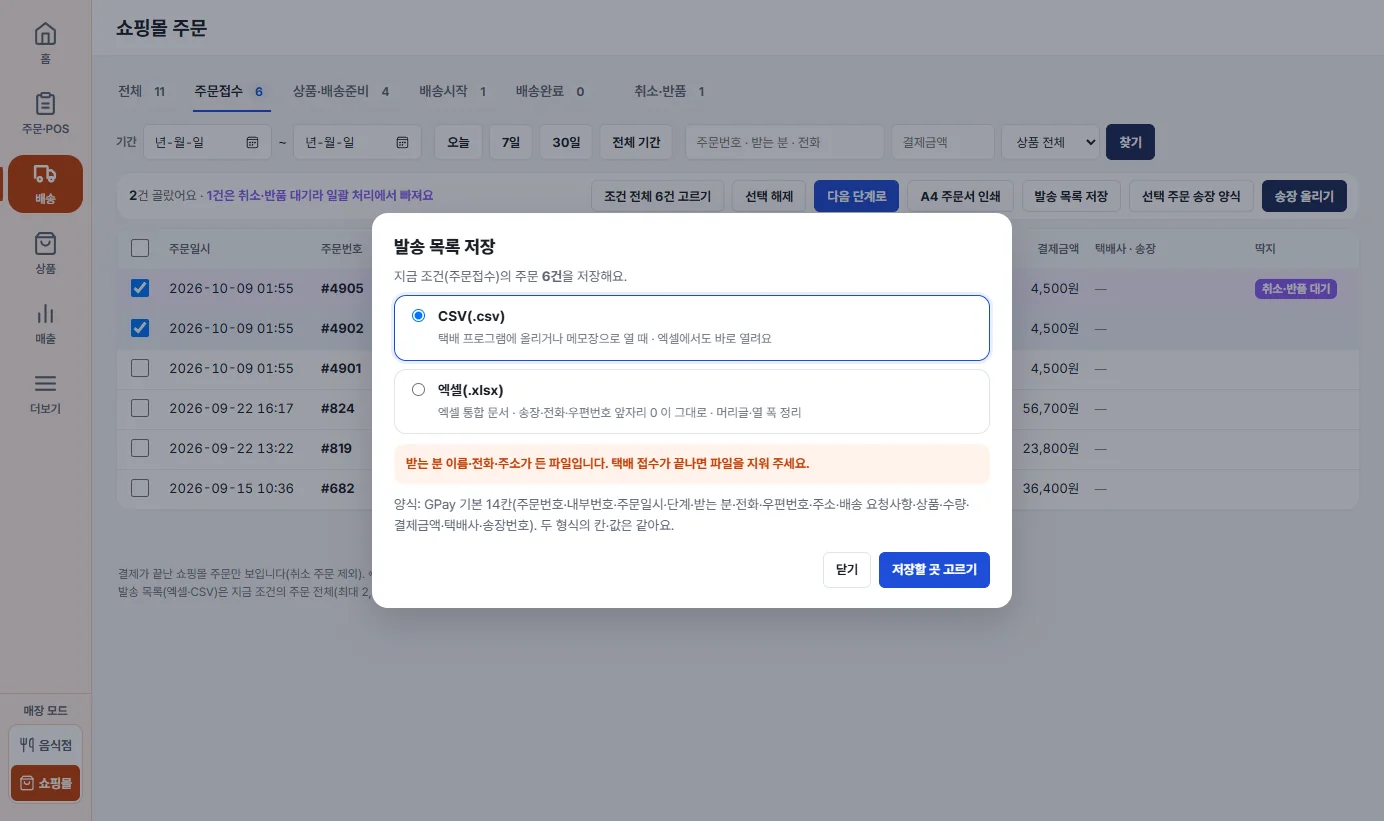
- Saves all orders that match the current conditions (up to 2,000 orders) to a file. Upload it to your courier program or open it yourself.
- Use CSV when you open it in a courier program or Notepad. In Excel (.xlsx), the leading 0 of tracking numbers, phone numbers and postal codes is kept, and the headers and column widths are tidied. The columns and values are the same in both formats.
- The template is the Gpay default of 14 columns — order number · internal number · order date and time · stage · recipient · phone · postal code · address · delivery request · product · quantity · payment amount · courier · tracking number.
- This file contains recipients' names, phone numbers and addresses. Delete the file once the courier booking is done.
3.7 Tracking form for selected orders
- After you select orders in the table, click 선택 주문 송장 양식 Tracking form for selected orders to download an Excel (.xlsx) file with the 14 columns pre-filled for the selected orders only. Fill in just the two columns for courier and tracking number and upload it as it is with 송장 올리기 Upload tracking — you do not need to type each order number.
- If no orders are selected, this button is disabled.
- The tracking number column is formatted as “Text”, so a leading 0 is preserved. Do not change this column to a number.
3.8 Uploading tracking numbers
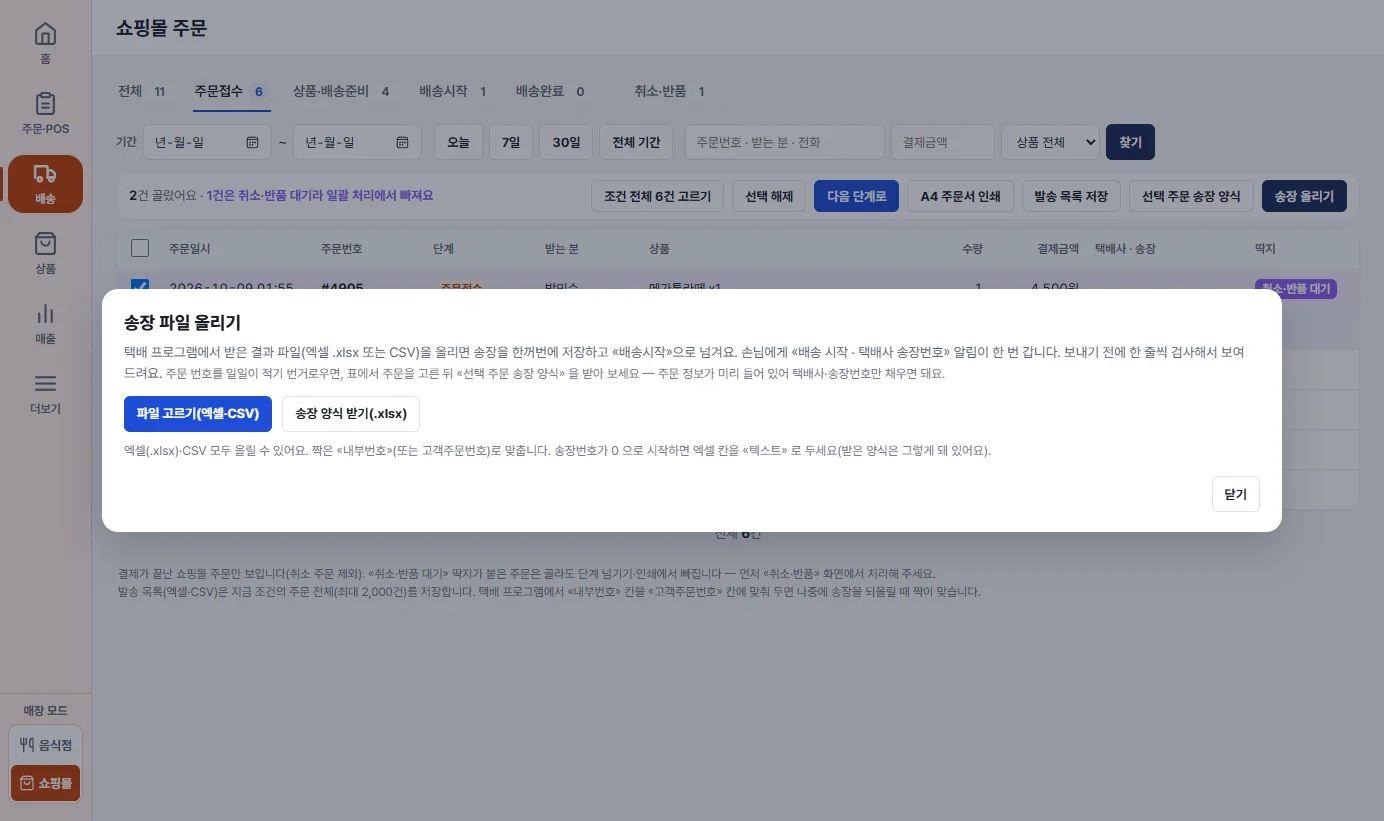
- Choose file (Excel · CSV): choose the result file from your courier program, or the form you got with Get tracking form (.xlsx). If you do not have the form, click 송장 양식 받기 Get tracking form first.
- Match columns: the program recognizes and selects which column of the file is the internal number · order number · courier · tracking number, and you can change them yourself if they are wrong. Rows are matched by the “internal number” (or customer order number). If the file has no courier column, choose the courier to use for every row from the list or type it in.
- 검사하기 Check: before sending, it checks every row and shows ✔ (can be sent) or ✖ (cannot be sent — the reason is shown).
- 보내기 Send: only the ✔ rows get their tracking numbers saved and move to Shipping started. The customer receives one “Shipping started · courier tracking number” notification.
- Download the rows that could not be uploaded with 못 올린 목록 저장(CSV) Save failed rows (CSV), fix them, and upload again.
Cases that show ✖
- Orders still at the Order received stage (you must first move them to “Preparing product and shipping”) · cancel/return pending orders · rows where the order could not be found · rows whose tracking number contains Korean characters · cases where the same order appears on two rows · an unknown courier.
- Empty rows are skipped. A row that already has the same courier and the same tracking number saved is not sent again, so the customer does not get another notification. If any row would change a tracking number, a confirmation checkbox appears; check it and then send.
When you upload tracking numbers from Excel — if a cell saved as a number has more than 15 digits, Excel changes the last digits when saving, which could send out a wrong tracking number, so such rows are excluded. For tracking numbers that start with 0, use the form you got with “Get tracking form” (text cells), or set the column to “Text”.
3.9 Cancellations and returns
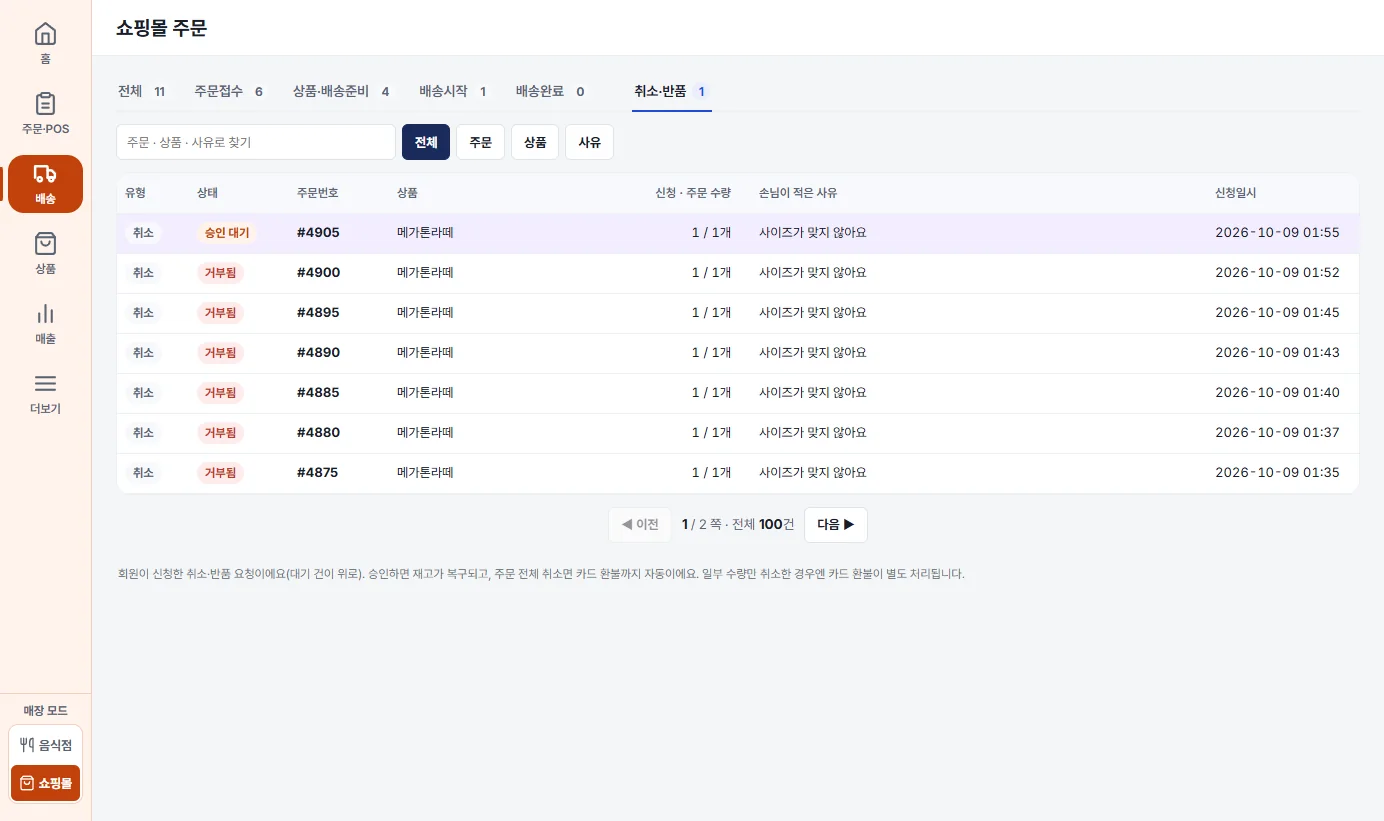
- When a customer requests a cancellation or return in the app, a row appears on this tab, and the order row gets a “Cancel/return pending” badge. You must handle this request first before you can move that order to the next stage, print it or upload its tracking number.
- Click a row and the request details (type · status · order · product · requested quantity / ordered quantity · request date · the reason the customer wrote) open on the right.
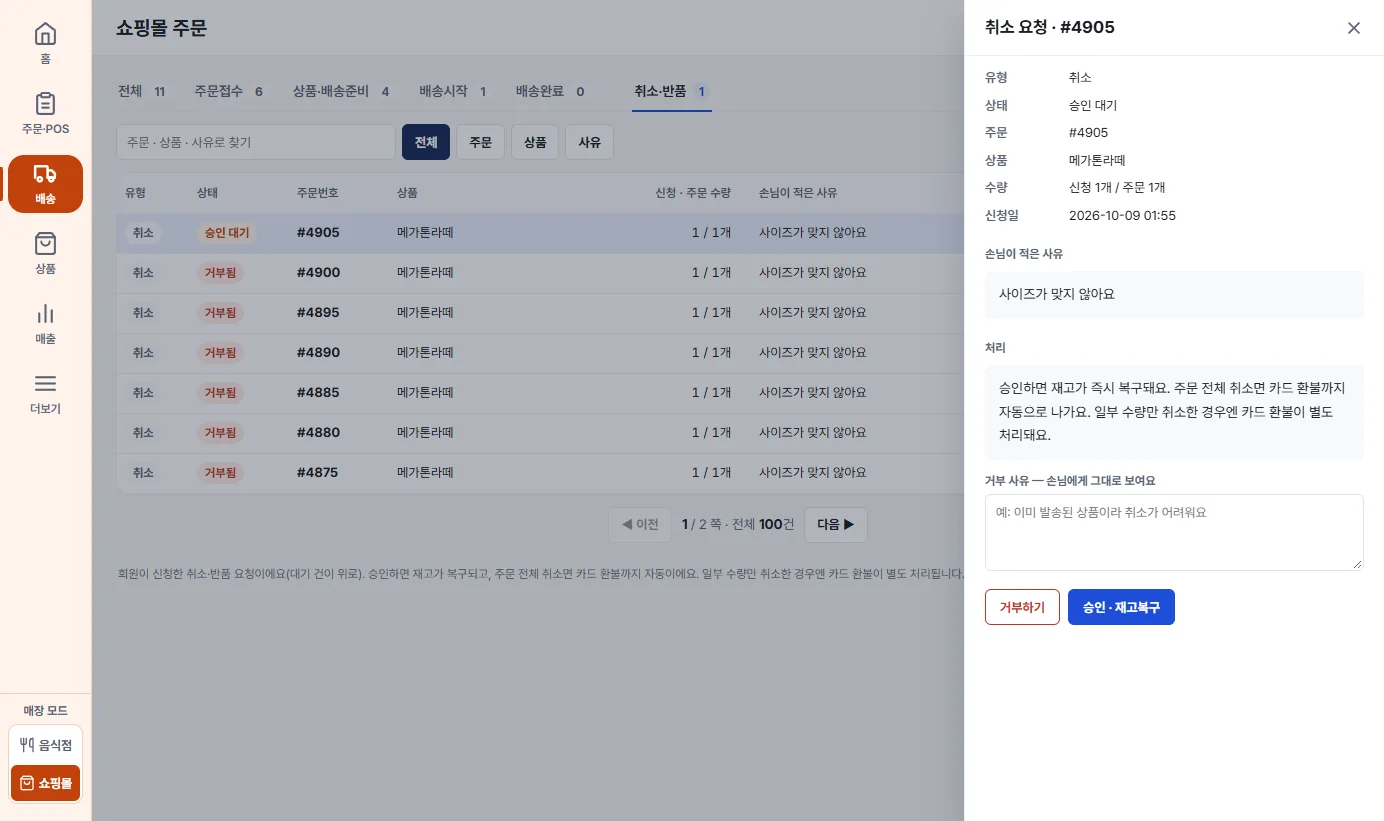
- 승인 · 재고복구 Approve · restore stock: stock is restored immediately. If you cancel the whole order, the card refund is also issued automatically. If you cancel only part of the quantity, the card refund is handled separately.
- 거부하기 Reject: you can click it only after you enter a rejection reason (if it is empty, “Please enter a rejection reason” appears), and the reason is shown to the customer as written.
3.10 What the badges mean
| Badge | Meaning |
|---|---|
| Cancel/return pending (purple) | An order that the customer has asked to cancel or return and that is waiting to be handled. It is left out of bulk processing. |
| Tracking number needed | An order at the “Preparing product and shipping” or “Shipping started” stage that does not have a tracking number yet. |
| Purchase confirmation | A delivered order whose purchase the customer confirmed, or that was confirmed automatically, and for which mileage was awarded. It is not shown until the server is on the new version. |
4 Products
4.1 Product list
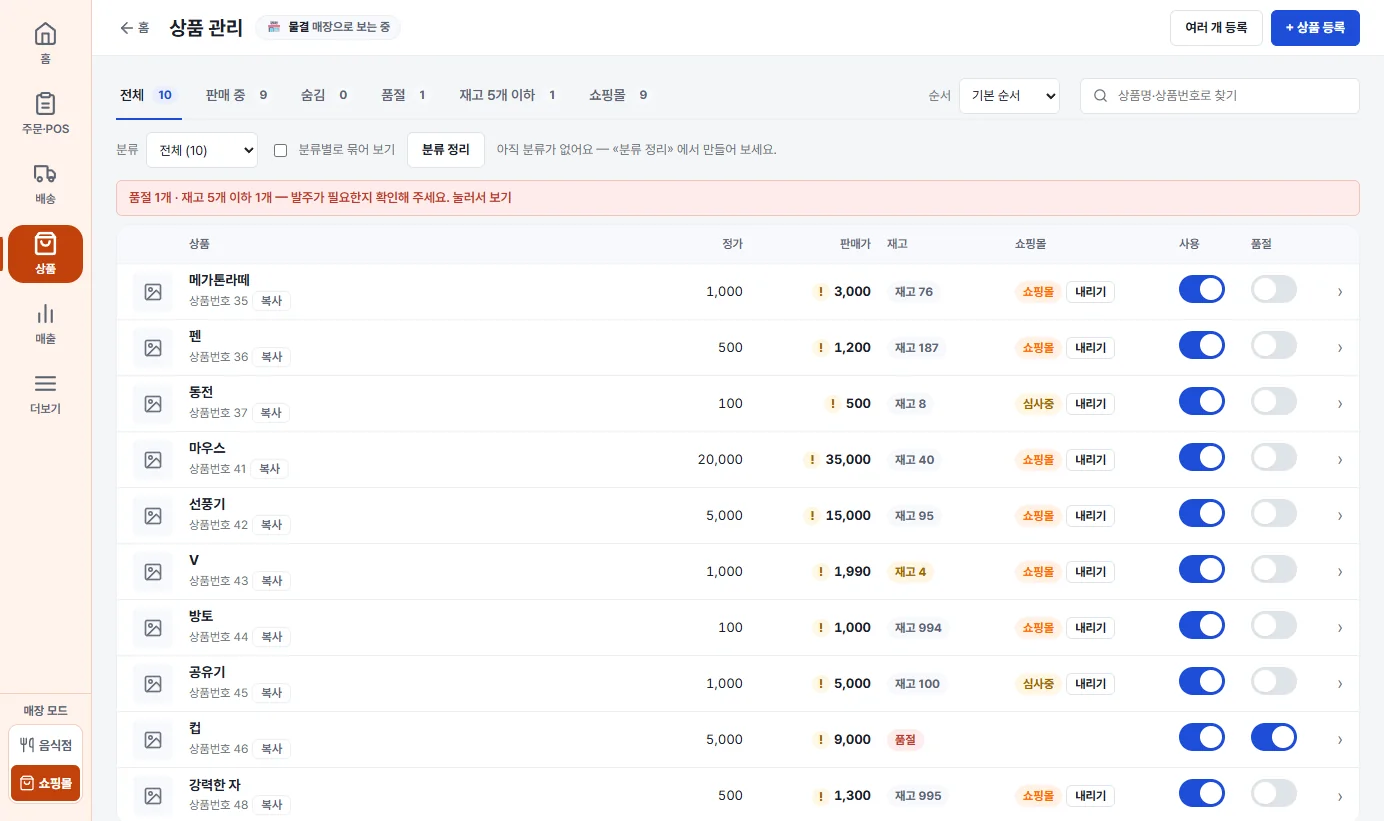
- Tabs at the top: All · On sale · Hidden · Sold out · 5 or fewer in stock · Shopping mall — the numbers are counts. The red bar is an alert that some products are sold out or low on stock; click it to see only those products.
- Change the sorting with Sort order, and search by entering a product name or product number in the search field (the / key jumps straight to the search field).
- The Shopping mall column of the table: the indicators Shopping mall (shown in the customer shopping mall) · Under review (awaiting display review) and the 내리기 Take down button. Use the Use switch to turn a product on or hide it, and the Sold out switch to mark it sold out. The ! next to the sale price means the sale price is higher than the list price, so no discount is shown on the customer screen.
- Click the ‹ at the right of a row or the product name, and the edit window opens on the right. 복사 Copy copies the product number.
- Create a new product with + 상품 등록 + Add product at the top right, and register many at once with 여러 개 등록 Add multiple.
4.2 Edit and add products
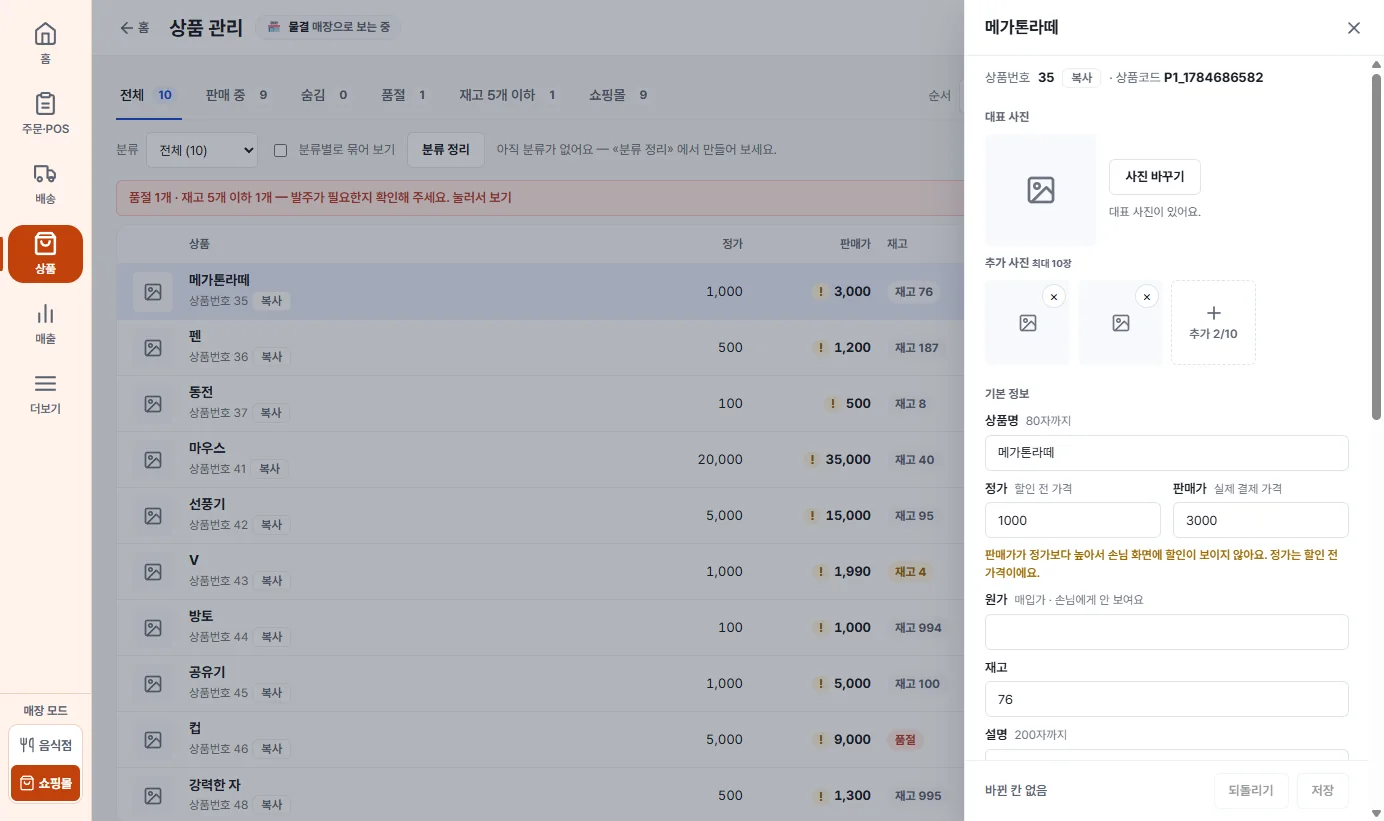
- In one window you edit 1 main photo and up to 10 additional photos, product name (80 characters) · list price (the price before discount) · sale price (the price actually paid) · cost (purchase price — not shown to customers, used for margin calculation) · stock · description (200 characters) · mileage · options (type · value · price · stock).
- The bottom row shows how many fields have changed and has 되돌리기 Undo and 저장 Save. You can also save with Ctrl+S. If you close without saving, a confirmation prompt appears.
- You can also add options in the window for registering a new product.
- For a product with options, you keep stock separately for each option. Stock goes down when an order is placed, and stock is restored when you approve a cancellation or return.
4.3 Adding multiple products
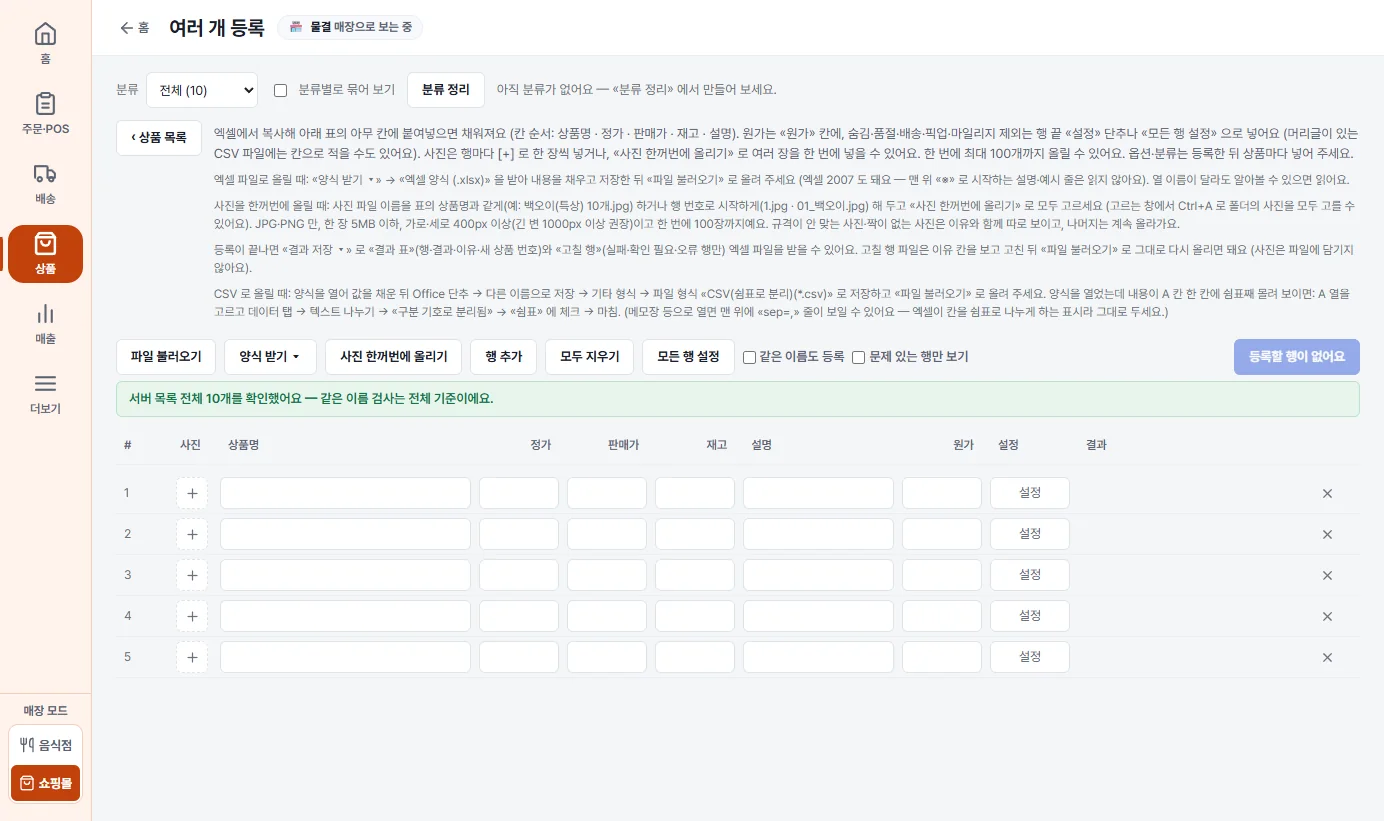
- You can register up to 100 at a time. The column order is product name · list price · sale price · stock · description, and there is a separate cost column.
- Three ways to fill in the table — ① copy from Excel and paste into the table ② get an Excel (.xlsx) template with 양식 받기 Get template, fill it in, then click 파일 불러오기 Load file ③ load a CSV (comma-separated) file. It recognizes the columns even if their names differ.
- Set hidden · sold out · shipping · popup · mileage with 설정 Settings at the end of a row or with 모든 행 설정 Apply to all rows. Add options and categories to each product after you register them.
- Before registering, every row is checked. Use 문제 있는 행만 보기 Show problem rows only to see only the rows to fix. Unless you turn on 같은 이름도 등록 Allow same name, names that already exist on the server are blocked (the name check is against the whole server list).
- When it is done, 결과 저장 Save results downloads Excel files for the “Results table” (row · result · reason · new product number) and “Rows to fix” (failed, needs checking, and error rows). You can look at the reason column in the Rows to fix file, correct the rows, and load the file again as it is.
- Upload photos all at once: name the photo files the same as the product name in the table, or start the name with the row number (1.jpg · 01_cucumber.jpg), then press Ctrl+A in the file chooser to select all the photos in the folder. JPG and PNG only, 5MB or less per photo, 400px or more in width and height, up to 100 photos at a time; photos that do not meet the specifications or have no matching row are listed separately with the reason, and the rest continue to upload. Photos with the same name are not uploaded.
If you do not register an uploaded photo as a product, it may stay on the server (a cleanup tool is being prepared on the server side).
4.4 Categories
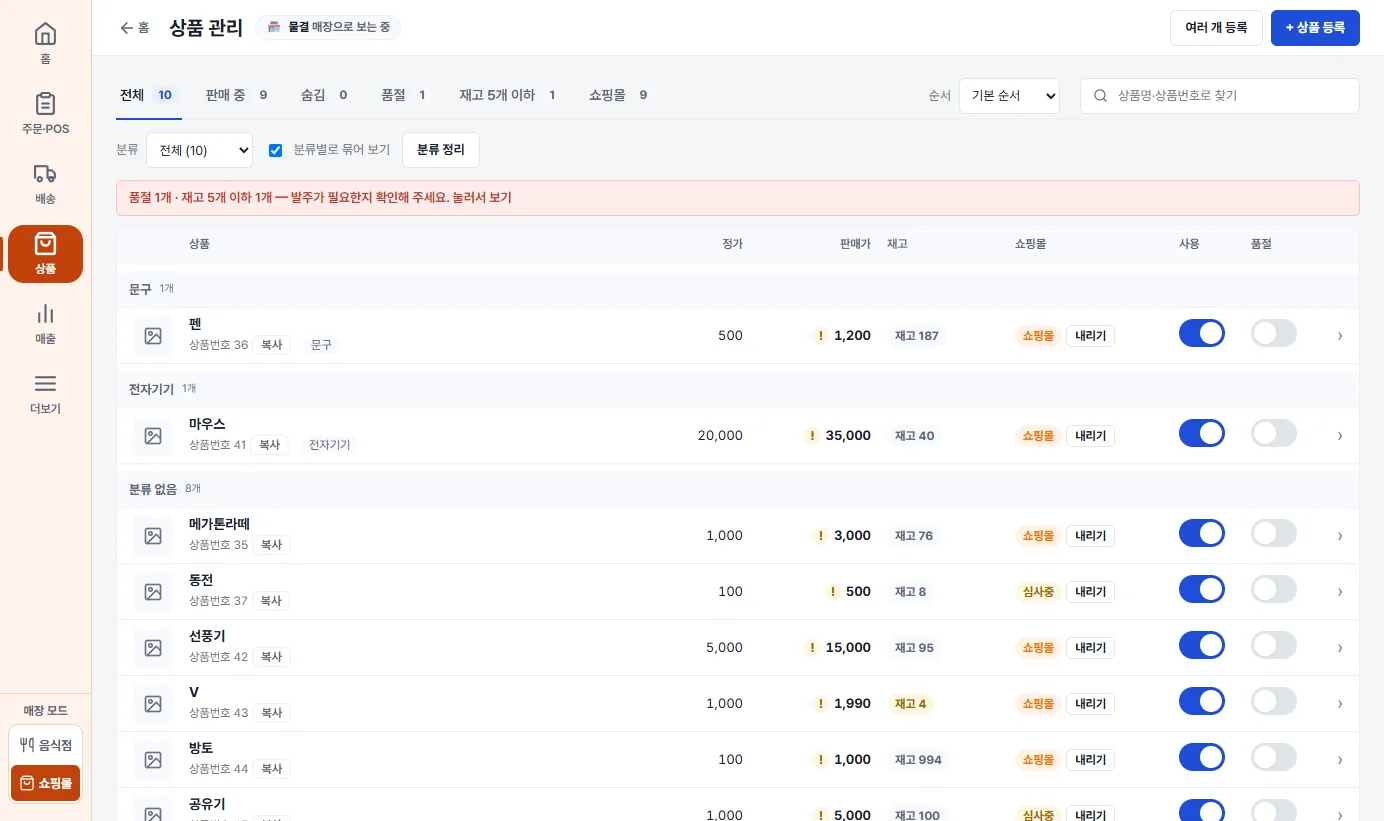
- A category is a name that the store owner attaches to organize products. It has no effect on the customer screen, shopping mall review, prices or stock. It is also separate from restaurant menu categories.
- In the Category field above the table, choose All / No category / name (count) to see only those products, and turn on “Group by category” to group them under a header row for each category (the setting is remembered).
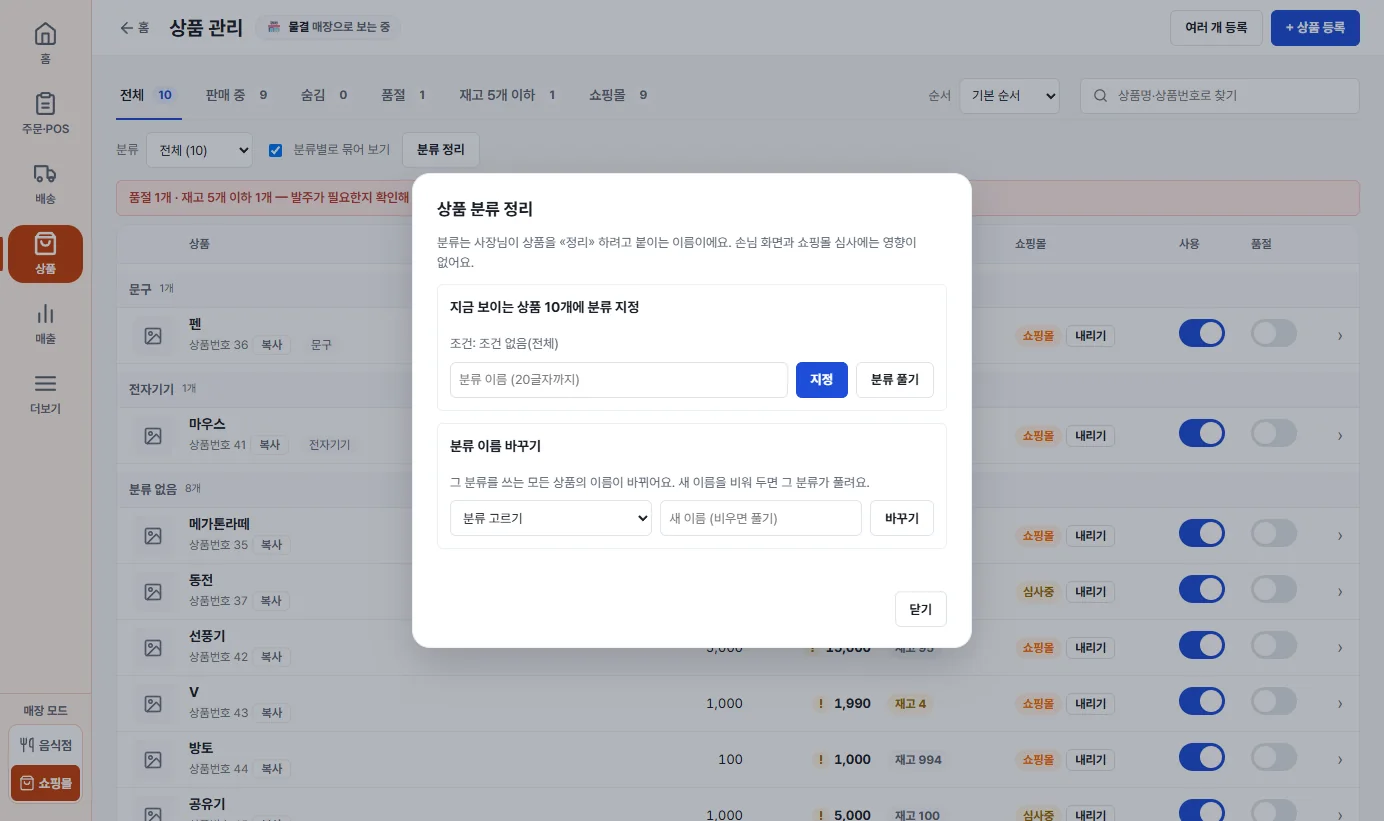
- First, use search, tabs and category to narrow the table to just the products you want to categorize (for example, “mouse” in the search field).
- Click 분류 정리 Organize categories to open the window, enter a category name (up to 20 characters), and click 지정 Assign, and that category is attached to all the products currently shown. The first line of the window says “N products currently shown” along with the conditions, so check the count before you click.
- 분류 풀기 Unassign category removes the category from the products shown. In Rename category, choose a category and enter a new name, and the name changes on every product that uses that category (if you leave the new name empty, that category is removed).
The category feature can be used only when the server is on the new version. If the server is not yet on the new version, the category row above the table is switched off by itself and a notice appears (this is not an error). There is not yet a way to attach categories by checking individual rows.
4.5 Enlarging photos
- Anywhere in the shopping mall and restaurant merchant screens, click a product or menu photo uploaded to the server to see it in a large window. Instead of opening the row, clicking a photo enlarges only the photo, and clicking anywhere else on the row opens it as before.
- If there are several photos on the same screen, move between them with the ← → keys (or the ‹ › buttons), and the position is shown like “2 / 10”. Close it with Esc · clicking outside · ×. Clicking the large photo does not close it (to prevent mistakes).
- This does not apply to images that are part of the screen, such as the store logo or icons, or to photos that failed to load.
5 Sales
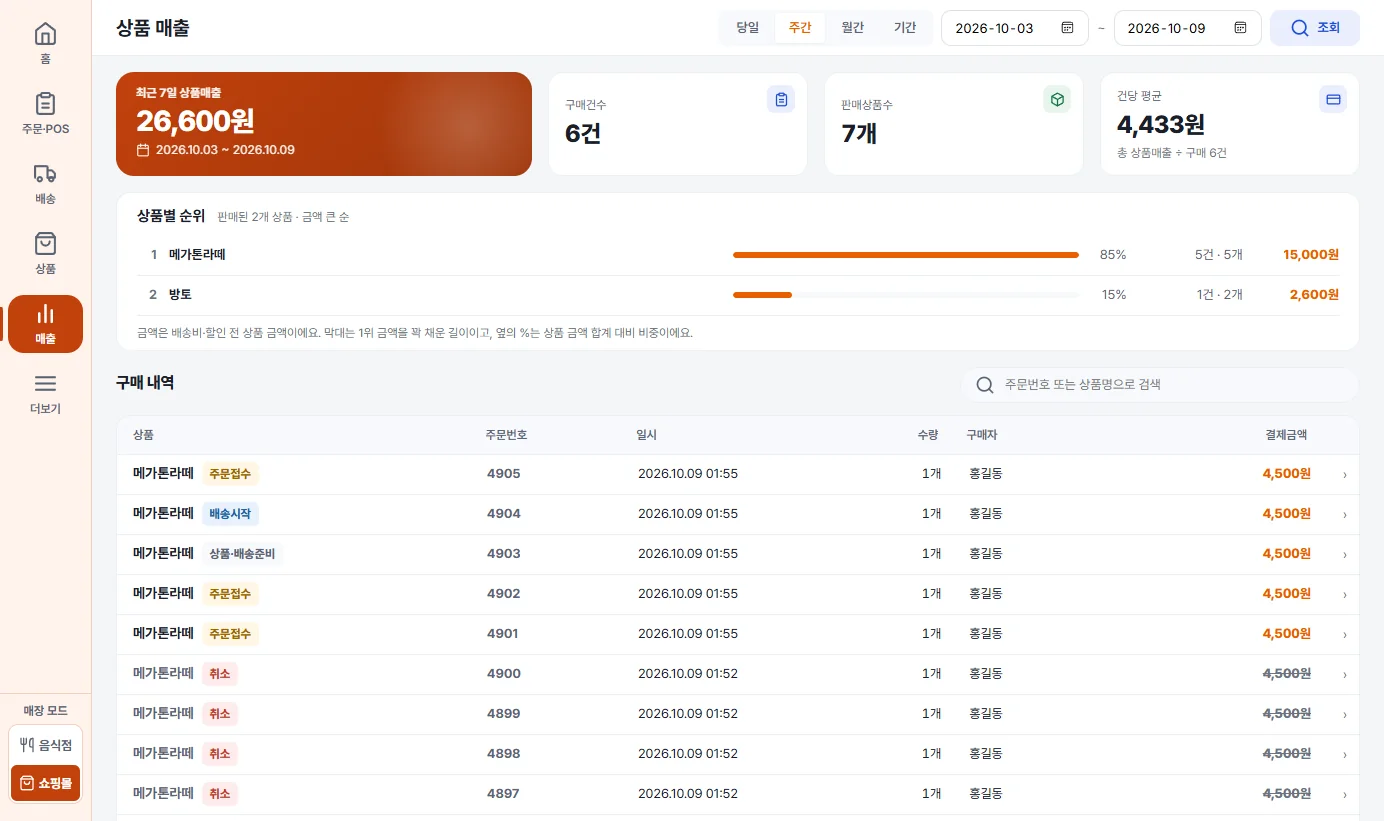
- The large box is the product sales for the chosen period, and on its right are the number of purchases · number of products sold · average per purchase. The amounts are product amounts before shipping fees and discounts.
- The ranking by product is in descending order of amount, the bar is full length for 1st place, and the % beside it is the share of the total product amount.
- In the purchase history table, each order gets a stage badge, and canceled orders are dimmed with a strikethrough on the amount. Search by entering an order number or product name in the search field, and click a row to open its details.
6 More (Settings)
6.1 Settings list
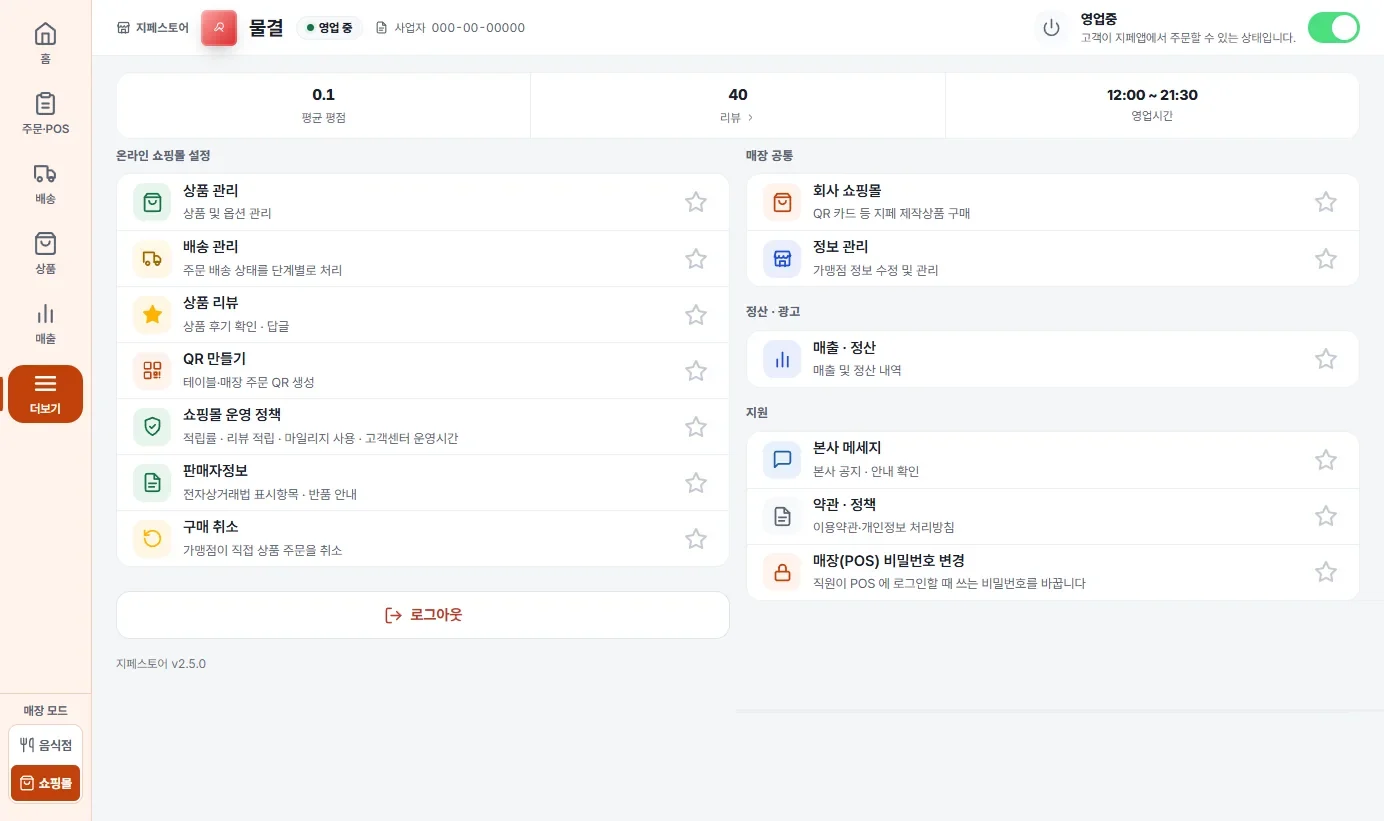
| Item | What you do |
|---|---|
| Product management | Manage products and options Chapter 4 |
| Shipping management | Handle order shipping status stage by stage Chapter 3 |
| Product reviews | Check and reply to product reviews |
| Create QR | Create table and store order QR codes |
| Shopping mall policy | Earning rate · review rewards · mileage use · customer center hours 6.2 |
| Seller info | Items required to be displayed under the E-Commerce Act · return information 6.3 |
| Cancel purchase | Cancel a product order directly as the merchant (opens on the cancellations and returns tab of the shipping screen) |
| Company mall | View products that Gpay makes and sells to merchants, such as QR cards (you order them in the Gpay app on the store owner's phone) |
| Manage info | Edit merchant information (address, phone, shipping policy, etc.) |
- The Open switch at the top right turns on and off whether customers can order in the Gpay app. A confirmation prompt appears when you turn it off.
- Click the star at the right of an item to add it to your Home favorites 2.3.
6.2 Shopping mall operating policy
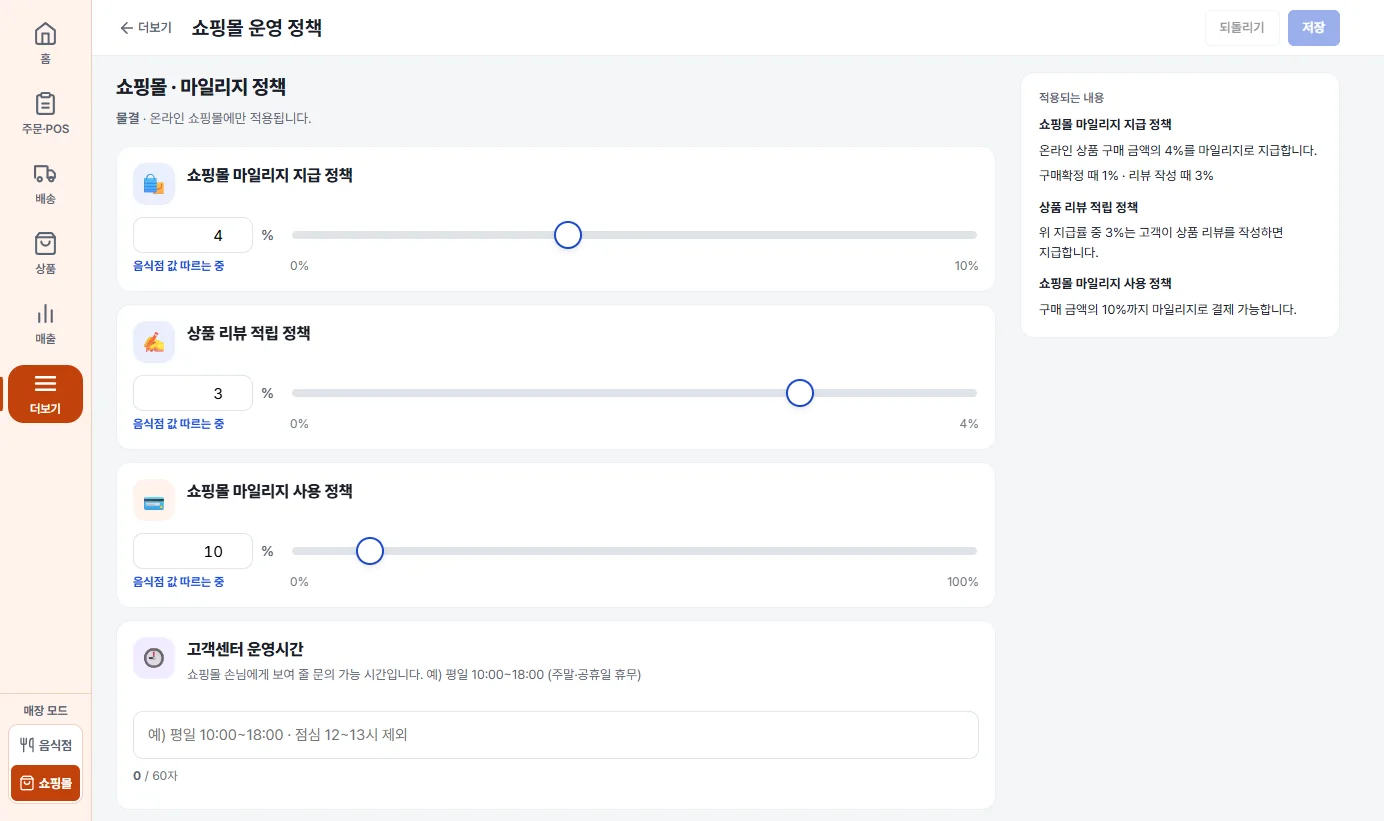
- Shopping mall mileage award policy: what % of the purchase amount is given as mileage (0 to 10%). Product review reward policy: the part of that award rate given when a customer writes a review. Shopping mall mileage use policy: up to what % of the purchase amount can be paid with mileage (0 to 100%).
- The “Following restaurant value” label under a value means that no separate shopping mall value is set, so the restaurant value is used as it is. Check the result currently in effect, written out as sentences, under “What applies” on the right.
- Customer center hours (up to 60 characters): the hours when inquiries are possible, shown to shopping mall customers (for example: weekdays 10:00–18:00).
- This policy applies only to the online shopping mall. 저장 Save and 되돌리기 Undo at the top right become active when you change a value.
6.3 Seller information
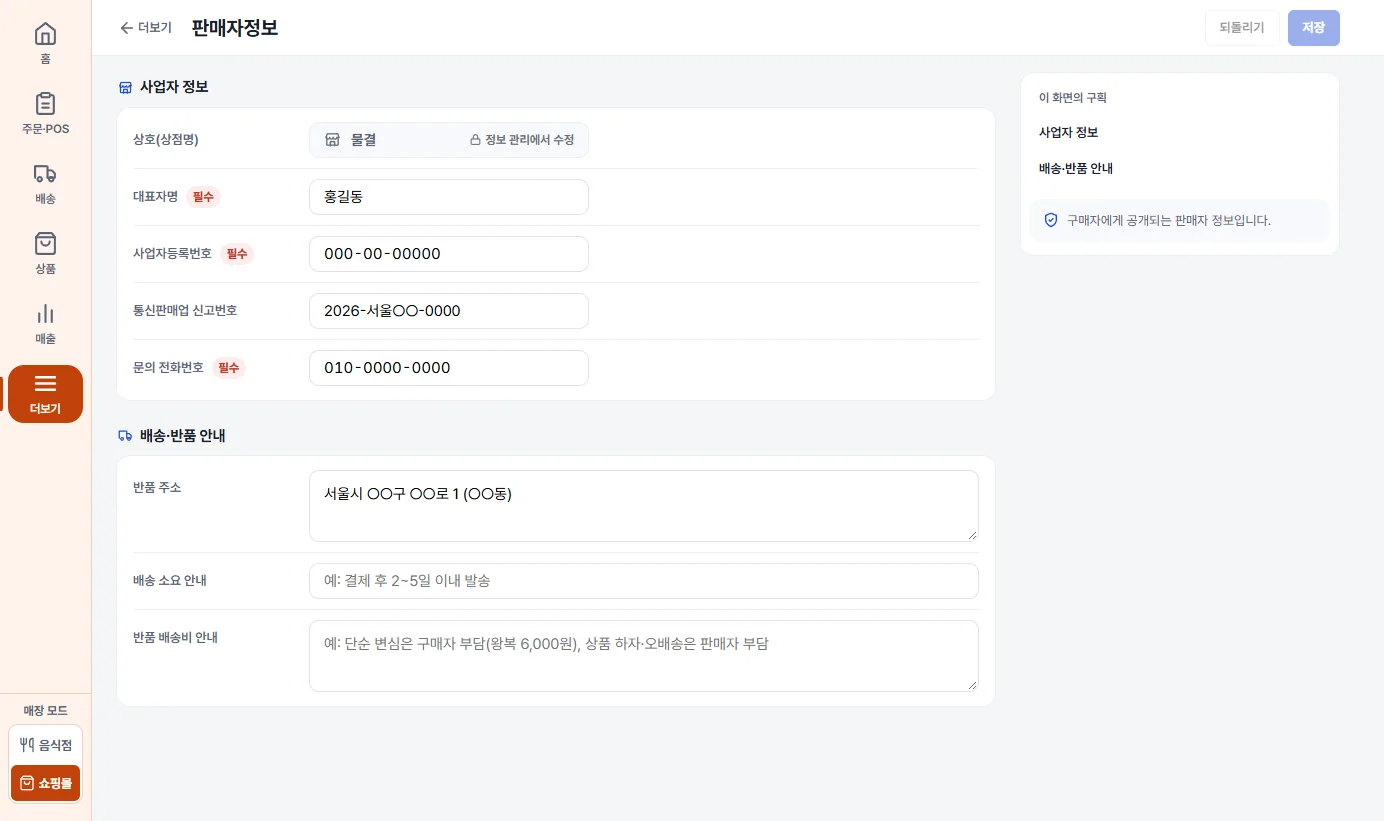
- Business details: the business name is edited under Information management (it is locked here). Representative name · business registration number · inquiry phone number are required, and the mail-order business report number is an item that the E-Commerce Act requires to be displayed.
- Shipping and return notice: enter the return address · shipping time notice (for example: ships within 2 to 5 days after payment) · return shipping fee notice. This is the notice customers see on the product screen.
- After editing, click 저장 Save at the top right.
7 Differences between phone and PC (POS)
- On the all-in-one shopping mall order screen, selecting multiple orders · printing A4 order sheets · the shipping list Excel file · uploading tracking numbers (Excel) are PC-screen features. In the Gpay Store app on a phone, you handle orders one at a time.
- Adding multiple products · organizing categories · uploading photos all at once are also based on the PC screen.
- The PC screen is laid out wide as above when the window width is 900 or more; if you make the window narrower, it appears in the same older layout as on a phone (tabs at the bottom).
- The Home favorites and the Printer settings card are PC only and are saved only on that PC.
This guide is the revision of October 12, 2026 (based on program version 1.3.191 and screen version 1.11.256). The pictures are example screens, so the numbers differ from a real store, and personal information is masked. For POS operation, see the Gpay POS user guide; the restaurant side is in the Merchant screens “Restaurant” guide.